
 Tweet
Tweet
Wow--that would make me go ape. Beautiful work. Requires a steady hand, lots of patience and time. Bravo for all your efforts!!
-
Those who look outside dream. Those who look within awake.

Samples of my work are found here: Life, Liberty and Pursuit of Happiness
To do list:
1:6 boots for Mathilda, 1:1 Romulan Commander outfit, Ursus helmet; Cornelius appliance
1:9 scale ape's new suit for Cornelius; -
Building the Spindles
 I have 10 new pics posted in the Drydock Project on the last page. I'm now working on the "Spindles" which connect the frames to each other. Originally I counted 560 of these spindles, but now I've changed the number, at least at this point, to 490. I have one set of these completed using flat washers and finishing washers and dowels to make the correct shape of the spindles. If you look at the pics you'll see that when these pieces are combined the final shape appears very close! Hopefully I'll have all of these elements finished withing the next two weeks! Let me know what you think. See you next update~!
~NemVia~Last edited by NemVia; Jul 11, '17, 4:44 PM....Once it's activated, there's no way to stop it! - Scotty: DMa
www.NemVia.orgComment
-
 In this weeks update, I've finally assembled one complete side of the panel frames along with the spindle assemblies. New Pics on the Sorry it took so long for this update, but the spindles took quite a long time to finish. I'll be starting on the other side of the panel frames as soon as I post this. Hopefully, by next week I'll be able to have these assemblies painted and begin mounting them to the overhead modules. It's getting exciting now! I can't wait to get the Enterprise into this thing! Until the next update.... Keep checking the site!
~NemVia~Last edited by NemVia; Jul 11, '17, 4:44 PM....Once it's activated, there's no way to stop it! - Scotty: DMa
www.NemVia.orgComment
-
Test Lighting the side panels, Painting, and Dry-transfers
Todays Drydock pt II update has 3 pics in it. I have finally connected together all of the light panels and have a test lighting pic. They're all working good! That will be the last time you see the panels frames in "WHITE". I began spraying the panels and frames on Monday. It takes about 2 to 2 1/2 hours per side to have everything completely painted. By "side" I mean inside and outside. There are so many details to paint so it takes a lot of time to make sure everything is covered. I just finished the final touch-ups today (Wednesday). Next I'm now adding some of the numberings that are seen on the backs of the light panles. There is only One panel in ST:TMP that the numbers are completely visible on the screen. I'm using White Dry-Transfers to add this finish touch. In the next update I'll have the front of the light panels with their inserts in place, then I'll begin working on the work booms, and work lights as well as starting on the Gangway mechanism and also the top parts of the overhead modules! See you next update!
~NemVia~Last edited by NemVia; Jul 11, '17, 4:45 PM....Once it's activated, there's no way to stop it! - Scotty: DMa
www.NemVia.orgComment
-
 I have added just one pic in Drydock pt. II. I have finished putting the inserts and colored gels on the entire port side frame. (21 panels) I added the pic to show how much closer I am to finishing this project. Now I'm working on the Starboard side and should have that finished by the end of next week. Then I can start assembling the frames to the overhead modules! Enjoy the pic and see you in the next update!
~NemVia~Last edited by NemVia; Jul 11, '17, 4:45 PM....Once it's activated, there's no way to stop it! - Scotty: DMa
www.NemVia.orgComment
-
Just an update. As of today I now have all of the panel frame covers in place for both sides. I'm not addding a new pic at this point because it is identical to the other side. If you haven't seen the first side then check out my website. I have to do a little bit of re-soldering for some of the panels due to connection problems, but they're basically done. Now I'm going to be adding the spindles to the overhead modules, then I need to add some re-enforcement to the armature to hold the weight of the ship and the drydock. After that I should be able to put the panelframes together with the overhead modules, then I can start on the booms and other details. I also will begin working on the final wiring and the roof of the overhead modules. Hang in there, people! I'm getting there!
~NemVia~Last edited by NemVia; Jul 11, '17, 4:45 PM....Once it's activated, there's no way to stop it! - Scotty: DMa
www.NemVia.orgComment
-
I've added 2 new pics to Drydock pt II. The final details for the underside of the Overhead modules has been added. I'm now completely finished with that part of the model. I've also added some re-enforcement for the modules armature. This will help support the weight of the panel frames. I'll get a picture of that in there by the next update. Now, I will be working on the models mounting box which will house the entire model for when I transport it hopefully to model shows. I need to do this now because once I assemble the panel frames to the overhead modules, it will be very difficult to move the model around. Plus I'll have a stable surface to work on the additional details and wiring that will be added when the re-fit model gets added. Stay tuned! More to come!
~NemVia~Last edited by NemVia; Jul 11, '17, 4:45 PM....Once it's activated, there's no way to stop it! - Scotty: DMa
www.NemVia.orgComment
-
Starting on the Mounting Base
Today I started building the base for a box that will shroud the Drydock model. The box will be used to protect the model during transport. Hopefully to a few model shows. I'm making the top and sides with hinges so the box can be opened as a display case. I will be lining the base and sides with black velvet material. Black velvet absorbs light so it will be easier to photograpgh the model from different angles and it will appear to be hanging in space. At least that's the idea. I'm also adding some castors so that the box can be safely moved on the floor. After I finish this box it will be easier for me to do the finally assembly and wiring of the entire model, including the PL Enterprise. Once these are in place I can start building those hexagon lights, the booms and the other spot lights and better judge their size and distance from the ship. I'll have more pictures in a few days, but now everything is winding down to completion. Keep checking! More to come!
~NemVia~Last edited by NemVia; Jul 11, '17, 4:45 PM....Once it's activated, there's no way to stop it! - Scotty: DMa
www.NemVia.orgComment
-
Big Update For The Drydock Today!
BIG UPDATE TODAY! I've added 19 new pics to the Drydock pt II page! I've finished the important part of the drydock display stand and I've assembled the starboard side of the panel frames. I've also added the PL Enterprise and did a few test pics with the model in place. It's looking sharp! Before I can add the other side of panel frames, though, I have to work on the gangway tunnel and a few other pieces that need to be added before the Enterprise can be enclosed in the Drydock. I hope everyone who visits enjoys these pics. It just means I'm that much closer to finishing my dream model! Please leave any comments you wish! I'll see you on the next update!
~ NemVia~Last edited by NemVia; Jul 11, '17, 4:45 PM....Once it's activated, there's no way to stop it! - Scotty: DMa
www.NemVia.orgComment
-
Incredible stuff."Crayons taste like purple!"Comment
-
Thanks Cap!
I've started building those 6 sided light panels and added some lighting details. I have 7 new pics on the site of how these are being built. These pieces are very tough to make and I've tried several ideas as to how to build them, but it's just one of those details I'm going to have to go around because I can't find what I need to build them. Hope you like the alternative instead.
~NemVia~Last edited by NemVia; Jul 11, '17, 4:45 PM....Once it's activated, there's no way to stop it! - Scotty: DMa
www.NemVia.orgComment
-
Starting on the work boom pivots and the travel pod dock...
Got a little more done today. I've built and drilled out holes on the pivots for the work booms and I've started on the travel pod dock that is connected to the outsode of the gangway. I have the Light booms finished and will start wiring by the end of the week. Just a few more details to complete here and then I can begin the final assembly of the entire Drydock. Hang in there... She's nearing her finish.
~NemVia~Last edited by NemVia; Jul 11, '17, 4:46 PM....Once it's activated, there's no way to stop it! - Scotty: DMa
www.NemVia.orgComment
-
Lighting the Work Booms and Pivots
I've now begun lighting the Work booms and the 6 sided panels. I've added some fiber optics to save on LEDs. This also helps to add more lighting effects for the model. On page 5 you can see how the optics will light up the ends of the work booms. More to come later!
~NemVia~Last edited by NemVia; Jul 11, '17, 4:46 PM....Once it's activated, there's no way to stop it! - Scotty: DMa
www.NemVia.orgComment
-
Looking good!!It's not a doll it's an action figure.Comment
-
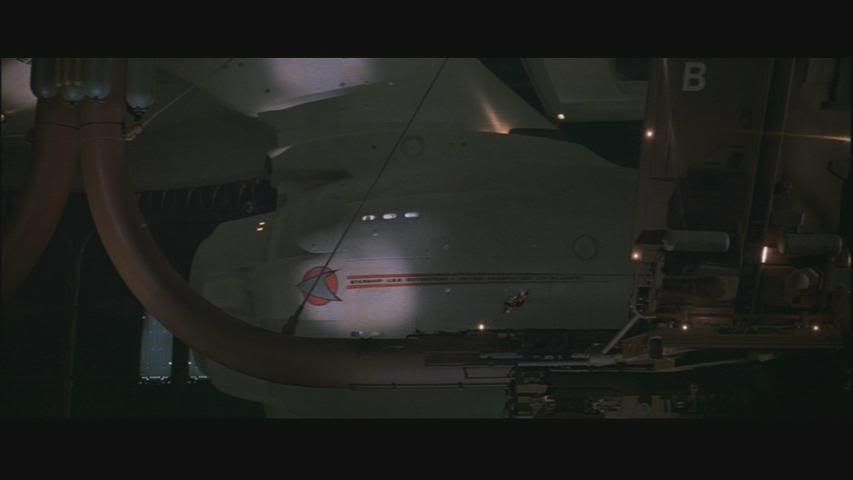
I've added 5 new pics of some of the details that will be added to the boom pivots and the six small panels that are seen as the travel pod passes the outside of the drydock. Also a closup of this detail is seen as the Enterprise pulls out of Drydock. I'm still working on the Spot light cannons or whatever those things are on the bottom of the drydock. I guess they could be the moorings that you here mentioned, but I don't know. I'll have some pics of those hopefully by the end of next week.
~NemVia~
The Pic below is the detail that I'm speaking of:
 Last edited by NemVia; Jul 11, '17, 4:46 PM....Once it's activated, there's no way to stop it! - Scotty: DMa
www.NemVia.orgComment

Comment