

-
I kind of based it off West's cowl with the idea that is was a helmet under the fabric, I used a SWAT helmet from the Real Heroes line as a base and added spandex and pleather over it. Next one I post is a long time coming, I should do all the rejected sculpts in a group, too. I see three sitting on my table here. -
No way! That's so nice of you to say!
I do think that it takes considerably more skill to put together those outrageously impressive garments that you do. And that removable Batman cowl rocks me to my core whenever i see it!
I am definitely waiting with great excitement to see your new head sculpts!Leave a comment:
-
-
-
I wish I'd been at MegoMeet to see these. I think I like Robin best of all because of the new body and costume detailing.Leave a comment:
-
-
Thanks a ton buddy! From one bat fan to another, that means a lot!
Leave a comment:
-
I really should have photographed that process but, I needed both hands for the procedure LOL!
Cutting anything metal is a DANGEROUS proposition. Always use eye protection because metal shards have a tendency to go flying everywhere! Also metal gets very very HOT when cutting it, so protect against that too!
For Robin's buckle, I wrapped the brass rod tightly in thick gaffer's tape. I then secured the rod in the teeth of a set of handheld clamp pliers. The gaffer's tape is used to prevent any bruising of the brass surface by the pliers. The pliers keep the rod secure so it won't go flying off during the cutting process. They also allow manipulation of the rod, without touching it while it's hot. I placed a cutting wheel on my rotary tool and very carefully made fast little "nicks" on the rod until it finally snapped. You'll have to make the cut as little nicks because the moment your spinning blade touches the brass there will be a big bright shower of sparks. These sparks are so bright that you will not be able to see your cutting area clearly if you try to make one continuous cut through.
NOTE: Always place the shortest end of your rod in the plier's vice teeth so that the final cut part is secure within the plier teeth. This will minimize the chance for injury since the smaller portion of the rod is more likely to be propelled away at the moment of the cut. Also, you'll avoid having to go searching for that teeny tiny length that went flying off and landed God-knows-where!
Once both rods were cut to equal length (and allowed to cool), I used an Xacto blade to cut away the gaffer tape and expose just the tips of each rod.
The rods are made perfectly equal in length to each other by placing TWO rods in the pliers' vice teeth and cutting them simultaneously. At this stage, the cut tips of the rods are perfectly even, but they are FLAT, as seen in this WIP image.
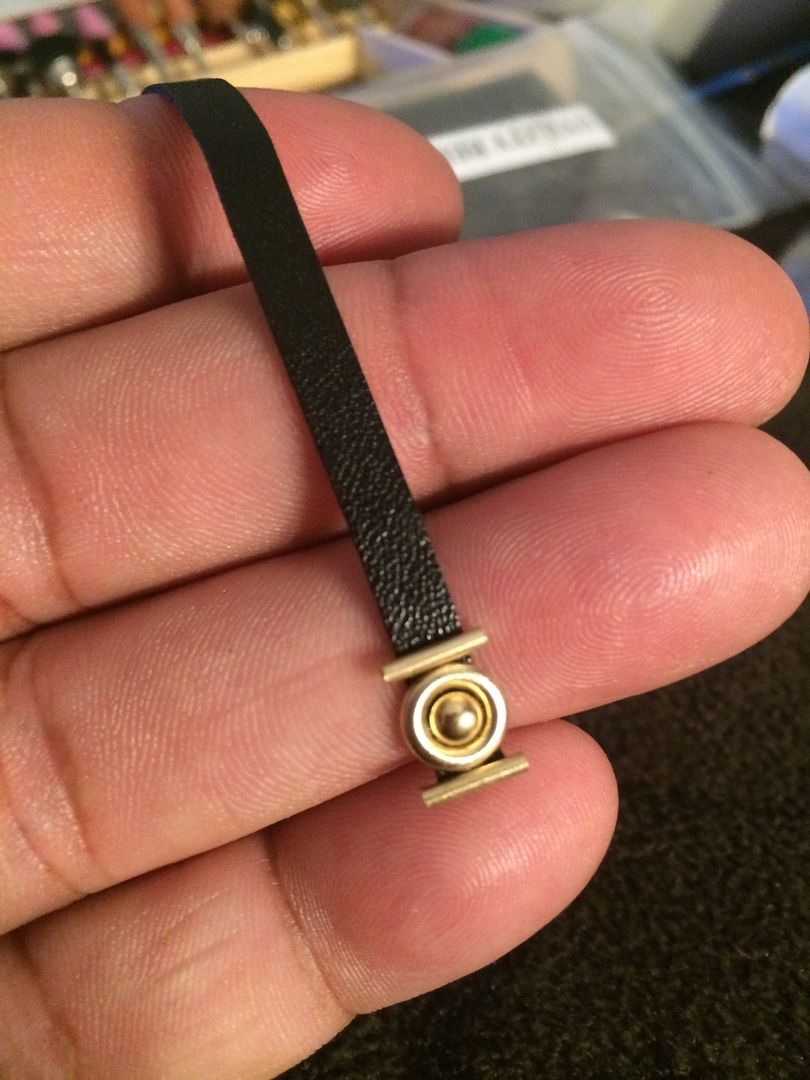
The tips require some smoothing and rounding off. With a flat grinding head mounted into my rotary tool, I gently ground the cut rod tips in a circular pattern until the jagged cuts became smooth... and then rounded.Last edited by darklord1967; Jul 28, '17, 1:57 PM.Leave a comment:
-
Thanks so much buddy. I love this little guy a lot too! There's just something about a MEGO-esque Robin... particularly in his classic original costume. Maybe it's the way he inspires the earliest MEGO memories for all of us.
I can tell you without hesitation that I made this little fella with a genuine, conscious, sense of AFFECTION... both for the character, and for the classic MEGO World's Greatest Super Heroes traditions.
Nothing gratifies me more than to see people recognize my strong affection for Robin The Boy Wonder AND for action figures that depict him all within the embodiment of my humble creation.Leave a comment:
-
Amazing work on the outfit, the detail is outstanding, what a fantastic looking custom.Leave a comment:


Leave a comment: