Customizing -- Greatest American Hero
by Matthew Jaycox
Hello and welcome to my third customizing article, "How to Make The Greatest American Hero prototype." Now some of you may not be interested in this esoteric character that, as we all now, never made it into production before Marty Abrahms and Co. went belly up. However, you should stick around for this article b.c there are alot of great tips on basic costuming, which I've been meaning to write about for some time now. For one-time fans of the show like me, this figure is a dream come true, especially is you don't have $1800 to drop on the actual prototype. There's only a handful of them in existence, and a rea most likely owned by final collectors, so this is your only chance to own one. The first thing you should do is get a copy of J. Bonavita's book, "Mego Action Figure Toys." It has good pictures of this figure in there and will serve as a pictorial guide to how this figure should look. You can also reference my final product as you go along.
I recommend using a David Soul head from Starsky and Hutch as your base head for modifying into Ralph Hinkley. They have very similar facial features, at least as action figures. Note: This is not the head I used in my final product, b/c once again, I felt I could improve upon the Mego design, I may change it later, but it works for now. Let me know if this article helps you fulfill a customizing dream. Continued feedback is what makes me want to keep doing this. If I feel like no one is benefitting, I'll just stop writing them.
Some of you may notice that this article sounds familiar to a previous one of mine regarding GAH. In that one however, I didn't include any costuming instructions. Still, for those of you who may have lost that article, it's all still here in its entirety.
Now let's get started!
Materials [HEAD]:
- A Starsky and Hutch David Soul head (blonde guy, was he Hutch? If not just go with blonde guy, b/c that's who I mean)
-Super Sculpey
- Acrylic modeling paints, flat
- Clay sculpting tools (stylus, smoother)
- X-Acto knife
- needle point files and sandpaper
- Bondo auto repair plastic jelly
- A/B plumber's epoxy or Miliput [or Alumilite A and B resin with mold release]
- Pam Cooking Spray
- Vaseline
Materials [costume]:
- Red poly-interlock (spandex) fabric (flat red preferably)
- Black Nylon Fabric
- Tape measure
- Red, double-fold seam tape (for the edges of the cape)
- Grey-Silver ribbon tape, approx 1/8" wide
- No Fray
- Sew on snaps
- Pins and needles
- Red thread
- Sewing machine and the skills to use it
- Flimsy white vinyl (for belt)
- White sticker labels, circular, diameter approx 3/4"
- Red and Black Markers, fine point
PROCEDURE:[Costume]
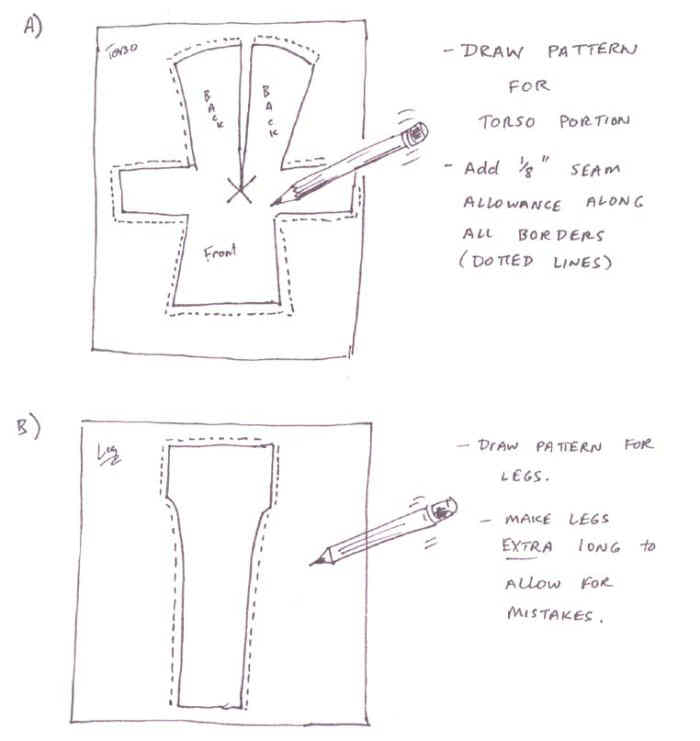
1) Take out one of your Megos that has an appropriate seam pattern to the one we are going to attempt today (i.e. Shazam). Take your tape measure and start making measurements, such as the arm length, inseam, length from neck to crotch, length from neck to waste. Write these down and draw a pattern as shown in (figure A). Add 1/8" seam allowance to all seams. I have not given you the measurements, but that is how your pattern for legs and torso should generally look (figs A+B). Most people can make the patterns, they just don't know the order of the sewing, which is where I can help!
2) Lay your shirt pattern down on a single layer of red fabric and pin the pattern to the fabric. Cut out along the lines. Remove the pattern and pins (fig. C). Repeat for the leg pattern, except this time, use a double layer of fabric since you will be cutting out two.
3) Sew the hem of the neck by folding the flaps of the neck down under and and stitching along close to the fold (fig. E). Note: a coding system I am using to make sure you always know which side of the fabric you are looking at goes as such; When looking at what will eventually become the inside of the costume, little "I"s will be written on the surface, if the outside, then little "O"s, and if a hem line, little "H"s.
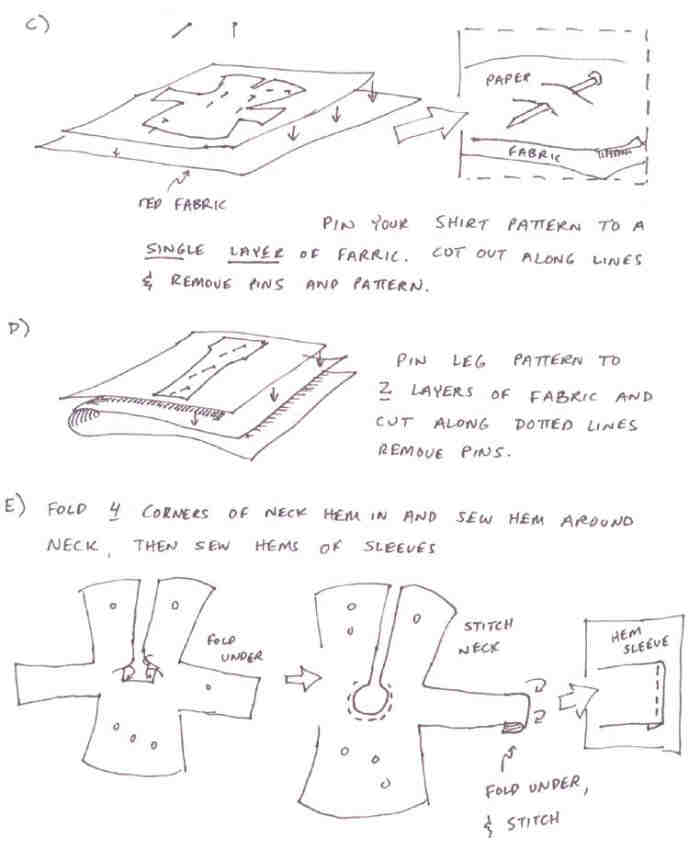
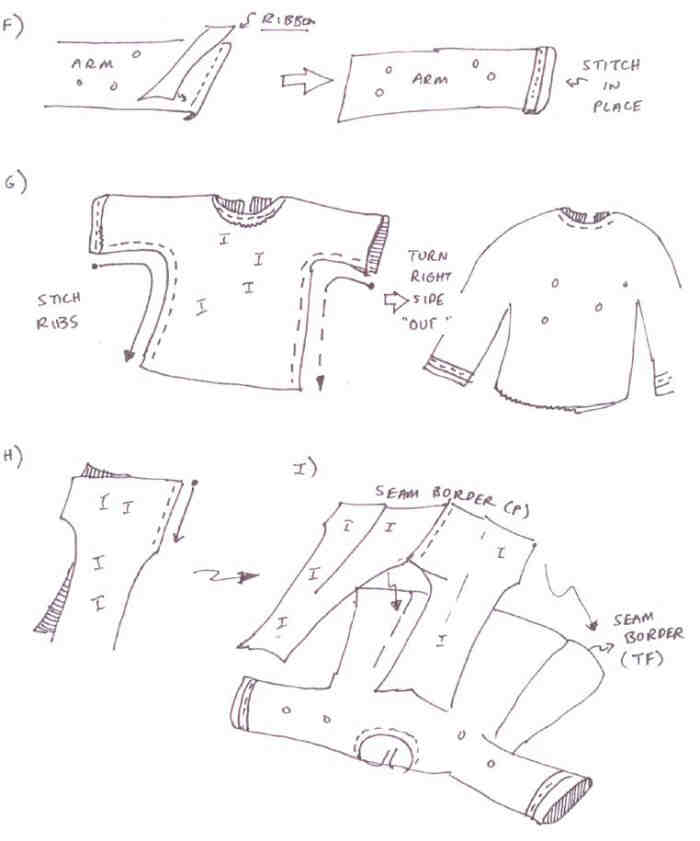
4) Stitch the hem of both wrists (fig. E, inset). Now take two short lengths of ribbon and lay them along the wrist close to the edge, and stitch to the fabric. Repeat for the other wrist (fig. F).
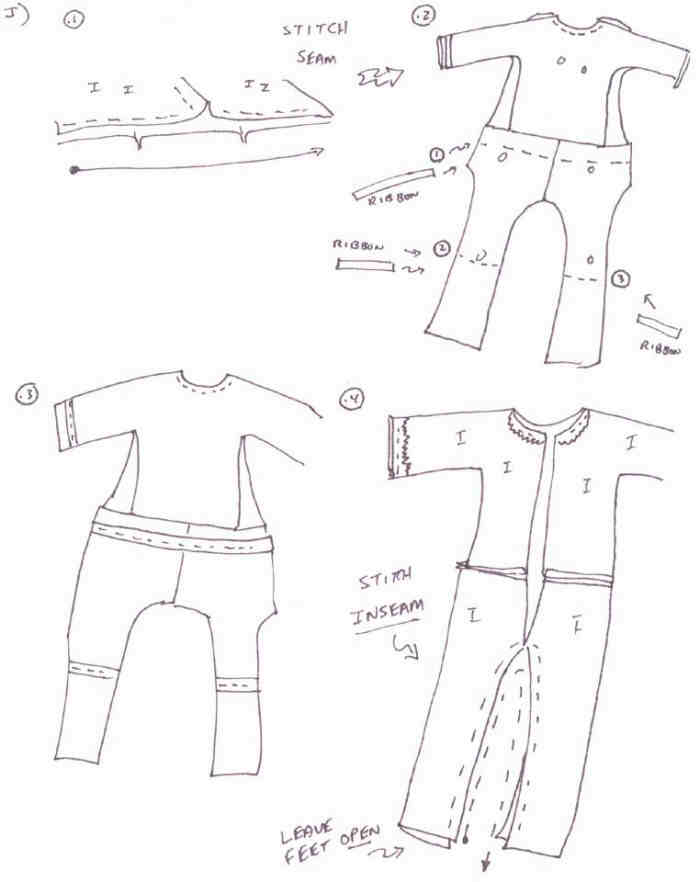
5) Turn your shirt inside out so all of the "I" sides are facing you. Stitch along each rib, starting at the wrist and working toward the hip in each case (fig. G). You may find it helps if you pin the fabric in place prior to stitching. Turn your shirt right side out now.
6) Lay the two "T"-like leg pieces together. Stitch the front of the pelvis as shown in (fig. H). Open this up like a book and position over the opened up shirt. The edge of the pants by the waist is called "seam border (P)" and the edge of the shirt nearest the waist is called "seam border (TF). They should line up as in (Fig. I). The "O"-sides of the garments should be facing each other with the "I" sides facing outward (fig. I). Pin this in place so that the seam of the crotch lines up with an imaginary line running down the middle of the torso. Stitch in place (Fig. J.1). Turn your new unitard right side out as shown in (fig. J.2).
7) Cut a length of ribbon for the waist and for the shin lines. Stitch the torso ribbon in a straight line approx 1/4" below the seam of the upper and lower body. Stitch the other pieces of ribbon in their appropriate places (fig. J.2 & J.3).
8) Turn the one-piece garment inside out so the I-sides of all surfaces are facing you. Stitch the inseams of the legs, but leave the "tubes" of the legs open for now (fig. Fig. J.4). Turn the costume on it's side and gather up the slack in the spine and rear end area and stitch it shut, leaving about 1.5" unstitched from the neck to the small of the back. This will facilitate your figure getting in and out of his costume. Fold the flaps of the back over and toward you and stitch their hems (Figs. K+L)