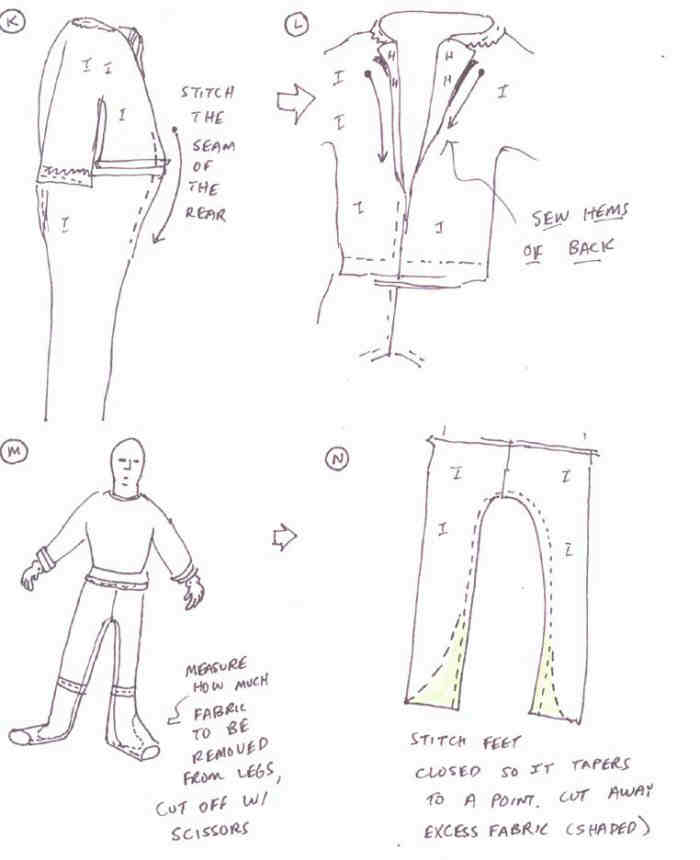
9) Place the costume on the figure and measure how much extra fabric you have in the "tubes" of the feet (fig. M). Cut this excess off, but leave approx. 1/8" for seam allowance. Stitch the feet closed such that the stitch tapers to a point as seen in (fig. N).

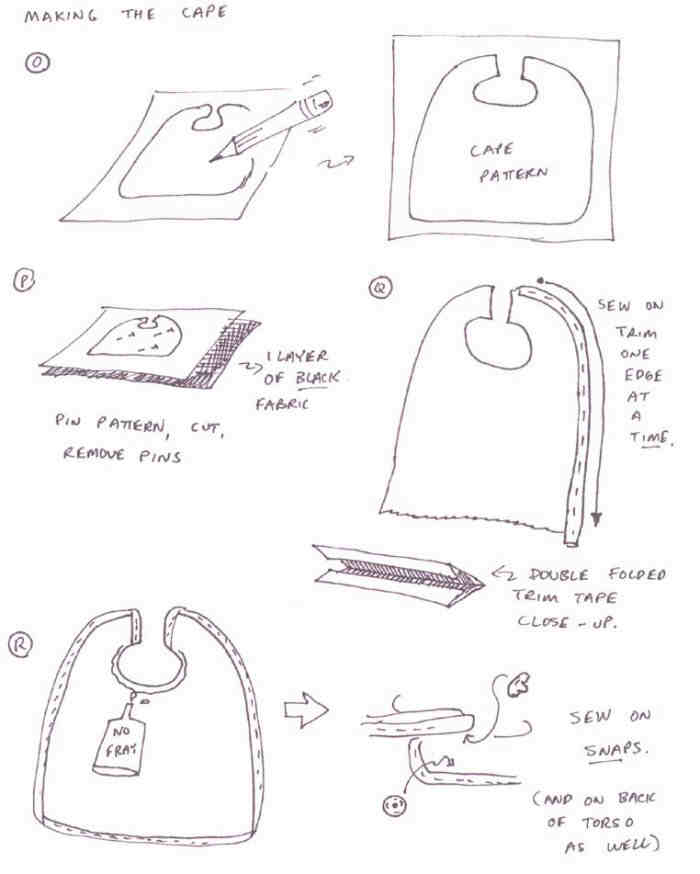
10) Draw a pattern for the cape closely approximating the one shown in (figure O.). Pin this to a single layer of black nylon similar to what Mego used on their capes (i.e. Shazam, Thor) (fig. P). Cut out along the lines and remove the pins and patterns. You may want to use some No-Fray here to keep your seams from shredding while you try to sew on the trim. You should get double-creased red trim tape which is approx. 1/8" wide. Lay this along the margins as shown, fitting the black inside the groove of the tape, and stitch in place (fig. Q). Work VERY SLOWLY on this. It is tricky. Hand sew a pair of sew-on snaps onto the neck area of the cape. Also do this for the unitard in back near the neck (fig. R).

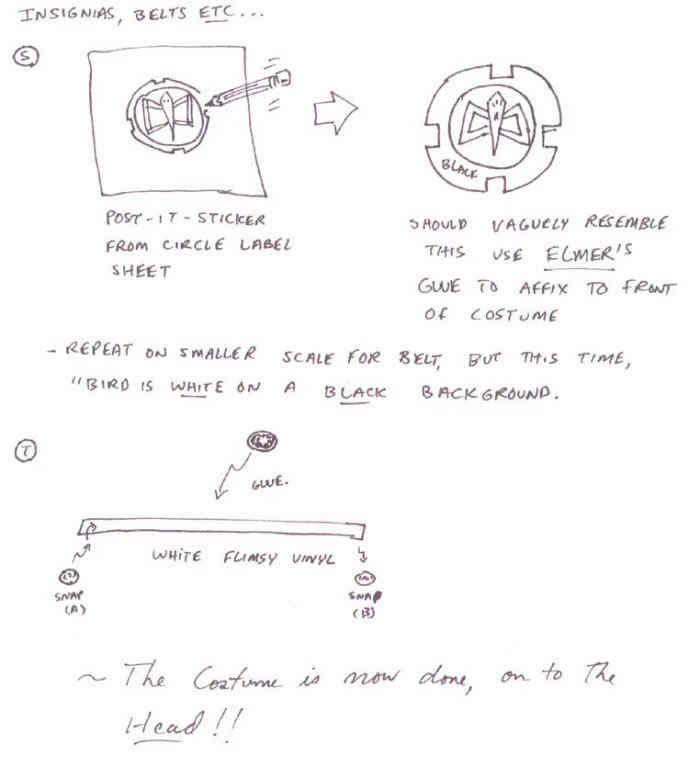
11) Draw your insignia in pencil on circle sticker until it looks good (fig. S). Erase your pencil marks as much as possible so you can still see them, and begin to color in. Outline the "bird" in black finally. Cut this sticker out and affix it to the costume. If you have worn the tackiness out of the sticker with repeated handling, use a thin smear of Elmer's glue on it. Elmer's is the only glue to use when affixing decals b/c it is water based and won't permanently affect the garment. Cut a thin strip of white vinyl of appropriate length and sew snaps onto each end (fig. T). Make another insignia on a smaller scale. Follow the color scheme in J. Bonavita's book. Affix to the front of the belt as a buckle. Your costume is now done, onto the head!

How easy was that?!?
PROCEDURE: [Head]
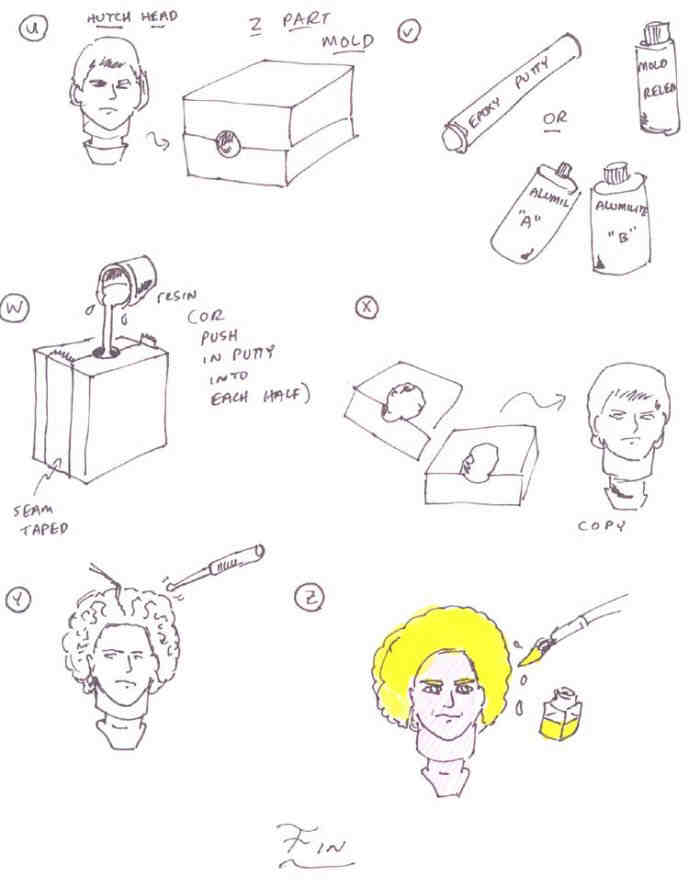
1) Get your hands on a Hutch? head from the Starsky and Hutch (the blonde guy). This head is very similar in general shape and size to the Ralph Hinkley prototype head (minus the blonde 'fro, of course). Make a 2-part mold of his head (fig U). If you already know how to do this, skip on to step 7.
2) Construct a mold box (fig. U). I like to use Lego blocks for this. I make the box large enough to fit two heads in side to side, and 7 legos deep. The bottom of the box should be open. Coat the inside walls of the box with vaseline. Place the box on a piece of wax paper which has been smeared lightly with Vaseline.
3) Mix up enough Bondo to fill the box halfway. Mix in a disposable tub (old Margarine tubs are good.) If you coat the inside of the tub w/Vaseline, it can be used over and over. Pour the Bondo into the Mold box and allow it to settle a bit. Once it has start to set slightly, take Hutch and press the back of his head into the Bondo until mid earline. Make sure the flat of the neck plug touches one of the walls of the mold box. Then take a couple of pen caps coated in vaseline and press them into the Bondo at two separate places. (These will eventually make guide pegs for the mold so it will always line up.)
4) Once the mold has set, with your head still in there, coat all surfaces (excluding the head. The head won't stick to the bondo) with a thin coat of vaseline, This will keep the second part of the mold from sticking to the first. Mix up some more Bondo and pour it on top of the head slowly so no air bubbles form. Fill to the top of the mold box. Allow this to set.
5) Remove the Legos and you now have a complete mold. Use a putty knife or screwdriver to separate the two halves. Remove the original head and clean it off. You now have a mold of Hutch.
6) Coat the insides of the mold with a little cooking spray and work it into all crevices. Knead up some epoxy (enough for one head) (fig. V) and press it into the mold. Fit the two halves together (fig. W). Secure them with several rubber bands. Some of the excess should squeeze out the hole in the mold by the neck plug. You will know it is done curing when this is hard. When done, carefully remove your brand new cast of a head. Note: if you want to use a resin plastic for this, it will work fine. Simply fit the two halves together after coating the insides with Resin mold release, and tape up the seam to seal it. Pour the mixed resin through the neck hole (fig. W).
7) Take out your files and X-acto knife and start filing away. You want to file down his hairline to more closely match that seen in J. Bonavita's book, "Mego Action Figure Toys."
8) Roll out some gobs of sculpey and lay them in thin sheets onto his head. Using your finger to smooth over any imperfections. Try to generally build up the round appearance of his hair. Finally, once you have got the general shape, use your stylus and sculpting tools to draw "squiggly" lines in the hair to give the impression that it is curly. It should bunch up here, and depress there etc... When you are done sculpting, place the whole thing in the oven at 275 F for 12-15 mins, or if your sculpey is sufficiently thin, blast it with your hair dryer in intervals until hard.
9) Paint your head as shown in the pictures of J. Bonavita's book. Use a flat white for a primer coat. Paint the rest in this order: Flesh tone of face, yellow of hair, whites of eyes, blue dot for eyes, yellow eyelashes and eyebrows (yeah, they actually gave him yellow eyelashes), white pupils. Cover with a flat acrylic sealer. Your head's now done and ready to be outfitted on the body.


