I'm gonna give it a try! That army picture is amazing! Right Click Save!
Announcement
Collapse
No announcement yet.
1979 Kenner ALIEN Complete Restoration - ADULTS ONLY
Collapse
X
-
haha... nice. The real beauty of this technique is it makes no changes to the figure at all. You can use it on severed or loose arms. Results can vary on first attempts; but then it just comes down to practice and refining your skill upon repeat attempts. If you have any trouble with it, just drive the screws back home into the figure to its original condition and you can at least say you tried. But believe me, it works. Just make sure you've got all the tools and materials on hand first.
- - - - -
On to the next phase, fixing those legs. The priorities here are to replace the right leg, fix the warping on the left leg hip joint so the gap is closed and make sure the figure can stand without falling over. Here goes...
Now I'm going to tackle the other major limbs, the figure's legs. From the photos that accompanied its listing when I bought it, I already knew that the right leg was severely damaged to the point where it irreparable. When a part of the figure is so badly deformed that the seams burst and the plastic distorts and discolors beyond recovery, there is only 2 options available to you. One, leave it be and live with the issue; or Two, thank God that Kenner assembled this figure using screws instead of glue and so that you can take advantage of its ability to be dismantled and swap the bad parts out for good ones. As I am lucky enough to have a spare right leg in my possession, I'm opting for the second choice.
If I didn't have a spare right leg - I may have still purchased this figure; but it wouldn't have become a subject for rehabilitation - it would have become a source for spare parts. Genuine spare parts can only come from other cannibalised figures.
Now, let's get this clear. Not everyone is going to have a spare right leg from an old 1979 space monster toy just lying around in their study. I'm very well aware that such things just don't happen in most households. Really. It just doesn't. lol. Nonetheless, Ebay can be a source for such parts, not just restricted to a particular leg, either, mind you. Unfortunately, if you do rely on Ebay for a rare part like this to turn up, you may have to wait. You still have other choices, though. You can always purchase a degraded figure from Ebay and cannibalise both it and your already damaged figure to address the problem. That's quite legitimate. You can then sell the leftover parts on Ebay - send 'em on their way either as individual pieces or as a bulk lot of parts. Someone else in a similar situation will buy them. Hey, you may even do better than break even financially on the transaction and still have your figure repaired. It has been known to happen. You can purchase a replacement online. It may take a while, for parts to become listed but it is possible. You can even make your request known on a forum such as this one that "I need part X... Can someone please help me out here?" It is reasonable to ask members in a Community of understanding folk who may happily help you out.
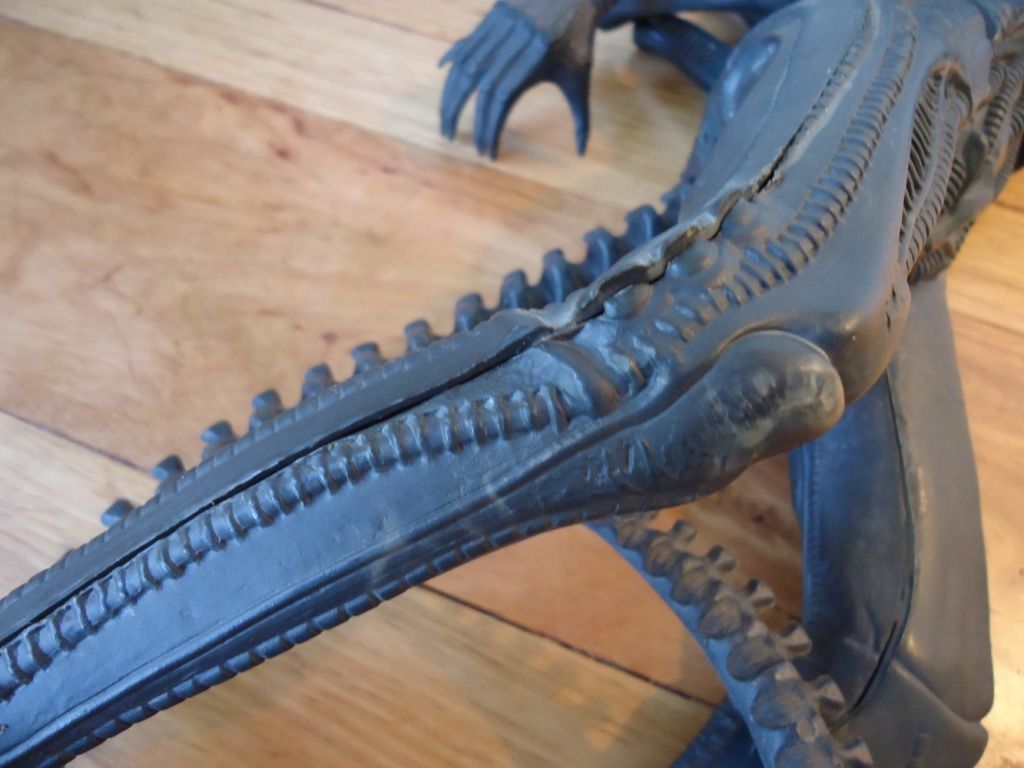
The outside of the right leg also displays significant damage.
Now, back to this right leg. It's getting swapped out with the spare one that I have lying around. Now, this action does come with a caveat. This spare leg isn't exactly in the best shape, either. It's had severe damage done to it internally at the hip joint at some time in the past. Mind you, this replacement leg has since been fixed and the large crack along the flange has been successfully closed by using an improvised brace to seal the gaping damage. It's the usual improvisation that I indulge in with such repairs, basically, the splint is a pair of measured pieces cut from an old DVD case. Old DVD cases are a great source of material for repairing these old figures and I must have destroyed about a dozen of them now during the course of crafting improvised mounting plates, brackets and splints for these old figures. Anyway, the big upshot here is even though the replacement leg is damaged at the hip and repaired, that repair will be concealed within the figure. Unlike the original leg that this figure arrived with which is an obviously degraded part that will always be visible at the knee.
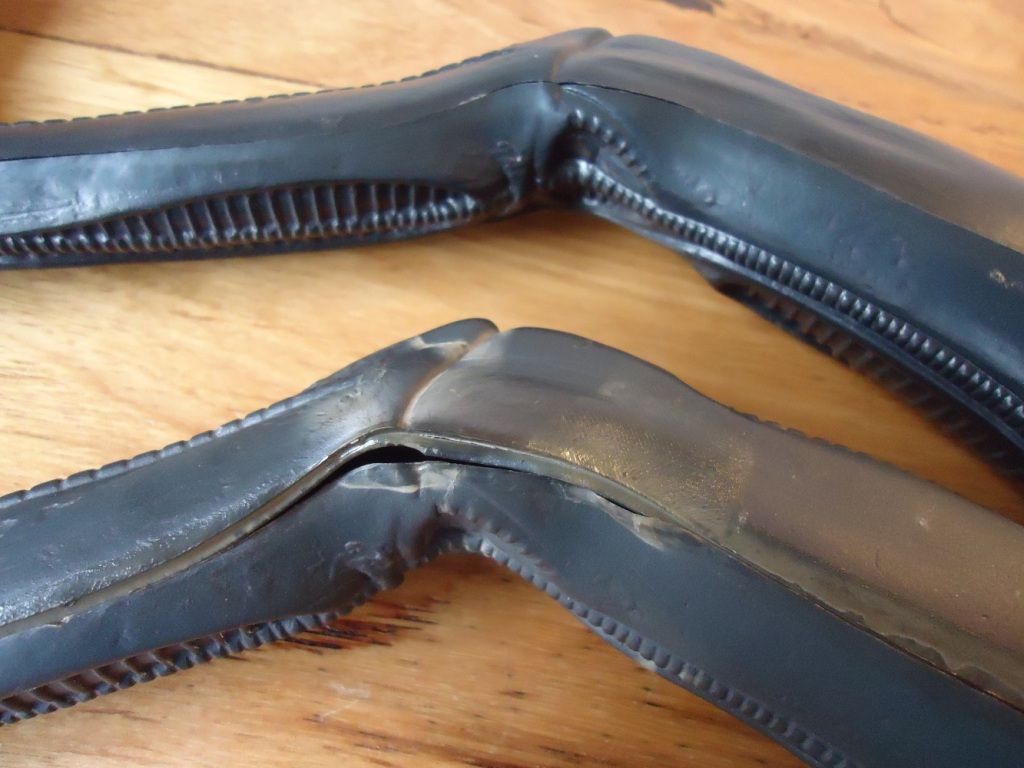
It's not a hard decision to make when comparing the limbs side by side. The replacement right leg (Top) is in preferred condition over the right leg the figure originally arrived with (Bottom).
After all, considering all the other internal work that has been/is still to be performed on this figure now, one more patched up repair inside the torso isn't going to make a difference. So, the right leg gets swapped over. Job done.
Now what about the left leg? When the figure arrived it displayed a suspicious tapering gap at the join where it meets at the hip. What's that all about? That's exactly the kind of issue that the replacement right leg had before I repaired it but in the case of this left leg, the damage is not quite so severe. The leg hasn't been forced to the point of snapping. It's probably come close, though. Close enough to cause some warping of the plastic which has resulted in the widened hip gap along with with some pale stress marks to be present where the limb was having force applied to it. It looks like it's come close to the breaking threshold but fortunately has stopped at that point. Nonetheless, the distortion in the plastic does cause some warping and the result is the gap at the hip on the left leg.
On this occasion, I'm not going to apply a splint to brace it to help maintain its shape. What I will do is hopefully diminish the gap by other means. So, off to the kitchen I go once again.
I've boiled a decent sized pot full of water and I'm going to heat treat the warping. There's too much of a spring back to just push it back into place so the boiling water will soften the plastic and I can than push it back into its original shape and it will retain the restored configuration without the warping. Needless to say, this method is going require safe handling of the figure and the mandatory use of gloves for my protection. I also know from previous experience of repairing such buckles and warping that the part only needs to be immersed in the pot for a few seconds. Any longer than that and you risk more damage.
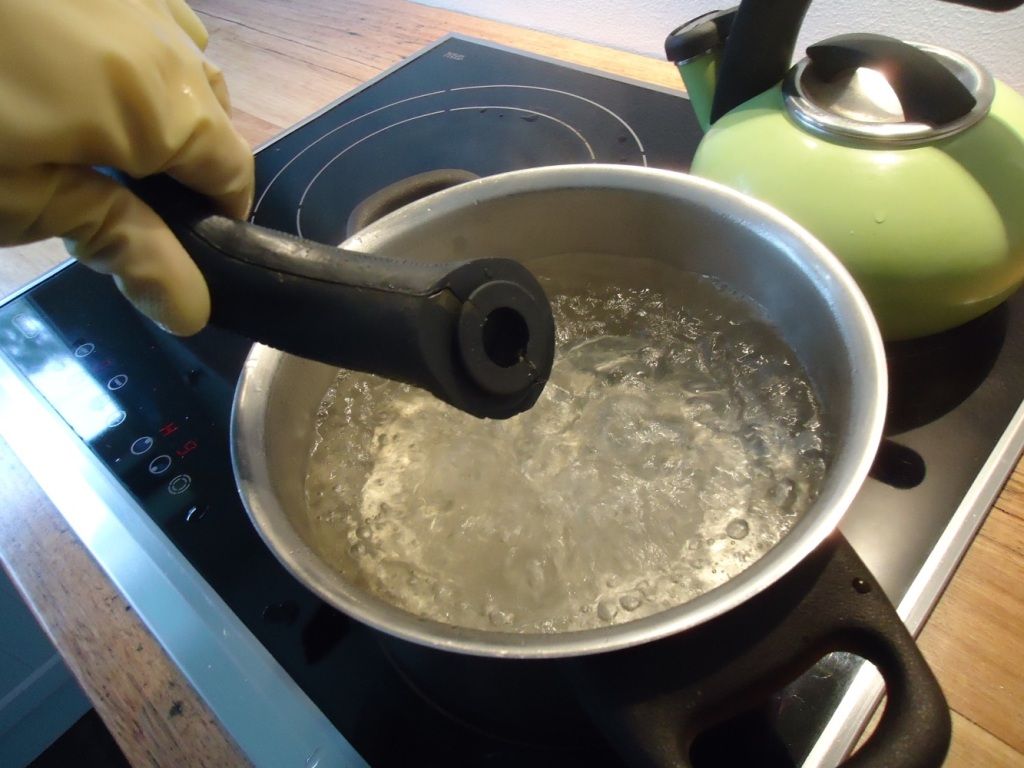
Just a few seconds immersed in boiling water water will soften the plastic. It won't take much and the risk of over doing it is high. Add some pressure by hand to the area I
want reshaped and then toss the limb into the freezer for 10 minutes.
OK, Good News. The heat treatment on the left leg went well. Actually, it went better than anticipated. Applying just some light pressure to the slightly distorted flat surface of the leg, the spindle flange was coerced ever so slightly back to its original form. Once the leg was cooled in the freezer, the repair maintained its shape perfectly. Now, Let's subject both legs to a test assembly and evaluate how well the newly replaced right leg and the left hip repair appear.
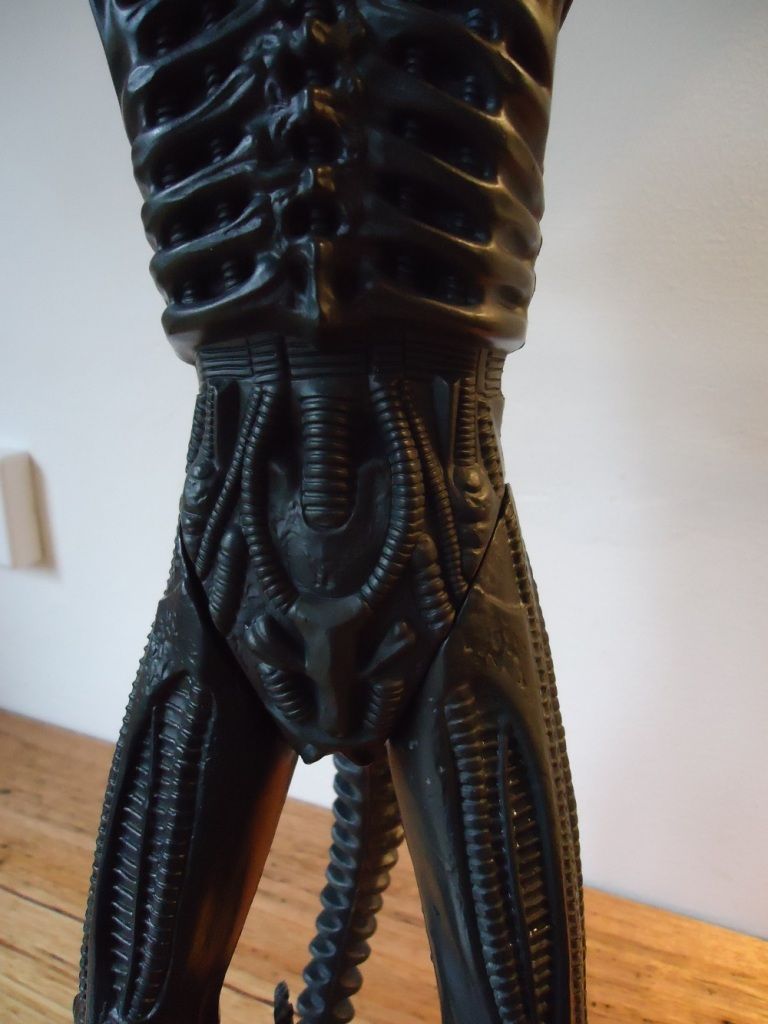
Not bad, actually. I'm very happy with this result and it's a great improvement over when the figure first arrived.
Well, so far so good. Both hip joints are now working and look good and importantly, the gap in the left leg joint is substantially improved. We're almost finished with the legs but one issue still remains. While the heat treatment on the left leg not only closed the gap between the thigh and the hip, it also had the extra benefit of making the joint tight once again. The last issue of the tightness on the right leg is all that remains to be addressed.
Aside from the deformations both legs possessed, their attachment to the figure was very loose when the figure first arrived. So in order to make sure the figure can hold a standing pose without threat of falling over onto its back, I wrap some teflon tape around the spindle of the right leg. This tape is soft, pliable and adhesive-free so it won't leave any sticky residue on the figure at all. It also acts as a dry material interfacing that doubles as a lubricant acting upon the joints.
A small spool of teflon tape only costs a couple of dollars and is purchasable from your local plumber supplies or hardware store. It's normally used to seal leaking pipes but its usefulness in this exercise is perfect. Just a single winding of the tape was enough to apply enough all round packing to the leg spindle to make the figure stand confidently upright once again without threatening to fall on its back. Getting those legs into a state that the figure can stand once again by using teflon tape is an easy repair with great results.
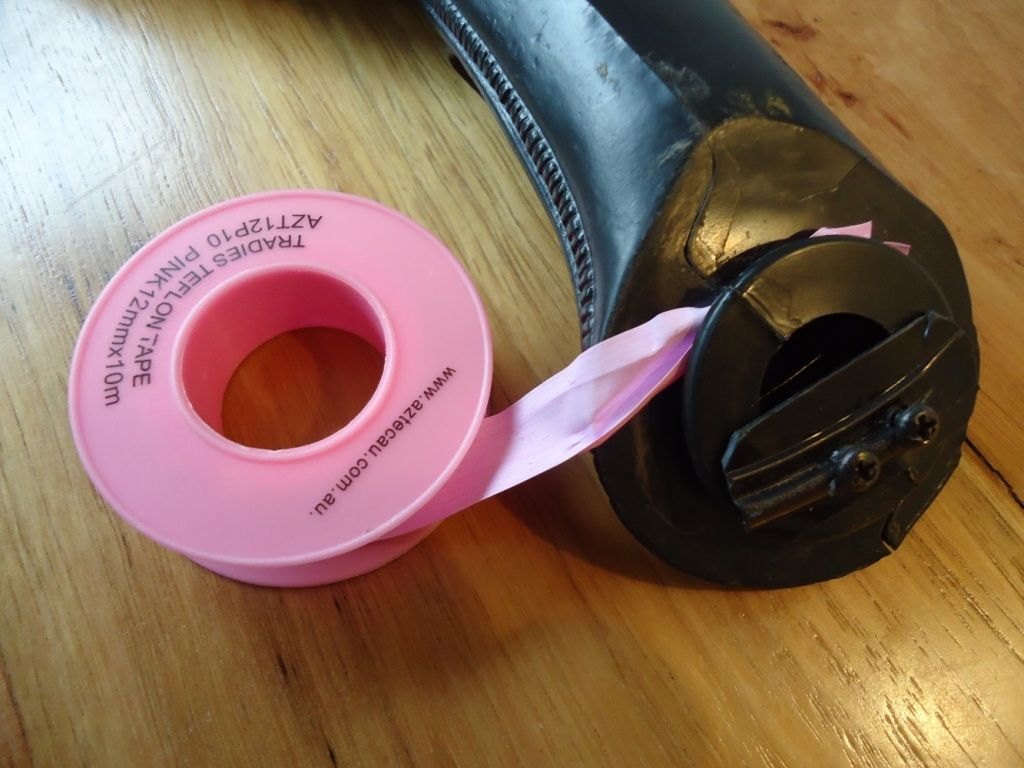
No more osteoarthritis for this leg. If only hip replacement surgery was this easy. The improvised DVD brace used to repair some other damage to this limb is also visible in this image.
Both of these repairs will be fully concealed within the figure.
The bright pink adhesive-free tape performs a couple of tasks. Firstly, it serves as packing between the hip and the leg to tighten the joint; secondly, it provides a smooth dry surface so that the parts no longer grind and reduces further deterioration due to any abrasion. This stuff is great and easy to use to solve a problem that I've encountered in just about every vintage Kenner Alien I have encountered.
Moving on... sometime in the near future, I'm going to address the problems with the tail. As part of that investigation, I'll also be showing you something very interesting, even special, about the tail. You might even call it a 'World Exclusive'! Hell, why not.
-WindebiesteLast edited by windebieste; Jan 22, '16, 5:49 AM.Comment
-
Fixing the Tail. Part the 1st of 2. Includes EXCITING NEVER BEFORE SEEN MEGO-MUSEUM EXCLUSIVE!*
Moving onto the tail of the figure we find that it displays a couple of issues that need to be addressed. Firstly, let's deal with its looseness. It's abundant free movement lolls about like a labrador dog's tongue on a hot day. Such looseness makes the tail hang in a single position and posing it in any other stance will result in it soon falling back against the figure's legs. There's a couple of ways to fix a loose tail, but it looks like someone has previously attempted to restore functionality to this one.
Inspecting the tail mount inside the figure I found that the original thick stub and serrated washer arrangement that normally secures the tail in place had been removed. The plastic stub of the tail was gone. Instead, a hole had been drilled into the base of the tail end and what looks like an aluminium plate had been used to fasten the tail back to its original position with a single screw.
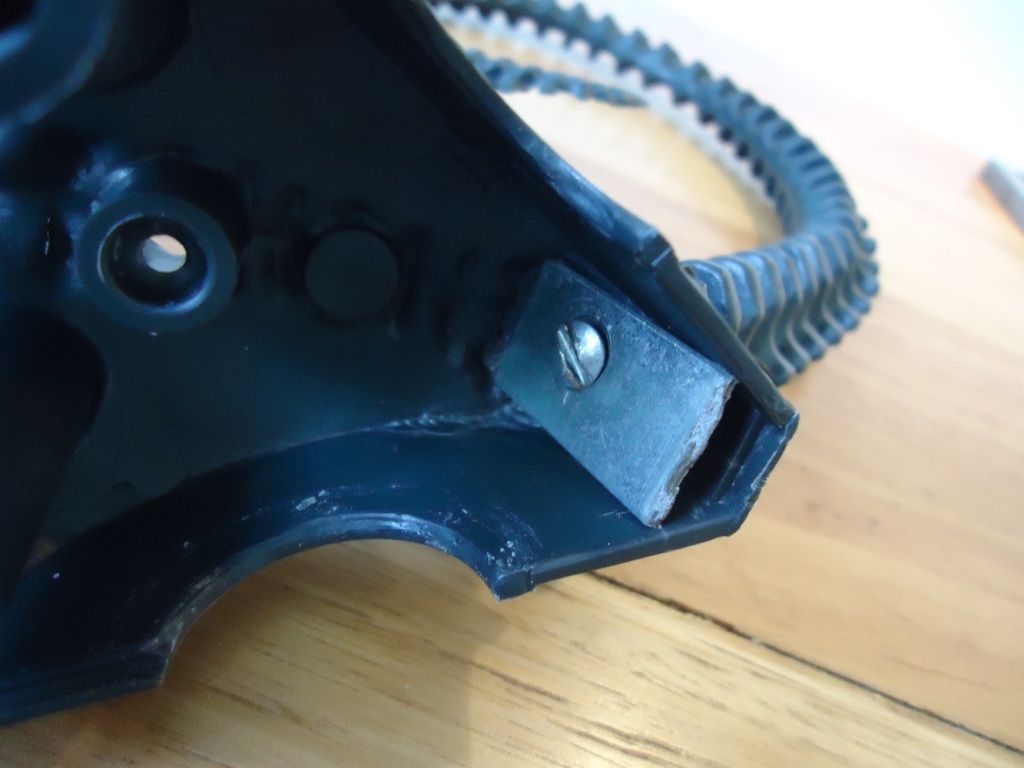
The interior of this figure revealed somebody else had already adopted a simple and effective solution to a severed (or loose) tail.
Fine, as far as I am concerned. I would have done the same thing, providing the stub was severed and the washer was broken or overly corroded. (seen that happen where the washer was not much more than a rusted ferris ring barely holding the tail in place.) If the washer is loose, then I like to retain as much of the figure as possible and just retighten the assembly. It's not hard and it means keeping as much of the figure intact as possible. Nonetheless, I am not averse to seeing this method being used. I've done exactly the same repair.
Here is my own version of the same repair, except instead of a metal plate, I have used an improvised plate cut and shaped from the plastic of an old DVD case. As I noted in an earlier post, disused DVD cases are an great source of easily to craft material that is strong enough for such repairs and easy to work with as well as being readily available. Anyway, seeing someone else independently conduct the same repair and employ a similar method would suggest that this is the best course of action regarding this problem.
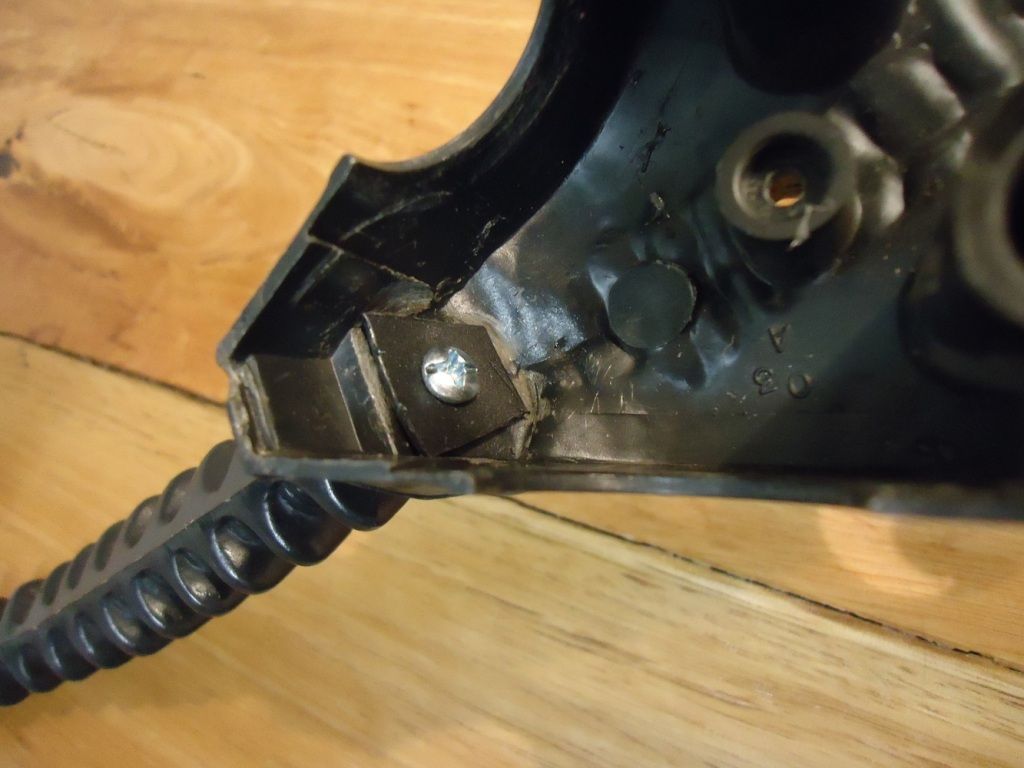
It's exactly the same solution I would have used to achieve the same goal as is in evidence inside this other figure I repaired about 6 months back.
Mind you, it was just a month or two ago where I saw yet another instance of the same method of attaching a tail to an Alien figure. This one kind of surprised me when I saw it. It actually wasn't within one of these old vintage 1979 Kenner action figures, either. It appeared inside the 2015 Gentle Giant Replica of this same figure. Gentle Giant's solution to keeping the tail in place is exactly the same method - dispense with the serrated washer and mount the tail directly in place using a hole drilled into the tail base and fixed in place with a mounting plate and a single screw. Well, in that case, if it's good enough for them, then it's perfectly fine for me, too.
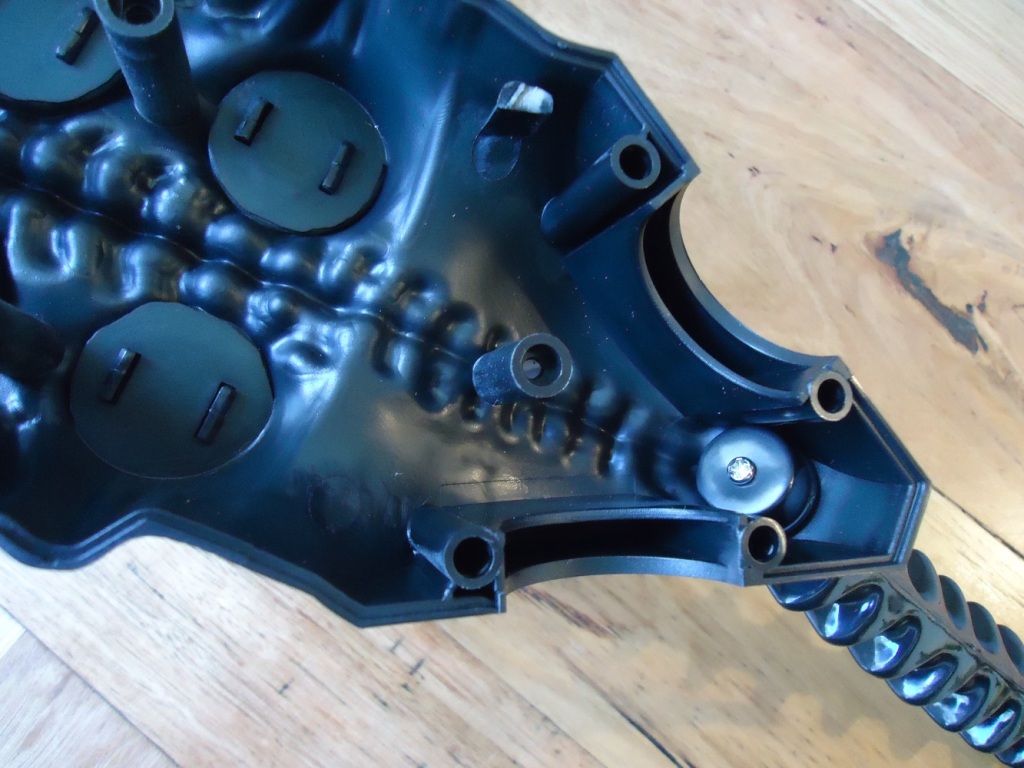
The same solution was employed by Gentle Giant for their 24 inch tall replica Alien figure. Enjoy your never before revealed insight into the interior of one of
these collectibles! Exciting stuff, huh.**
In this regard, the work on the sample I am currently engaged in had already been performed by someone else, it had just come loose. A couple turns with a screwdriver fixed the problem. All that's happened here is someone has beat me to the work already and my effort solely consisted of readjust the tightening of the already extant repair. Nonetheless, the work is still worthy of documentation. I just can't claim credit for (all of) it. Good and done. Next issue, please.
The second item on my list of issues to address regarding the tail is it's warped presentation. I'm not going to do that right now though and I'm going to split this post in half. I'm getting a little tired now. I've spent most of this week bent over this derelict figure, tending to it, repairing it, taking notes and sifting through dozens of photos to post a few online. So, a little break is needed on my part.
I'll be back with part 2 of this exciting documentary soon.
-Windebieste.
*Oh God, this had better be good, huh. LOL.
**Yeah, I've pulled apart one of these overpriced things, too.Comment
-
Fixing the Tail. Part the 2nd of 2. How to Make Alien Tail Soup.
Normally the tail should be straight when viewed head on but this sample I'm working on has it's tail curving all over the place. This repair is easy to do and the best method I have found is to heat treat it. I know some people would suggest using a hair dryer or a heatgun on a low setting but I take issue with both of these tools. Firstly, they don't heat the tail evenly and an uneven use of these tools can result in a concentration of over heating and other irreparable unwanted warping of the tail. The problem is also further exacerbated when such tools have to be hand held leaving the repairer with only one hand free to manipulate the figure. I much prefer to handle the figure with both hands than use tools this way. Having as much physical control over the figure while I am performing as possible means using both hands. For this reason I will avoid using a tool in one hand and manipulate the tail with the other because doing so sounds like a fine recipe for reducing chances of success rather than increasing it.
Anyway, let's move on. Either way, I will fix this tail.

I believe that the figure has spent a long time lying on its side. The tail matches the shape of the left leg it was lying against when placed in this orientation. It's easy to see how
the constant lying on it's side over many years could cause the figure's tail to buckle; along with the left hip to slightly collapse and deform, resulting in that gap we repaired earlier.
As I have already explored using boiling water as a means of evenly heat treating a warped part of the figure, I am going to repeat using that practice with the tail. Let's get started, shall we? It's time to head back into the kitchen - our laboratory in this case - with this repair in mind.
Some preparation is required first. The first thing we need to do is brace the tail, lashing it into shape. We need to do this for a number of reasons. Lashing the tail into shape will pull it's coil tighter. This tail has been stretched slightly and I feel it is necessary reshape the tail an pull it into a slightly better shape, improving its form. Another reason to brace the tail with lashings is for very practical reasons. When immersed into boiling water, we don't want it to become unmanageable after its been softened. Keeping the tail secure in this shape will make it a lot easier to work with a softened, wobbling heated limb and we can maintain control over it more readily. This is very important.
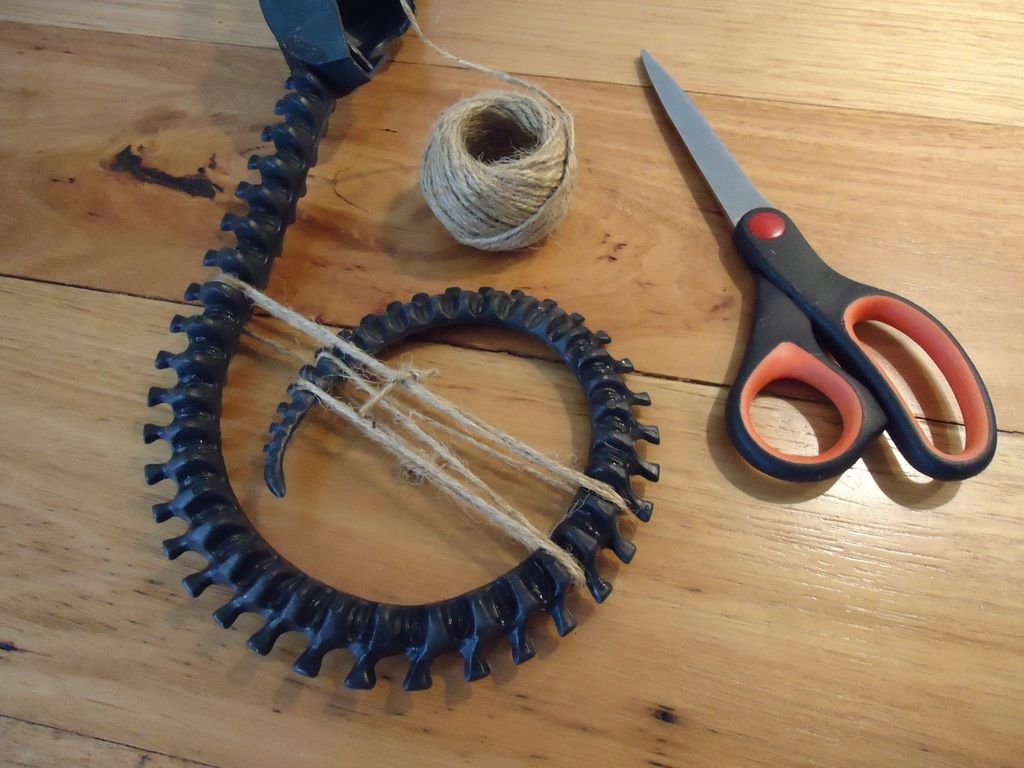
IMPORTANT!: Use natural fiber based twines that will not stretch when wet or become heated. Avoid any plastic based bindings.
We now have the tail configured for the big moment. I boiled the water and lowered the tail into the pot. We want it really soft to convince the plastic to abandon the former shape and yet also be restrained by the bindings. Keeping the tail submerged and rotating the figure to heat the limb evenly is important. You will need to keep immersed for about 20-30 seconds - a lot longer than what I did earlier with the left leg. We actually want this item to soften up evenly. Avoid resting the tail on the bottom of the pot.
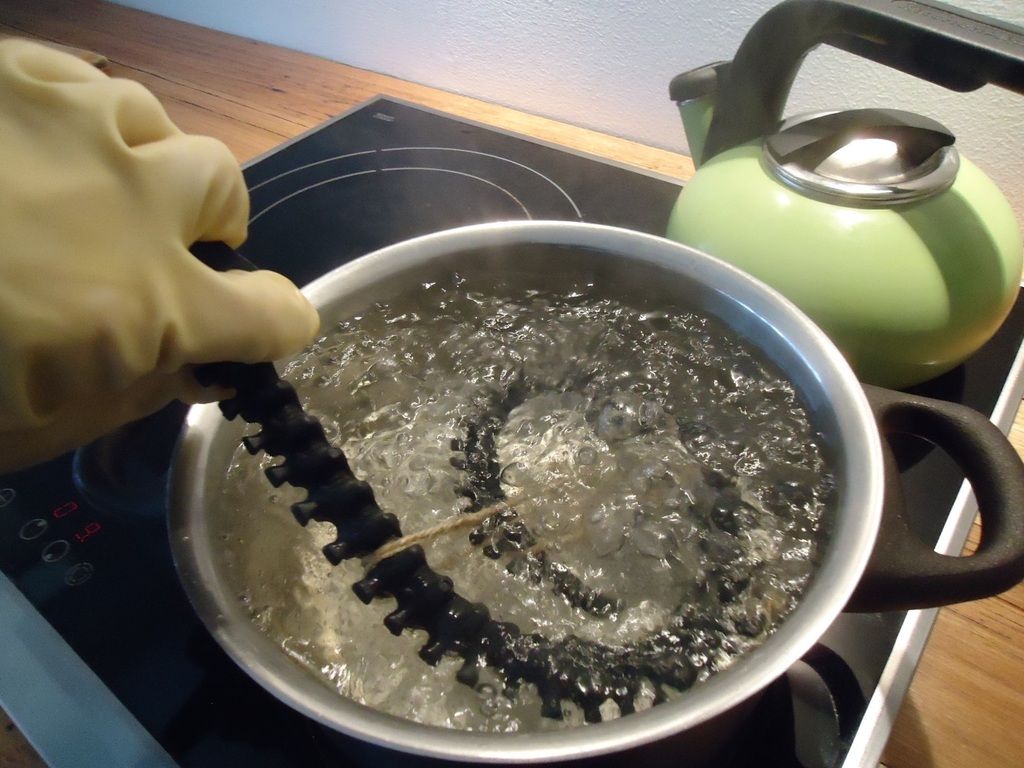
Immerse the tail for about 20-30 seconds. DON'T FORGET TO WEAR GLOVES!
Remove the tail from the pot and place it flat between a pair of weighty cutting boards, wooden ones preferably. This will help convince the tail to flatten out and retain the new shape while cooling.
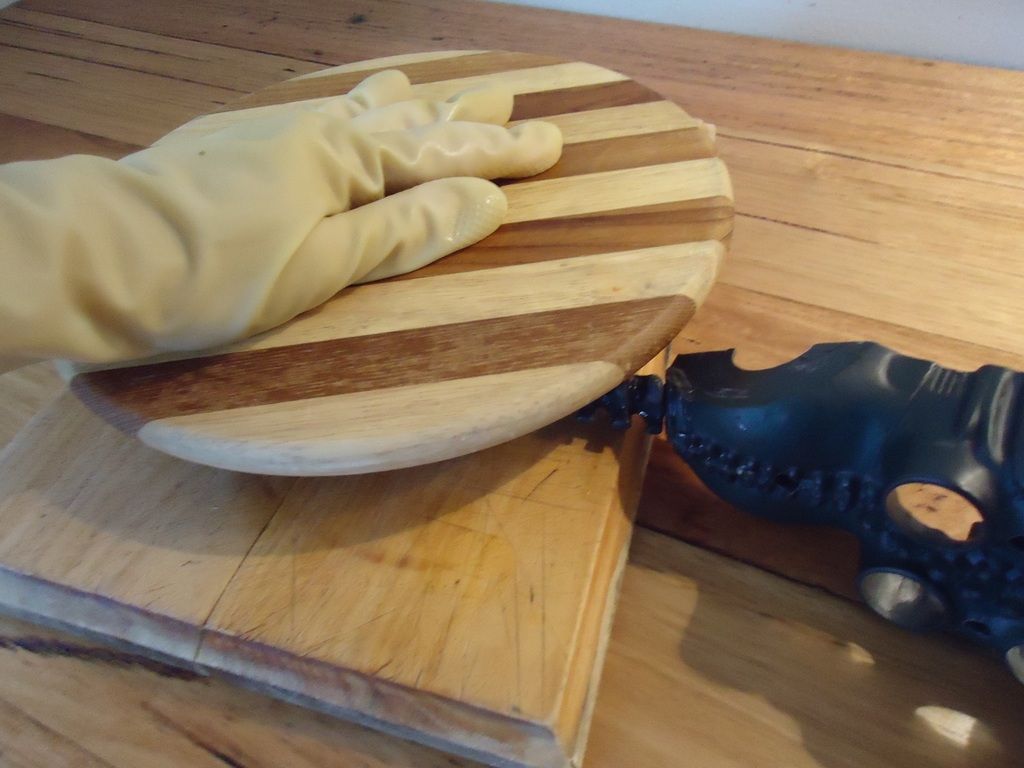
The tail is removed from the pot and placed between a pair of wooden cutting boards. Have these ready and nearby BEFORE you proceed with immersing the tail in hot water.
Then take this assembly, including the cutting boards, and shove the whole lot into the freezer for 10-15 minutes. This will allow the tail to cool quickly and adopt the new shape as defined by the bindings along with keeping it flat. I then remove the items from the freezer. You'll know if the tail has been in there long enough because the wet twine bindings will be frozen and rigid. Cut the twine free the tail. The tail will be redefined and ready to test. Let's perform another test assembly to inspect the results.
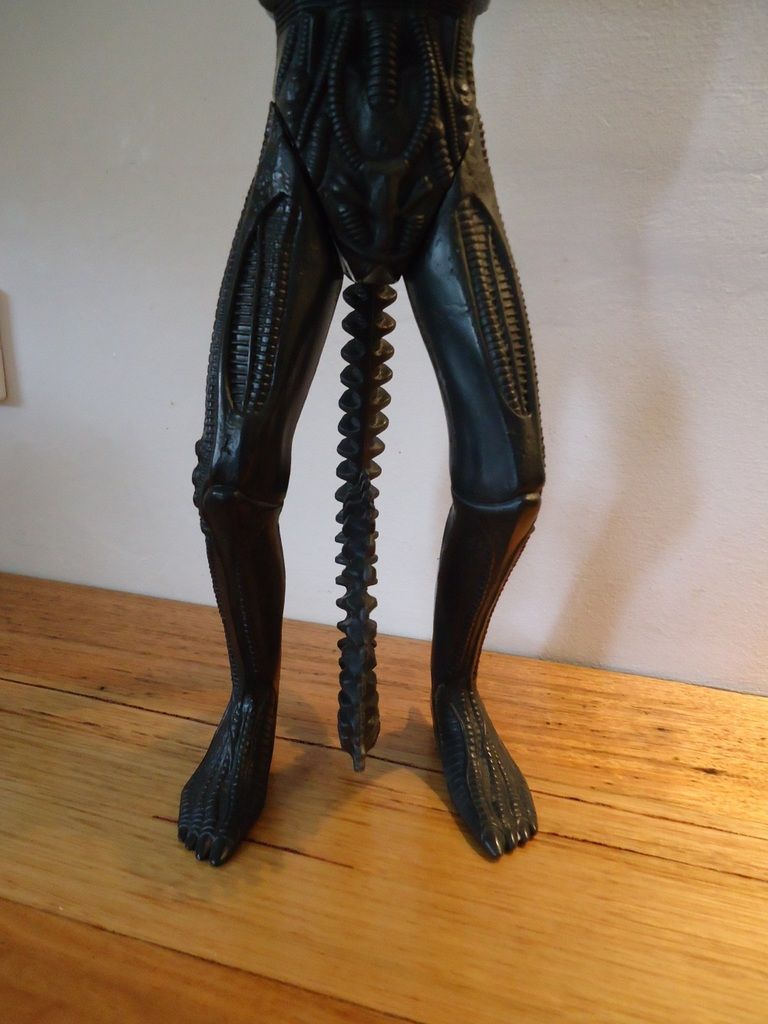
Looks good and reasonably straight, too. Compare its shape now to the image of the tail taken during the figure's assessment.
Job done. Now it's finish up time. Pour the remaining heated contents of the pot into some bowls. Garnish with chives and basil. Serves 4.
-WindebiesteComment
-
We're rapidly approaching the conclusion of our exploration and repair of this particular figure. There's just one last major repair required on it. The 3 of the 4 unusual tubular organs that sit upon the figure's back are broken. Well, all 4 of them now, actually. The final one was so delicate, it severed and broke away just by handling it. So all 4 quad appendages needed to be returned to the figure in such a way that they would sit correctly.
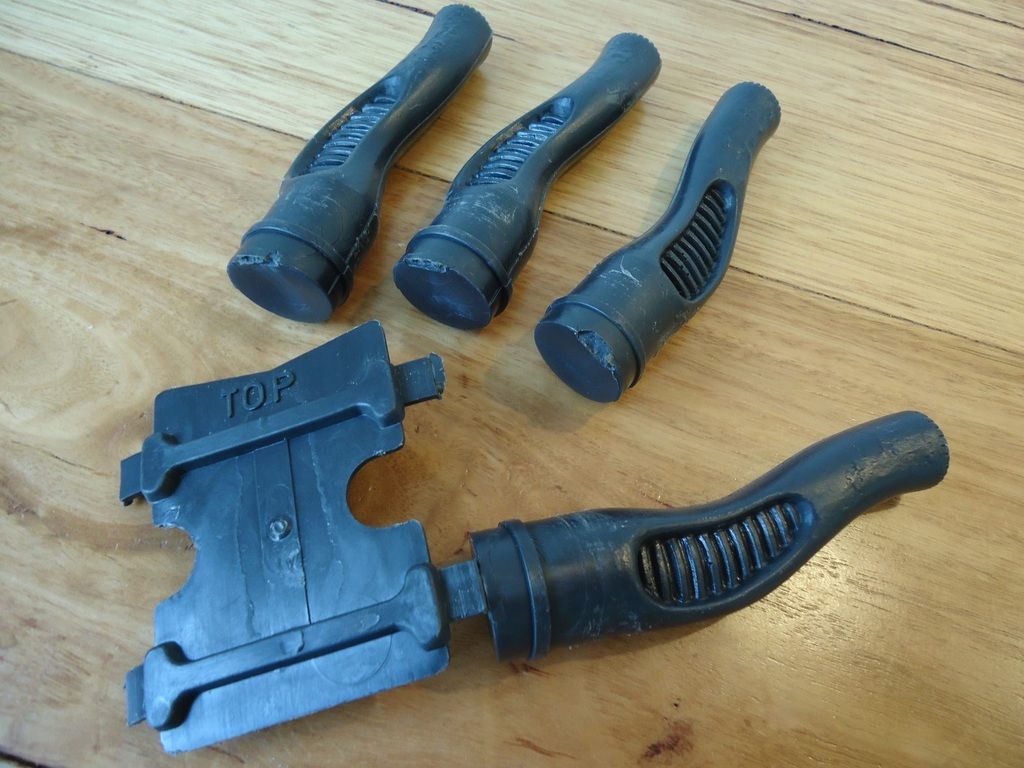
The quad appendages of the figure would normally be attached to this plate. These three have all broken off and the 4th just barely remains to be attached.
It's an easy fix and one that doesn't take long. With the backing plate removed, it's an easy task to drill 4 holes into the plate and a hole into each of the 4 appendages. Then it's a simple task to just reconnect the appendages with some screws. Not difficult at all.
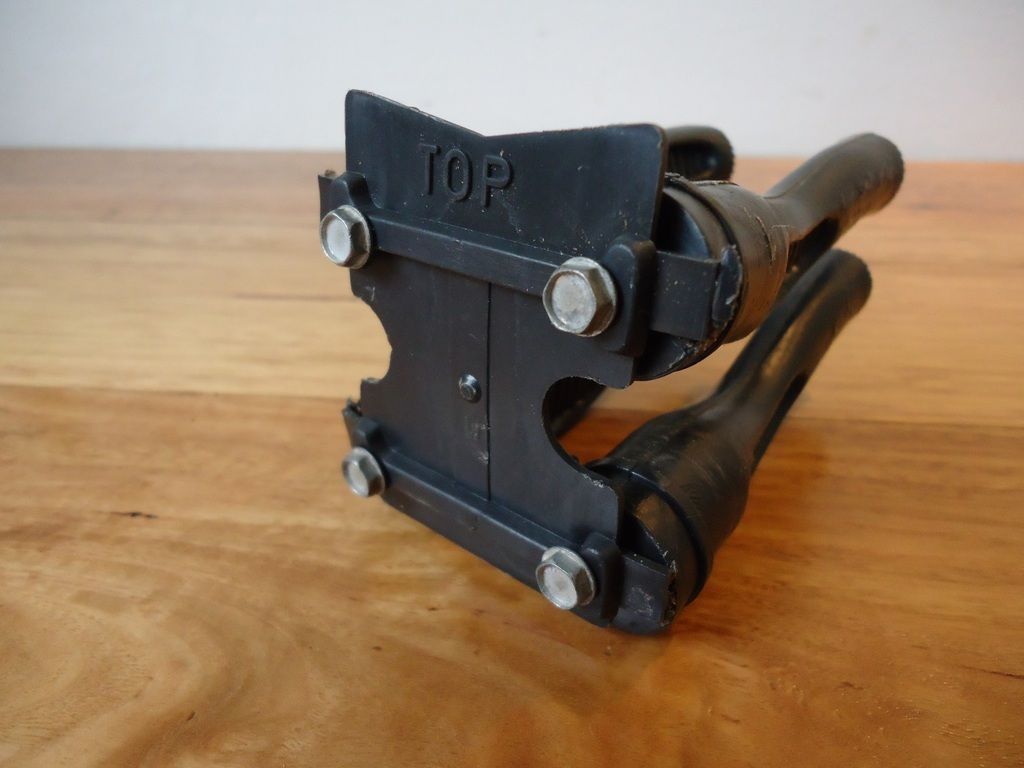
A few screws through the plate into the base of each appendage will fix them. Sometimes it's necessary to add washers as packing to extend their length through the rear torso.
We should do a test assembly to see how it's turning out. Placed into the back of the figure, they are now parallel and align properly without any looseness and retain their position without any unwanted rotation, dropping or wobble. Job done.
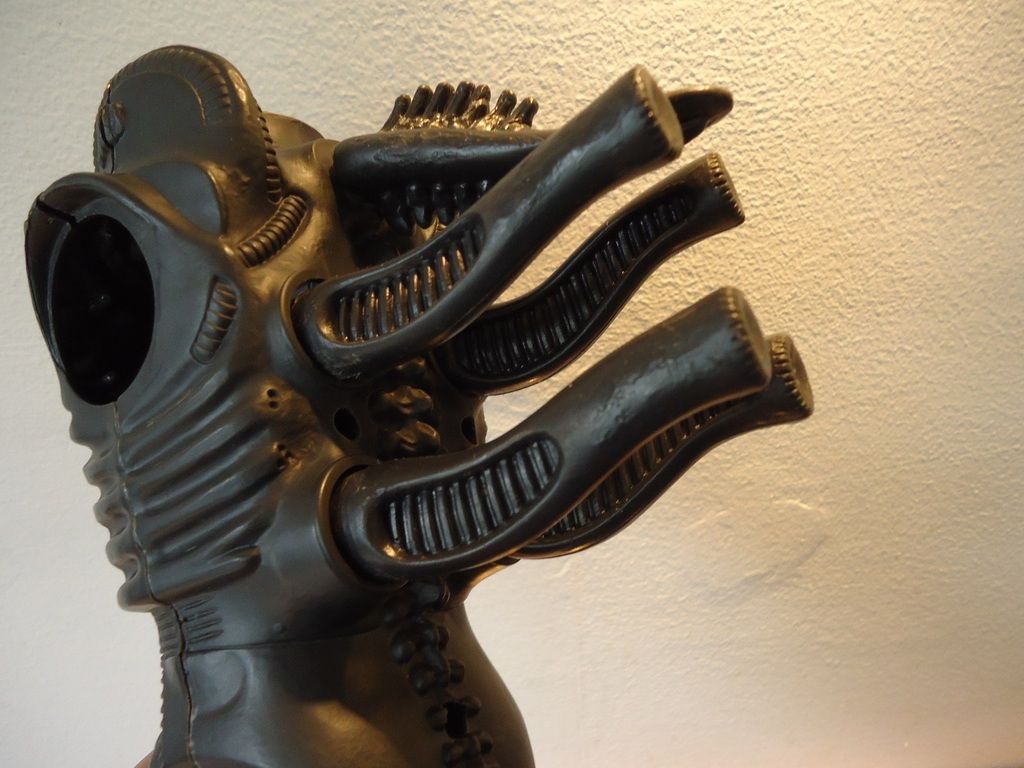
All 4 appendages are now secure and parallel giving it the result this repair should possess.
We're almost completely done with all the repairs on this figure now. It's been a terrific subject to work on. It's had more than the usual problems these old vintage action figures have - but that's what's made it a great candidate for documenting all of its repairs and sharing here. I've encountered all of these issues before but so many of them in the one figure is unusual. Just about all the common problems were present on this item.
It's almost finished now. I just have to perform some more minor tasks to get it into a decent shape. Mostly polishing and removal of residual glue on the limbs and reducing some of the more obvious abrasions (the chin, hand and other locations). That will take some time and I won't be documenting that process too elaborately - I might even leave it for some other time - when I have access to a bench grinder to speed up the polishing process a little.
Nonetheless, we're not completely finished with this fellow just yet. It still has to be assembled and a proper summary made of the figure. Needless to say, it's come along very well.
-WindebiesteComment
-
Finally we come to the end of our little adventure together and '1979 Kenner ALIEN Restoration Candidate No. 25, Cinderella', has now been completed. Well, to all intents and purposes for this Project, anyway. Ya. I named this figure after the well known little fairy tale character who starts out being the grubby wench of the household and gets a total makeover so she can attend the Prince's Ball. Yeah, I guess that makes me its Fairy God Mother. I can deal with that. Either way, this figure can now stand up and be proud once again.
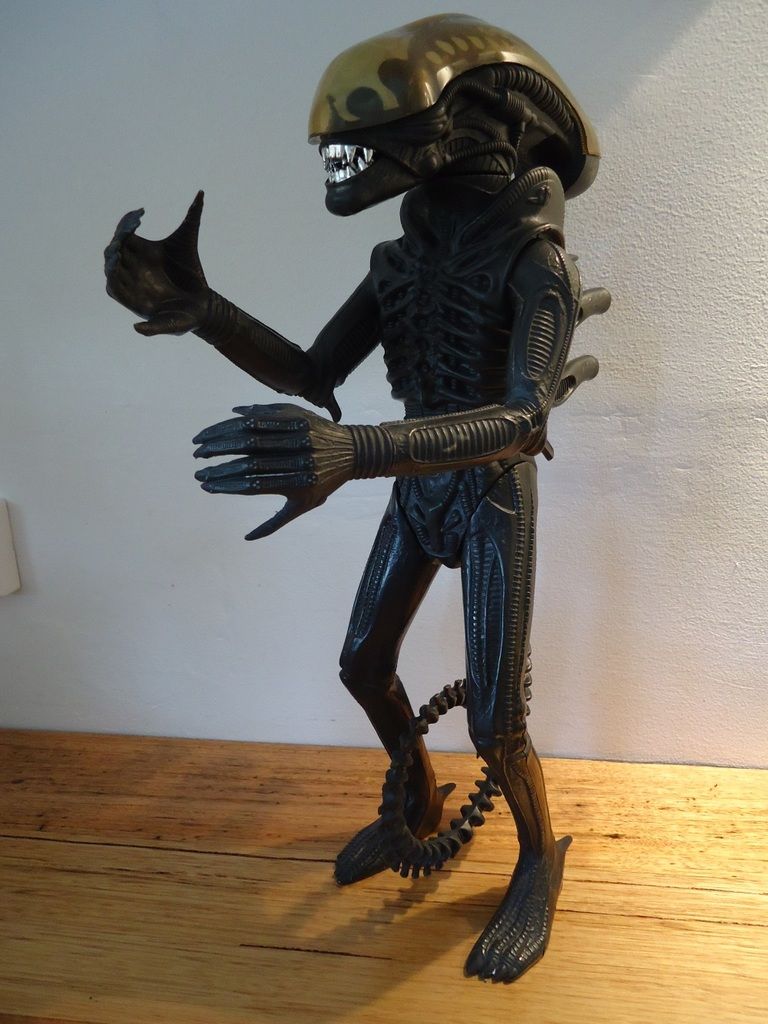
She's a dainty little angel, aint she sweet? Look how she holds that pose! Such elegance!
Well Cinderella isn't quite completed yet, I still have to give her a bit of a polish on some locations to get rid of any remaining glue residue, but she sure looks sexy now, hey.
This figure has been quite the challenge and when I purchased it, it was with the purpose of documenting the entire restoration process from beginning to end. It's been an absolute joy on my part to take this once dreadful condition figure, all dirty and partially broken in several ways and transform it into a much more deserving trophy. It's a shame that there are so many of these figures out there in the wild that are in such degraded states. With a little care, even the most FUBAR samples like this one can be given a new lease of life.
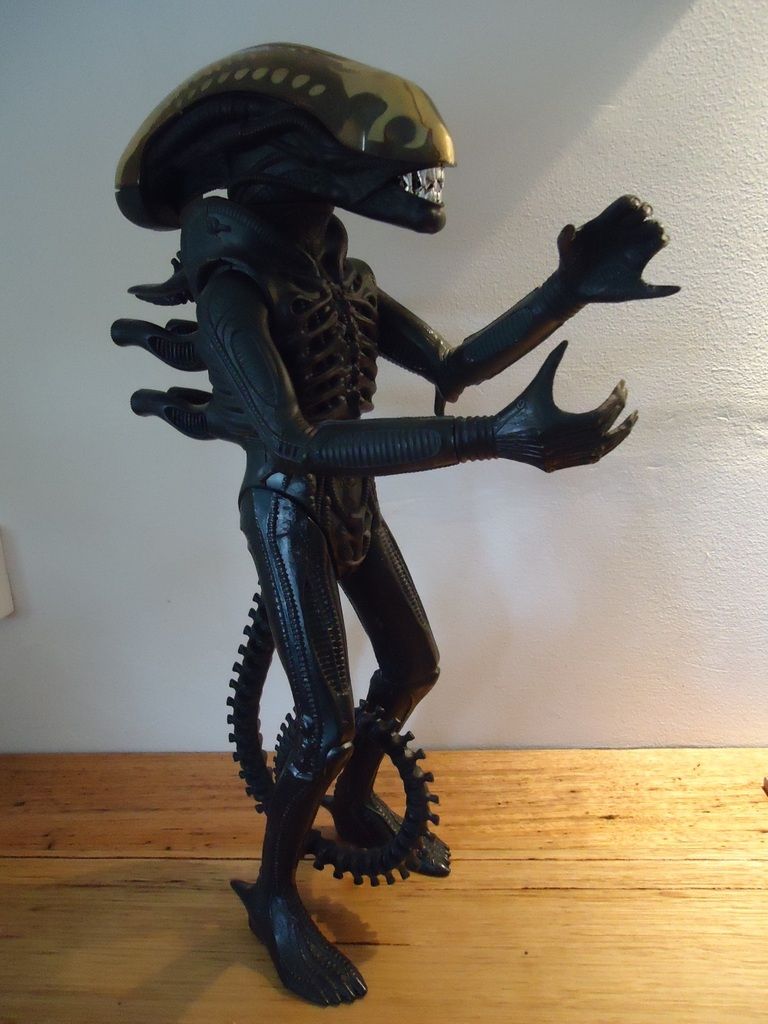
This figure was an absolute joy to refurbish. I think it shows. The arms in this shot are posed different to above. Neat, huh.
During the past week, a lot of care and patience on my part has taken place to restore this figure. I try to respect these old figures as much as possible and as part of that reverence, none of the repairs performed on this figure involved any glues or adhesives. Some minor modifications to the figure, namely the legs and the quad dorsal appendages were necessary to bring the figure up to this display worthy standard but such modifications were only employed where no other method is available.
All the same, most of the repairs were pretty quick and involved nothing more complicated than a hole puncher and some other commonly found tools. Aside from the neoprene rubber strip, which is relative easy to come by, all materials used were commonly found household items as well. An old DVD cover... A wire coat hanger... There was nothing done on this figure that required special skills or training but careful use of tools (and a couple pots of boiling water) along with patience can just about fix any problems these figures have today. Even after 36 years.
Here's the task list I set out to accomplish with this figure. Most of this work was completed and almost all of it was documented on these pages:
- Scuffed chin - Not just a scuff but chip damage and cannot be repaired.
- Carapace has small crack at rear - Cannot be repaired.
- Teeth a little scuffed with minor chrome missing - Cannot be repaired.
- Light cigarette odor - Now clean of funny smells.
- Covered in light dust - Now clean of dirty coatings.
- Carapace may not be original - See anomalies section below.
- Scarring on torso halves - Some success removed with hand polishing.
- Both legs are loose - Both legs are now tight at the hip.
- Left arm detached - Left arm re-attached and re-tensioned.
- Right arm loose - Right arm re-tensioned.
- Dorsal crest attached but loose - Improvised bracket wedged inside neck to support it.
- Quads x3 broken - All 4 broken quad appendages now aligned and parallel.
- Left hip damaged - Repaired.
- Tail warped and bent - Repaired.
- Tail loose - Retightened screw already placed inside by previous repairer.
- Right leg scarred from possible fall damage (or maybe previous repair attempt?) - Cannot be repaired but has been replaced.
- Residue on left arm - Limited success removing some residue.
- x1 internal pin missing from left shoulder - cannot be repaired but does not affect figure functionality.
- x1 internal pin missing from right shoulder - cannot be repaired but does not affect figure functionality.
- Not original screws present - See anomalies section below.
- Head previously severed at neck and reglued together - Previous repair is functioning perfectly. No additional work required.
Yeah... a lot of work, actually.
NET RESULT: Totally worth it.
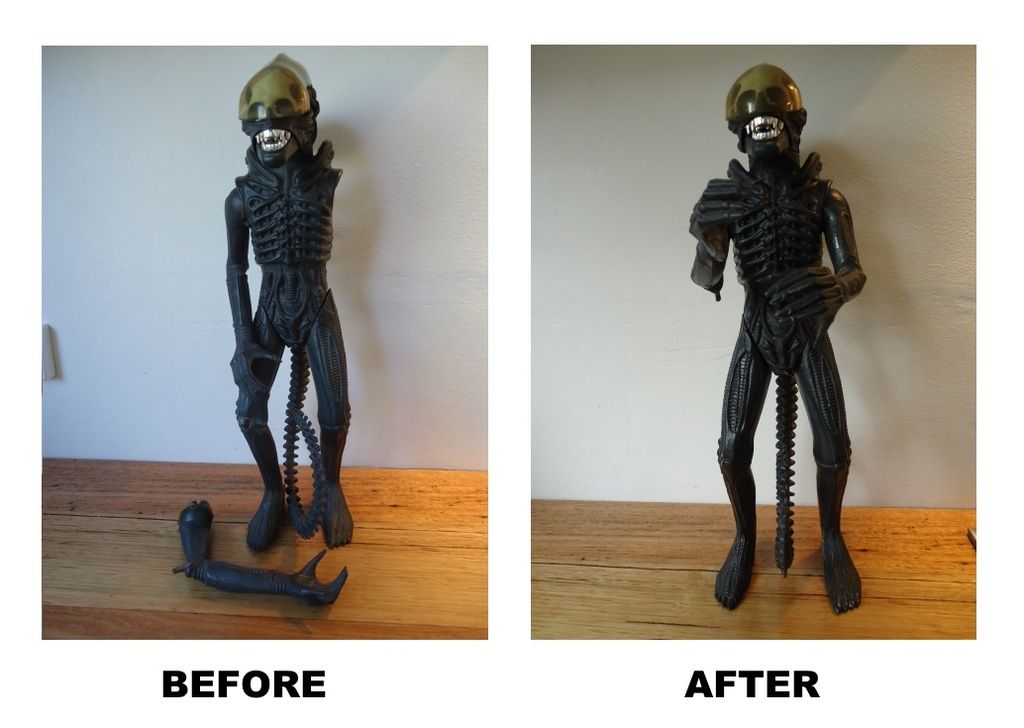
Comparison photos of the same figure before and after restoration work.
During the rehabilitation of this figure, I noticed some oddities, anomalies and, well, strange stuff I'd not encountered before. The first being the carapace. I'm still not convinced it's not original. It's way too aged and it's perfect in every way except it has a sepia like color variance. There's other variations present on the figure as well. The screws didn't appear to be the same ones I commonly associate with the figure; but when I actually tried a set of those, they didn't work properly and instead turning freely in the holes without purchase on the figure. So I am thinking the screws that came with the figure are original.
I noticed a few other things as well. The quad appendage plate inside the figure was shaped differently. There's a number missing on the interior of the back torso. The color of the replacement right leg is a slightly different shade of dark grey (I began to notice this after many hours of staring at the figure. lol.). The manufacturer’s date stamp ‘CPG PRODUCTS CORP. 1979’, is missing from the jaw activation trigger. So all these minor differences might mean something. I'm thinking that this figure is an early (or possibly later) batch item from the figure's production run, one that's not as common as the many others I have seen.
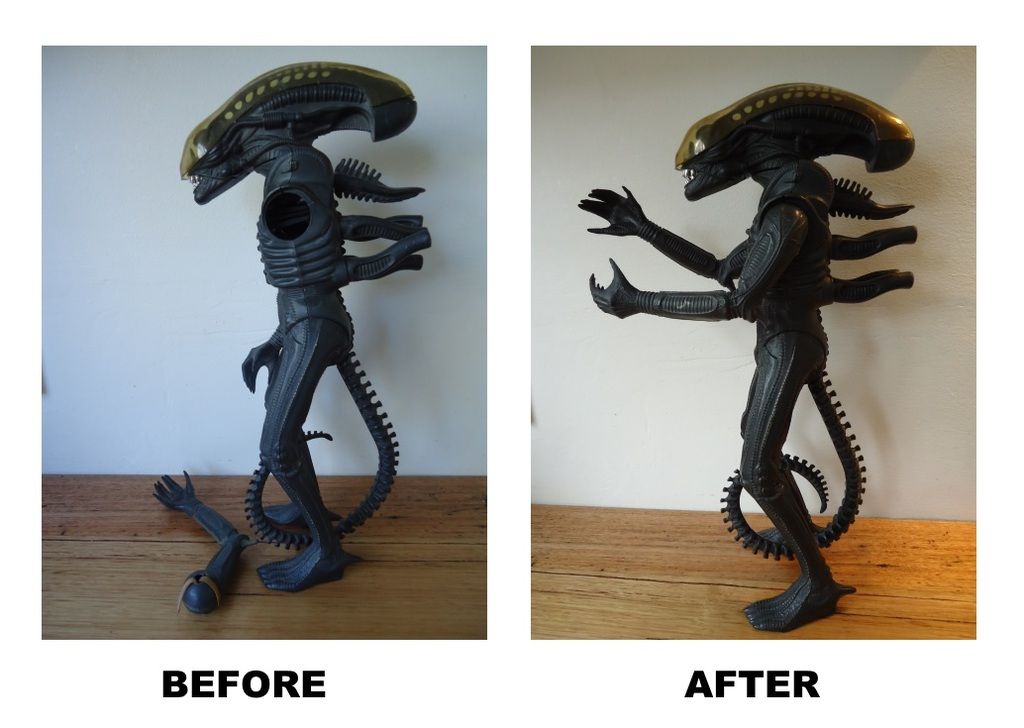
Comparison photos of the same figure before and after restoration work.
The other thought that crossed my mind is it's a bootleg. I seriously doubt that it is. Bootlegs don't emulate the original manufacturer's product to this degree and make minor alterations to the interior of a figure. They don't use exactly the same color dyes for the plastic. They wouldn't make the stencil for the head paint and use exactly the same glow in the dark paint. I'm also familiar with the latter Tsukuda (1984, 1995 and 1997) and Halcyon (1991) versions of this figure and despite them being legitimate licenced items from Fox, they are just terrible variants and I can spot them from a mile away. No. This item was made by Kenner Products. It's Kenner through and through. It's tiny deviations present make it something special though.
On top of all this, I'm really pleased to be have been able to share this experience with you and proud to own this figure.
For me now, I have a ton of work to do. I am slowly building my web site dedicated to everything I know about this figure; and if you've been following my random posts on ToyArk, you will know there is a surprising amount to learn about it. My knowledge about it is always expanding. I'm so surprised that it's possible to dedicate oneself to just appreciating this single action figure. There's just so much to it, it's just amazing.
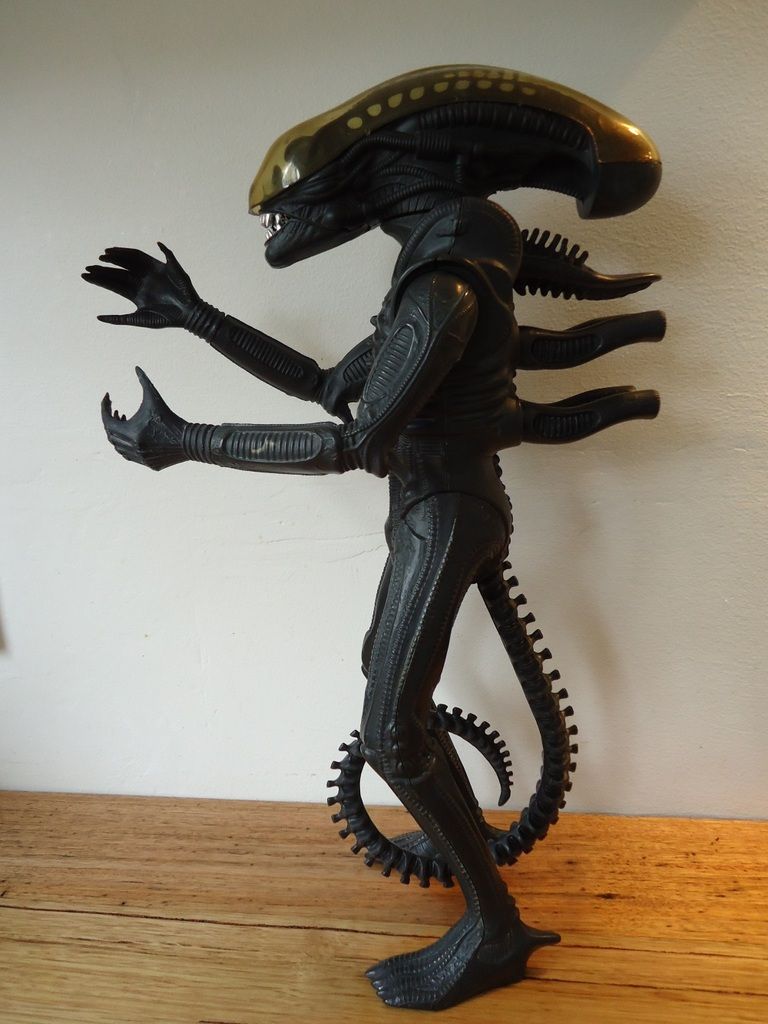
This is the 25th 1979 Kenner Products ALIEN action figure I have had the joy of refurbishing. Soon, I will be looking out for No.26.
Thank you everyone for reading my lengthy posts about how to fix various problems you may encounter with this figure. I will frequently visit this forum in the future to see how you Guys are going with any of your own restorations you choose to make and maybe answer some questions to other common problems this figure frequently exhibits but were not present on this sample.
It's been a lot of fun and I will let you know when the site is up and running. That's likely to happen sometime in mid February.
Thanks for reading!
-WindebiesteLast edited by windebieste; Jan 23, '16, 2:54 AM.Comment
-
Terrific workshop. I'd love to see more like this.
The original Kenner Alien is on my (very short) shortlist of vintage collectibles, so I'm sure I'll make use of your teaching in the near future....
.
.
"When things are at their darkest, it's a brave man that can kick back and party."Comment
-
The sepia coloring of the dome could be cause by nicotine staining. You had described the figure as having a "Cigarette smoke odor" well that smoke leaves stains too, and the color is usually a yellowish brown. If it was in the home of a heavy smoker, it would not surprise me if it is nicotine staining. Have you tried to wash it to see if it will help?
Great article thoroughly enjoyed reading it. very well done.Comment
-
ADDENDUM
I am so stoked that you people are impressed with these efforts. I'm even more pleased that some of you have been inspired to give your own Aliens the attention that they deserve. I hope your results are as rewarding as my own have been. It can a fiddling thing to fix the arms. Yes. I spent a lot of time mastering the method outlined above and as this figure proved to me, I still don't get the desired results on the first attempt. When it is done right, however, it's a celebration. I'm so looking forward to your successes in this regard.
carapace was washed thoroughly along with the rest of the figure to remove all odors. You can check out the first image on page 2.
Anyway, along with the Addendum, in particular the anomalies regarding the carapace, dorsal appendage plate, interior of torso half, trigger copyright info. I've taken some comparison photos of this figure and another one I have
GENERAL:
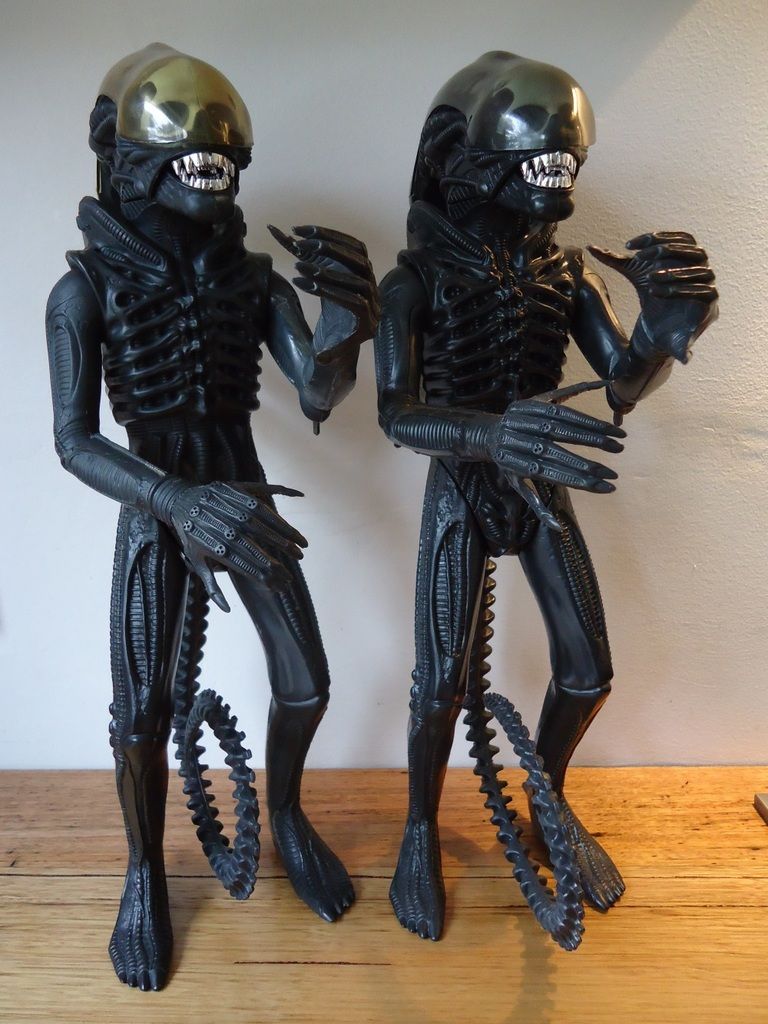
When placed side by side, (The restoration figure is on the Left) there's almost no discernible difference. There are, however, a few extremely subtle discrepancies. The carapace is slightly off color and the sheen on the left figure is slightly duller (disregard the restoration's right leg, it's a replacement) especially noticeable on the right arm. Otherwise, they are identical. (Also disregard the tail. The smaller coil radius is my doing.)
PAINT APPLICATION:
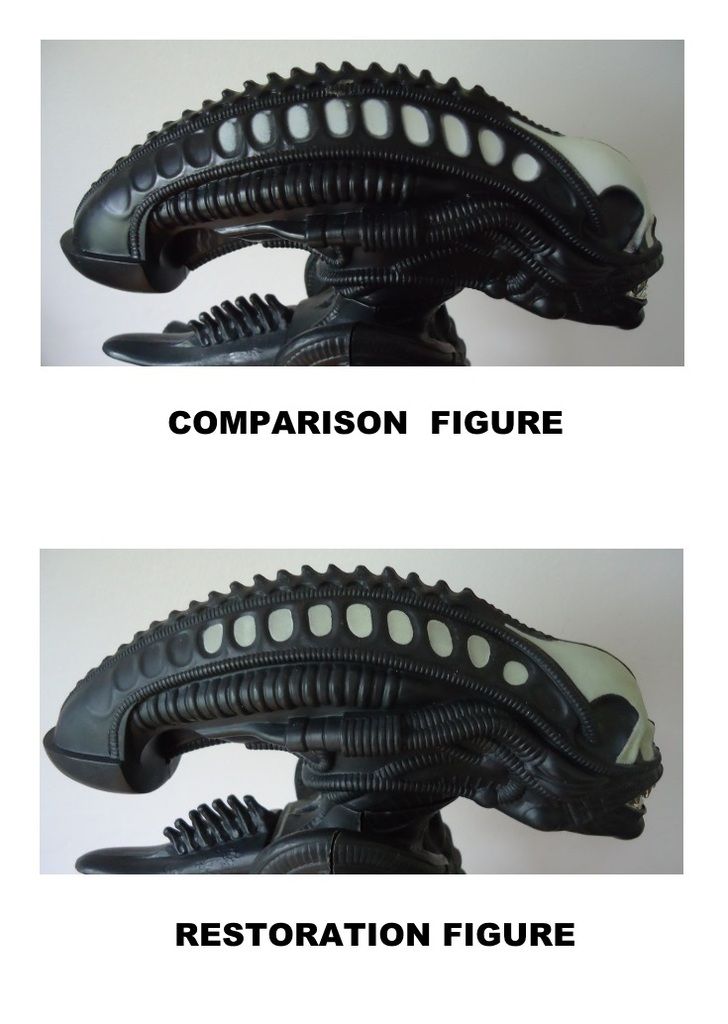
The paint used on the figure's head is the same seen on other figures. It glows in the dark just fine but it does have a significant difference compared to the other figure. The edges of the stenciling are much sharper and there is significantly less feathering around the edges. Also note that the plastic of the head is a duller sheen despite the fact that all details are exactly alike.
COPYRIGHT INFORMATION:
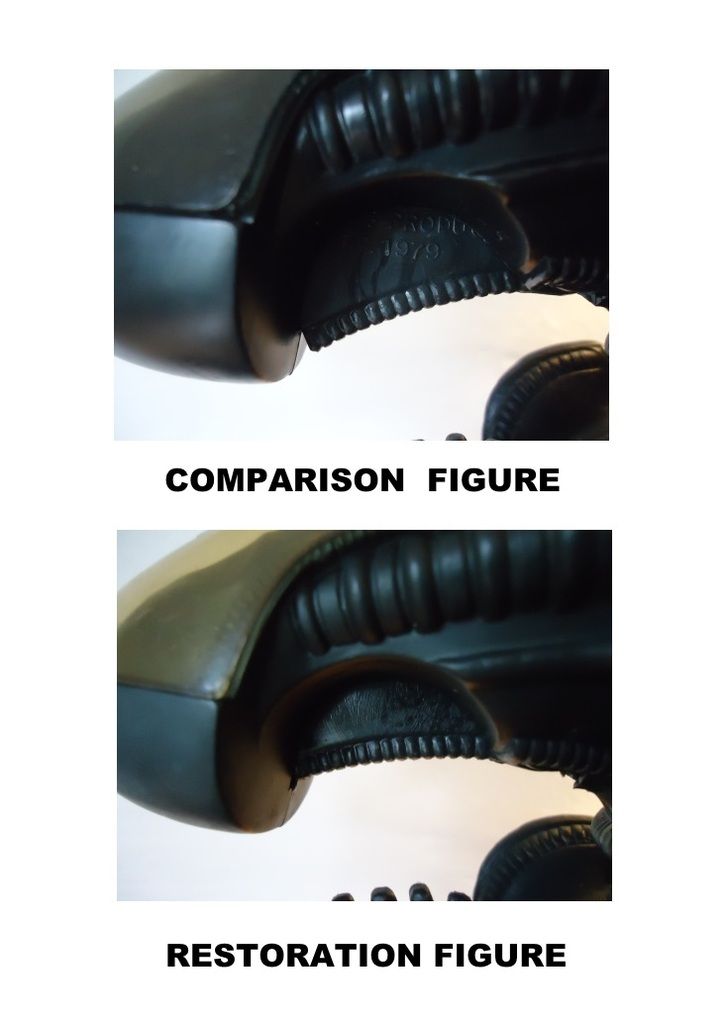
All the details are exactly alike except for this most important item. The copyright details are not present on the restoration figure. Missing is the line, ‘CPG PRODUCTS CORP. 1979’, the Kenner Products parent company had stamped on all of these figures. Well, apparently not all, it would seam. Note the slight dullness in the plastic of restoration figure's head.
TEETH:
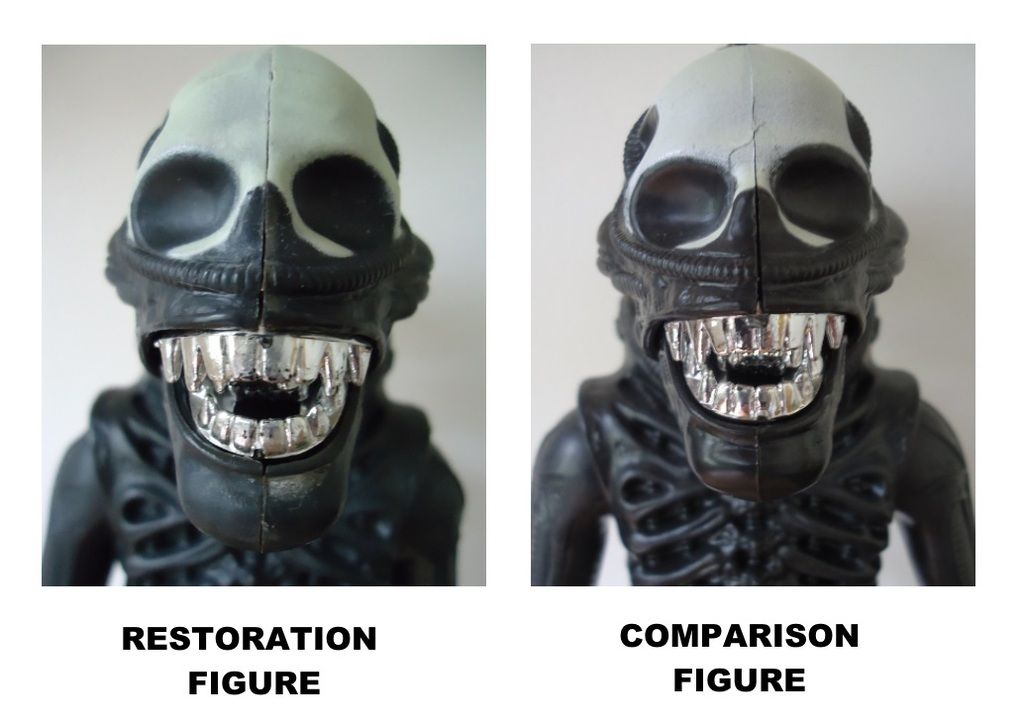
I didn't have to deal with the dentition during the course of the restoration as all of the mouth parts were present. Other than a slight loss of luster in the chrome finish, they look exactly the same as the comparison figure. This may even be attributed to the very slight change in lighting during the time it took to pose each figure for this comparison.
INSIDE THE TORSO:
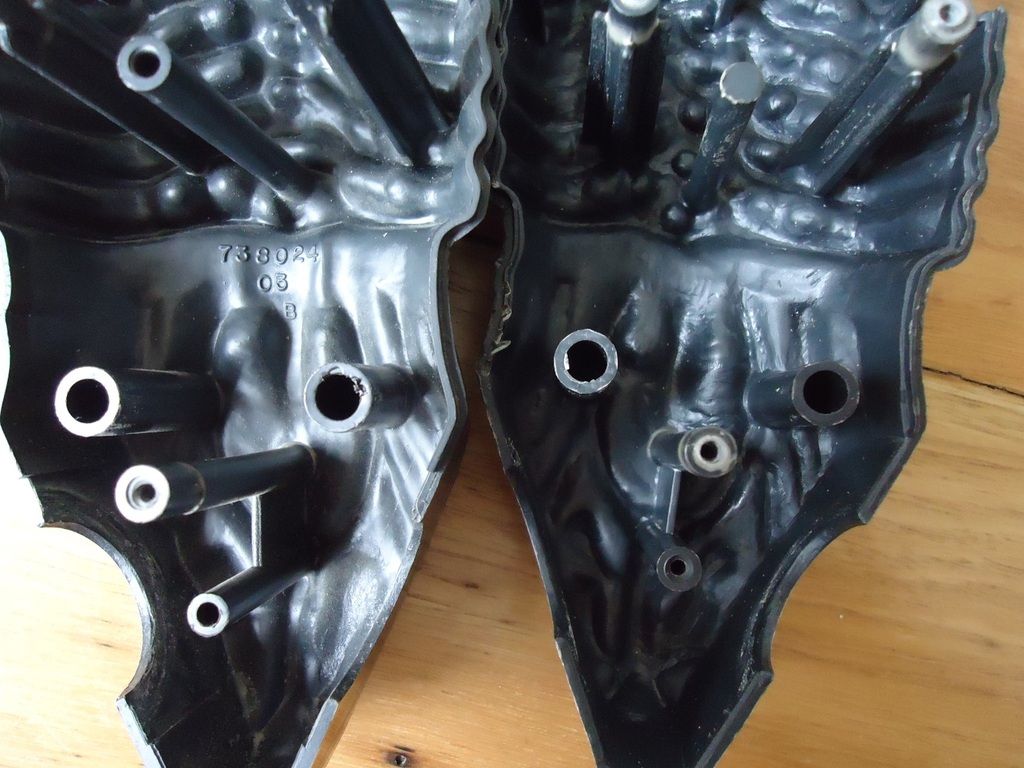
Here we are looking at the interior of the front halves of both figure's torsos and the differences become very numerous. The comparison figure is on the Left and the restoration figure is on the Right. The more you look the more you will see... For a start, the part no. '738024 03 B' present on the comparison figure is absent on the restoration. The overall surface texture of the interior is constantly different across both samples. The center post (which pushes and holds the quad appendage plate in the figures back) is narrower and filled in on the restoration figure. There are minor differences present all over the place when you look inside the torso. It's like a game 'Spot the Differences', there's so many.
QUAD APPENDAGE PLATE:
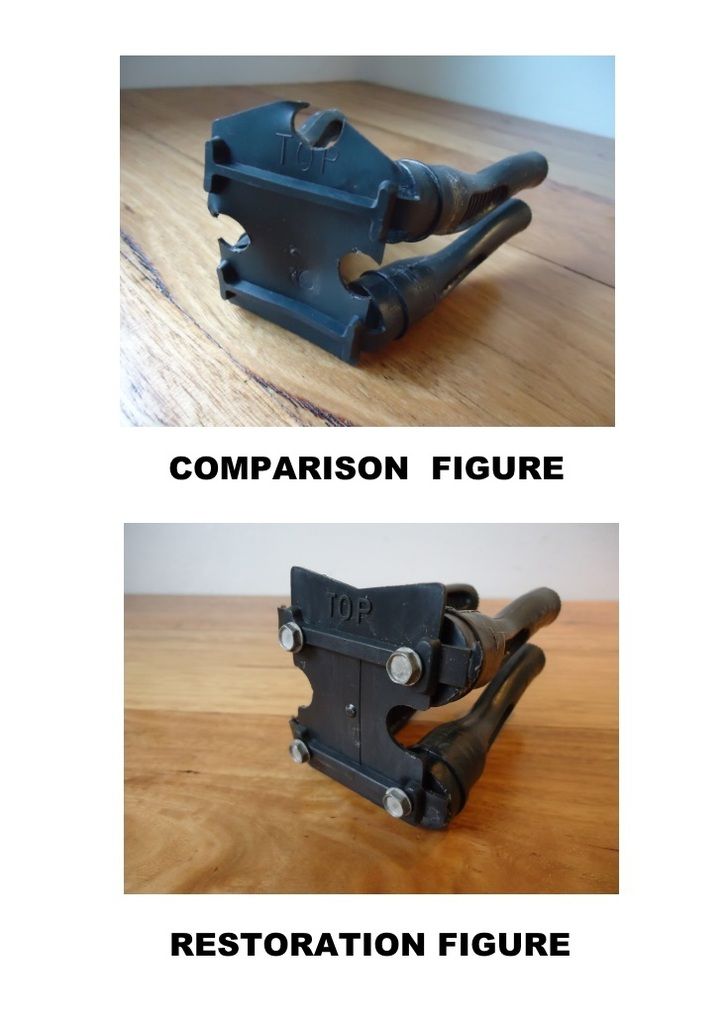
Speaking of the quad appendages, the interior plate that holds them in place has also undergone numerous revisions. The plate itself looks as it has been completely redesigned. (Ignore the 4 screws, they are my addition.) When you compare them side by side, (OK, one above the other...) there are obvious differences.
IN CONCLUSION:
Most of the perceptible changes seem to occur within the figure but the removal of the copyright information makes the purpose baffling. I can understand how production can be made more efficient by changing the shape of the appendage plate. The shape in the restoration figure is more efficient and someone wouldn't have to be employed to punch circular gaps into the piece to permit to sit inside the figure amongst all the screw and securing posts. I can totally see why that revision was made. I totally get that other changes exist too for what ever amendment reasons Kenner needed to make. The figure appears to be a different batch item - possibly a later one as indicated by the appendage plate revisions - from those we normally see, but I can't understand the removal of the copyright information. Well, not completely, anyway. I do have some ideas about this anomaly.
I'm thinking Kenner Products and their parent company, CPG Products Corp. (Itself a subdivision of General Mills, actually.) were heavily committed to selling this figure. It failed miserably and it's possible that CPG abruptly discontinued wanting to be associated with a toy of such disreputable nature in family homes. (Now, this is all speculation and conjecture on my part... lol.) So, in order to capitalise on the figure as much as possible and recoup their losses, they removed their identity and did not want to be recognised as a party to its manufacture. Of course, such an action happened too late in the toy's process and very few of this variant actually made it out the door. Well, it's a theory, anyway. I didn't say it was a good one. It might defy logic - but then again, so does marketing this thing at children in the first place. It's based on the changes present within the figure and what I know about it's history. Which is also something of great interest to me as well.
Anyway, the figure resembles an original Kenner Products item in every possible way aside from the noted anomalies. The materials that the hands, tail and dorsal appendages are constructed of differ from the rest of the body of the figure. This is to be expected from a genuine figure. Would a bootleg take that kind of detail into account? What's more, the outward appearing shapes and materials used in just about every feature exactly matches other Kenner Aliens in my possession. So I am tending to lean on the likelihood that this figure is a later variant rather than a bootleg. Possibly one of the last ones Kenner made.
All this aside, you can rest assured that every repair I've detailed with this figure is relevant to any other 1979 Kenner Products Alien action figure. Just by a stroke of absolute luck this one has a few minor discrepancies.
WE AINT DONE JUST YET.
I did mention earlier that I am working on a web site dedicated to this awesome action figure. Eventually, I do want to post a gallery of images featuring owners posing with their figures. ...or even just their figures on display. I would love it if readers here could support me in this endeavor and permit me to use your photos on the site. It's still under construction but it should be launched sometime in mid/late February.
Thank you all for all the positive feedback. It's very encouraging and totally makes all the effort worthwhile.
-WindebiesteLast edited by windebieste; Jan 24, '16, 10:19 PM.Comment
-
The differences you point out make it much more likely to be late stage engineering sample than part the production run, in my opinion. Copyrights and mold numbers/markings are often stamped late in pre-production, after most style, safety, and cost refinements are made. Regardless, really interesting, thanks for sharing all of this.Comment
-
Hey, thanks for the feedback. It did occur to me that it might be an early batch item, or even a prototype or proposed release sample.
What dissuaded me from that likelihood was the nature of the variations in the mounting plate for the back's appendages. When I look at this item, I see it has definitely had changes made to that part that actually improve it. If you look closely at the part in the comparison image, you can see the moulded edges on the recesses of the part. On the comparison item, these recesses have clearly been punched and the process of cutting the circular recesses would have been manually performed. Someone sat and punched the 3 recesses on thousands of these pieces so that the piece would sit inside the torso without interfering with the various posts.
Just allow me to speculate here. If it was part of a later batch (remember this figure only had a single production run) it would make sense to add the revised recess design into the part to eliminate labor costs and streamline the production of the figure. Of course, this is purely conjecture on my part and I may be completely wrong, but taking into consideration that the piece looks like these improvements have been made to it, then yeah. I'd say it's a later version of the figure. ...which of course raises the question of the missing copyright details.
I'm not going to pretend I know the answer to this because that simply contradicts with your own equally valid points, which I would be completely comfortable with if that one piece didn't show evidence of being the superior piece. Right now, I'm happy to settle on letting it be sent to the 'Hey, this is odd... I wonder if I will ever find out what it all means' basket.
At this point I just put it down to conflicting anomalies with an explanation that's been lost sometime since 1979.
Thank you all the same, I will keep your comments in mind coz honestly, I really don't know the answer to this conundrum.
-Windebieste.Comment
-
Just going to add another item to the addendum.
I did mention that this figure required multiple attempts to get the arms to hold a pose. I like my old Alien figures be able to have their arms reaching out in front of them when standing free; and they have to be tensioned just right to do so.
During the course of restoring this this figure, I did a lot of polishing and cleaning to remove some of the residual glue that's present on the limbs and joints. I was looking over the figure today and I noticed that I'd over-polished the ball joint and significantly reduced the amount of friction between the shoulder socket and the ball joint itself. Such cleaning did reduce the amount of residue on the joints but left a mirror smooth finish on the ball joints, making the multiple attempts necessary for the figure to hold a pose.
So I took the figure apart again today and reduced the smoothness on the surface on the ball joints by lightly rubbing them with extremely fine sandpaper. Super fine stuff, and little to no pressure applied to them. Just enough to take the fine polish off of the joints themselves. I then reassembled the figure and set it up again with its arms outstretched. It now holds the desired pose even more confidently than previously.
So, if you're having trouble with the arms almost - but not quite - holding a pose; then the use of a very, very light touch of extremely fine sandpaper (not so fine that you polish the figure. lol.) will help solve this problem. You don't want visible scratches on the ball joint - just enough of an un-smoothed surface to allow the shoulder to gain some purchase on the ball joint and have friction do the rest.
So, yeah. That was a worthwhile adjustment to make to the figure and I thought someone here might benefit from the finding.
-Windebieste.Comment


Comment