

 Tweet
Tweet
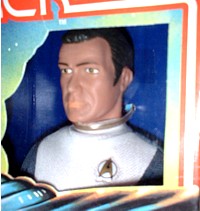
Hi I haven't done a custom for a while and the Micronaut Time Traveller has been on my mind for a while and when my local comic shop had some Khan figures cheap I decided it was time to have a bash at him! sorry for any bad pics they were taken with a camera phone
once I split the body in half the first thing i did was build a jig to make marking him up easier for me

I then marked the body out using masking tape for the width I would need to remove from the body, and the jig to mark the depth. I cut the front of the body with an exacto saw

and the sides were cut by using a sharp modelling knife, I avoided a cutting wheel, as I have not done this to a EmCe toys body before and wasn't sure what would happen. The only problem I had with this was I had to cut through the pegs that align the body at the bottom of the torso which was a bit hard going, but nothing to major


with the torso section removed I was now able to mak and cut the piecies that would be used to full in the section ready to make the removable chest piece


these sections then needed to be sanded down to the contours of the body before I could move on to the chest piece.
The back fill parts of the chest piece were nade from some strips of Styrene section glued togeather, and then these were once again sanded to the contours of the body tedious but worth it I think.

Once the piece was shaped to the body I started to add some of the side strips to the chest piece, at this point I thought it would be a good idea to test fit the piece so I reassembled the body to check the fit before I heated up the strips to fit them to the body properly.


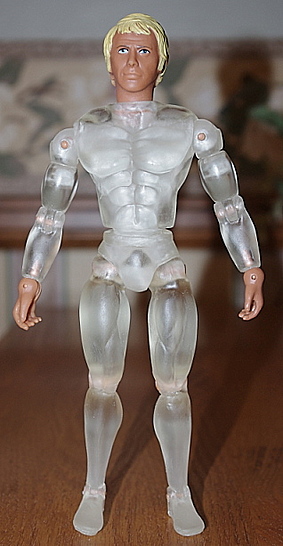
and this is just to show the Time Traveller to the Mego torso

Thats as far as I have gone for now, I hope to get a it more time on it later this week, to get the side strips fitted to the body and coverd with sheet styrene to finish the look, hope to get some more pics posted then
Hope you like it so far any comments greatfully appreciated
once I split the body in half the first thing i did was build a jig to make marking him up easier for me
I then marked the body out using masking tape for the width I would need to remove from the body, and the jig to mark the depth. I cut the front of the body with an exacto saw
and the sides were cut by using a sharp modelling knife, I avoided a cutting wheel, as I have not done this to a EmCe toys body before and wasn't sure what would happen. The only problem I had with this was I had to cut through the pegs that align the body at the bottom of the torso which was a bit hard going, but nothing to major
with the torso section removed I was now able to mak and cut the piecies that would be used to full in the section ready to make the removable chest piece
these sections then needed to be sanded down to the contours of the body before I could move on to the chest piece.
The back fill parts of the chest piece were nade from some strips of Styrene section glued togeather, and then these were once again sanded to the contours of the body tedious but worth it I think.
Once the piece was shaped to the body I started to add some of the side strips to the chest piece, at this point I thought it would be a good idea to test fit the piece so I reassembled the body to check the fit before I heated up the strips to fit them to the body properly.
and this is just to show the Time Traveller to the Mego torso
Thats as far as I have gone for now, I hope to get a it more time on it later this week, to get the side strips fitted to the body and coverd with sheet styrene to finish the look, hope to get some more pics posted then
Hope you like it so far any comments greatfully appreciated


Comment