

That's a great idea, photocopying the actual shirt pieces. I did my first few custom suits by tracing parts of a Mego body, and by scanning other clothing pieces I needed. Unfortunately, I don't have any Mego scale dress shirts, or anything resembling one. I know some of the sellers, like Dr Mego and CTVT sell shirts that are the right style, but they don't fit fat bodies.
I don't think converting the Ken jacket was too bad, because I like what I have so far. But looking at the way the shirt that goes with it is set up, I'm not sure it's going to work for what I need anyway. I'll come up with something. I am actually going to try using the top half of a jumpsuit pattern, putting the opening in the front, and adding a collar. It won't matter as much, because it will be attached underneath the waistcoat. Only the collar and sleeves will really be visible, because the overlapping part will be covered by a tie.
-
I thought of another idea! Maybe you can just photocopy the mego-scale shirt...and cut that out for a pattern...just leave enough fabric for the seams....you can redraw the pattern on your photocopy and cut that out.Leave a comment:
-
Del do you have any Mego scale dress shirts you can take apart to get a pattern from? That would be the easiest way to get a pattern...or just make one from scratch. It may take a few tries to perfect it and get the shirt to fit nicely, but it's much easier than trying to convert an existing pattern.Leave a comment:
-
This is my first attempt at taking that pattern and making a waistcoat. Without sleeves, the armholes are way too big and the back lays funny. I just need to fix those, and then it's on to making a dress shirt. If anyone has a good dress shirt pattern, I'd love to see it, because converting these Ken patterns is time-consuming.

Leave a comment:
-
I think I finally have a decent pattern for a double-breasted jacket, that will also fit a fat body. There are still a few puckers here and there, but I'm confident that this will work for some customs I have in the works. Next time, I might make the notches in the lapel a little lower and a little deeper, but I don't think think they look too bad here. The collar could be narrowed, depending on the style you're going for. This should also work for a waistcoat, if you make it without sleeves and shorten the bottom.

Leave a comment:
-
Well, I finally got enough work done on this to post. I'm not sure how it fit on Ken, so maybe it's not designed to close in the front. I cut most of the pieces down by about 1/2", and I'm happy with the sizing everywhere except the front and the collar. I think if I leave the front at its original size, it will lay more like a double-breasted jacket, especially on the Stooges body I'm using for the Sandman. I just think the collar needs to be a tad wider so it doesn't seem so bulky when I topstitch and fold it out.
I also need to work on the notches at the lapels. I think this effort looks better than the previous ones by a long shot, but the stitching came undone on one side when I pulled the right side out. Maybe I just cut it too close.
As you can see, it could work for T1 bodies, if you don't need the jacket to close. I'll keep working at it and continue to update when I can.

Leave a comment:
-
del how does that pattern look when it's flat, particularly the notched collar? Sometimes you just have to notch the fabric right up to the seamline before you turn inside out to minimize puckering. But you have to do this carefully or you may cut the seam by accident or your seam could fall apart when you turn the fabric right side out. And the most important thing is you have to iron as you sew.
I think the shoulder seams go out too far, but the bottom seam close to the waistline is fine. I would trim your pattern up by the shoulders but not at the waist and see if that fits better. Or, alternatively, you can turn your clothing inside out, place it back onto your figure, and then cut off the sleeves, cutting where your new seamline needs to be. Then, take apart your sewing and then redraw your pattern based on this new measurement.Last edited by jessica; Jun 21, '11, 11:10 AM.Leave a comment:
-
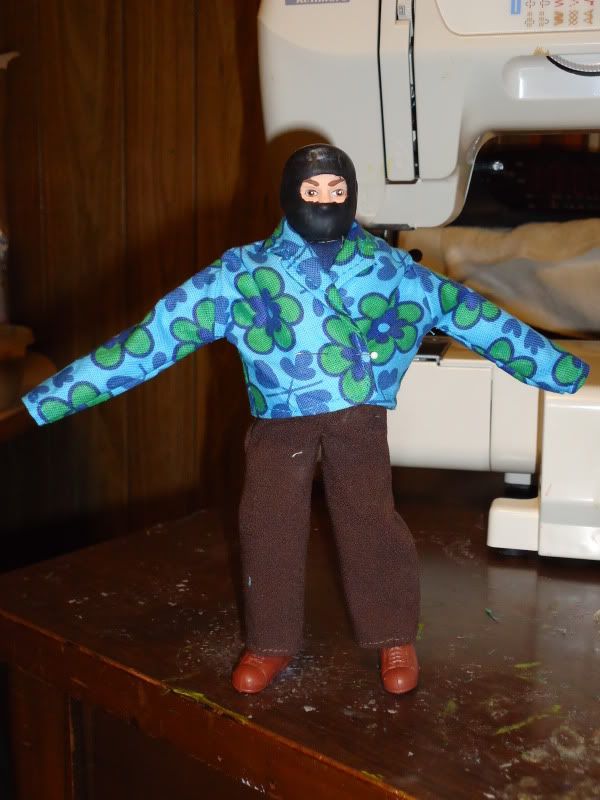
Getting There
I know, the sleeves need to be shorter. Since this is still a practice run, I'm not going to worry about them. I'm not entirely happy with the fit along the sides, especially where the armholes seem to stick out a little to far, causing the shoulders to hang low. There's also a lot of puckering around the neck and shoulders. Any suggestions what I could to fix that? Also, those little notches on the collar are going to take some practice. They are a huge pain in the butt!
Anyhoo, here are pics. I'll take any suggestions I can get to make it fit better and more smoothly.


Leave a comment:
-
The first thing I thought of is reducing them to 67% on a copier, but like Jessica was saying, the proportions are very different. A good example is how Barbie and Ken Trek uniforms wouldn't fit a Playmates figure, even though they're both considered 1/6. Shows how someone's first reaction might be way off.
Leave a comment:
-
-
-
^^Thanks Jessica. Right now I am measuring how much to take off the pattern. Recontouring the sleeve where it meets the armhole took a lot of guesswork, but I think I have it. Then I traced my new sleeve pattern against where the armhole is, to make them compatible with one another.Leave a comment:
-
Doll clothes are not simple, Del. They are harder than 1:1 scale, so you are doing wonderfully well.Leave a comment:
-
Leave a comment: