For my Nick Fury, prior to painting, I would simply add a small piece of electrical tape for the eye-patch and paint the cord of it in. I am sure you can figure out other solutions to this as well (fig. W). I have shown you how to paint several times before, so I won't go over it save to say that I typically paint in this order:
1) Base
color of flesh
2) Base hair color
3) Whites of eyes
4) Hair detail
5) Eye brows, irises, eyelashes
6) Lips, smile lines
7) Pupils
8) Stubble
9) Final details
Always use flat acrylic modeling paints. I don't seal my paint lately as I like the nice flat look and I don't plan on getting them wet. Work slowly on this and don't get impatient (fig. X)
Now, we are almost done! But how to fit the head onto the body so it won't pop out. This is simple. Simply wrap a short length of PVC (electrical) tape around the neck plug tightly. It will widen out, but compress enough in the neck hole to give a nice, tight fit. It is important that when doing this, you press the head STRAIGHT down into the neck hole, and that if you twist it in like a cork, you only twist in ONE direction, otherwise the tape will buckle up and snag. You actually might want to fit the head to the body BEFORE painting b/c that way you won't ruin your paint job by forcing the head on.... your call, though (fig. Y). And that's all there is to it!
SPECIAL SOLUTIONS: I was recently at the Dearborn, MI comic show and Flattworld Figures was there, and I got to see some Flatt originals up close. What particularly impressed me was one of Charlee's innovations that allows his custom heads to look in all directions, not just spin around. It's accomplished by rounding off the base of the neck, and attaching it via elastic to the post that runs through the pelvis of Mego bodies, like on the female figures. To make this, simply sculpt the head as before. At the end, however, prior to painting, use your large X-Acto knife to whittle down the neck into somewhat of a blunt point (fig. Z.1). Use coarse sandpaper or a Dremel to sand the base into a nice, round, bottom (fig. Z.2).
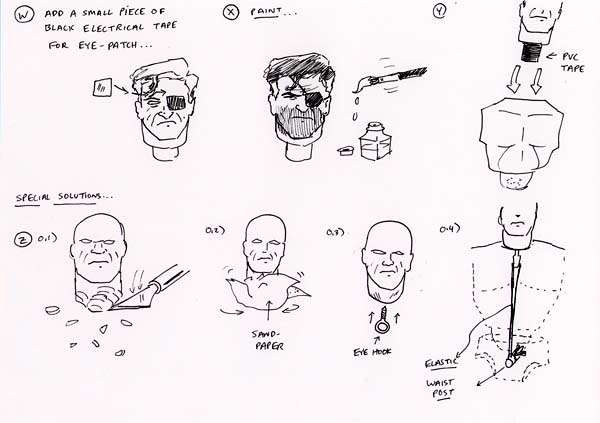
Take a VERY SMALL eye hook and drill a starter hole for it using a small drill bit, in the bottom of the neck of your head. I can't stress enough that the eyehook be small, otherwise it could cause cracks to form in your sculpture as you thread it in (fig. Z.3). Thread a length of elastic through the hole and tie the two free ends around the pelvic post (Gawd, that sounds obscene!) of your Mego body, and you now have a head that can look up and down, side to side, cock its head to the side as well.
See my close-up head sculpts of The Phantom, The Flash II, Dark Knight Batman, and Captain America to see how this looks.
Well, that's all for this time. I hoped this helped you guys with your sculpting woes (Scott Metzger). I know I kind of flew through some sections in this article, so if you have any questions, feel free to e-mail me at : [email protected]
Note: I will NOT respond to any e-mail that incorrectly addresses me as "Jay" when my first name happens to be "Matt." Sorry, just a pet peeve.
Join me next time when my article will show you how to make custom hands of different poses, and how to make posable hands!
Until then (this is funnier if you imagine John McLaughlin of the McLaughlin group saying it), Happy Customizing, Feliz Navidad, Merry Christmas, Happy New Year, Chanukah, Kwanza... Bye Bye!
Matt

