Customizing -- Green Lantern
by Matthew Jaycox
Here he is. The Granddaddy of them all. The figure that, if you want no other customs, you want this one! I of course speak of none other than the Emerald Avenger, Hal Jordan, the second, and still the coolest, Green Lantern (save your letters, Alan Scott and Guy Gardner fans!).
I've gotten alot of requests for a How-To on this figure, but I've put it off b/c it requires some tricky sewing that beginner readers of mine probably weren't ready for. Now is the time though. This will be my last Figure customizing article for a little while. Instead, future articles will focus on such things as making accessories, specialty clothing items, making your own packaging etc... Future figures from here on out in articles may be chosen on the basis of how many requests I get for How-To on them. E-mail me with your preferences. My complete list of all the customs I have made will appear at the end of this article for you to refer to.
Back to G.L. This figure will dress up your collection in a way you just don't realize until you see him standing with his other JLA counterparts. Get him right, and Mego fans everywhere will think you are a genius. Plus, on another level, we owe it to the guy to immortalize him since he appears on the Hall of Justice playset decals.... especially since D.C. in their all-seeing wisdom decided to have him leave D.C. universe continuity not by retiring or dying gracefully in battle-- NO that would show too much respect. They make him go crazy in a gender-bending rip-off of Marvels' Dark Phoenix saga and then have him kill himself! What the hell is wrong with D.C.?!? Every time they want to boost sales they kill or paralyze someone (Robin II, Batgirl, Batman, Superman, Flash, Green Arrow, Green Lantern), and usually someone whom I think is cool.
Now c'mon, let's give him the respect he deserves.
That said, let's get started!
Materials [HEAD]:
- A Sir Galahad/ Will Scarlet head
- Super Sculpey
- Acrylic modeling paints, flat
- Clay sculpting tools (stylus, smoother, prods)
- X-Acto knife
- needle point files and sandpaper
- Bondo auto repair plastic jelly
- A/B plumber's epoxy or Miliput [or Alumilite A and B resin with mold
release]
- Pam Cooking Spray
- Vaseline
- Lego Block mold box
Materials [costume]:
- Emerald green poly-interlock (spandex) fabric (flat green preferably)
Note: this farbric streches not only up/down but left/right as well, as
opposed to jersey which only stretches in one direction
- Black Spandex
- Tape measure
- Grey-Silver ribbon tape, approx 1/8" wide
- Sew on snaps
- Pins and needles
- Green thread
- Sewing machine and the skills to use it
- Flimsy white vinyl (for gloves)
- White sticker labels, circular, diameter approx 3/4"
- Green Markers, black felt tip pen
- Super Sculpey (for ring)
PROCEDURE:[Costume]
1) Take out the type II body you will use. Take your tape measure and start making measurements, such as the arm length, inseam, length from neck to crotch, length from neck to waste. Write these down and draw a pattern as shown in (figure A). Add 1/8" seam allowance to all seams. I have not given you the measurements, but that is how your pattern for the torso should generally look (figs A+B). Most people can make the patterns, they just don't know the order of the sewing, which is where I can help!
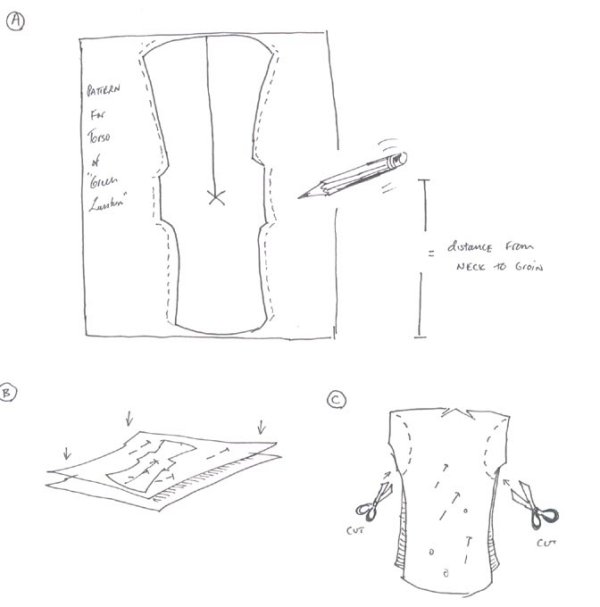
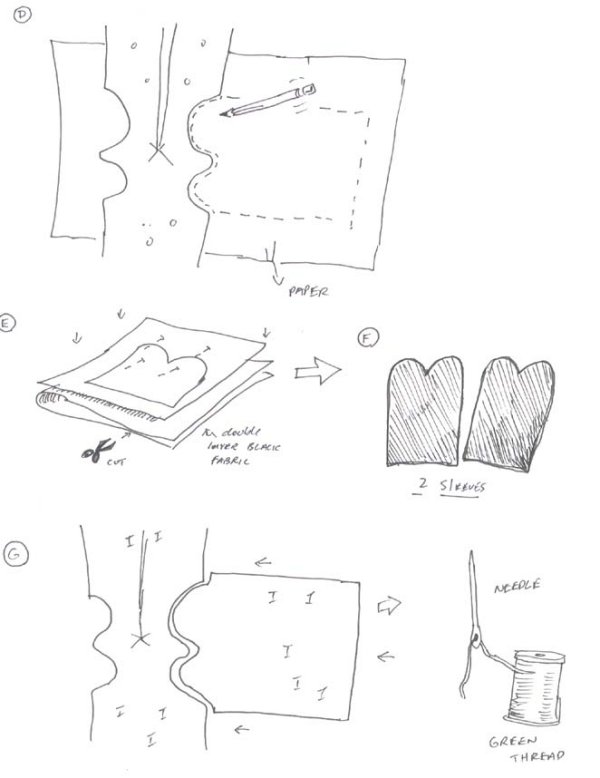
2) Lay your shirt pattern down on a single layer of Green fabric and pin the pattern to the fabric. Cut out along the lines. Remove the pattern and pins (fig. B). Fold the torso along a crease at where the shoulders will be (fig. C). Cut out the 2 semi-circles as shown. Lay your green torso down on a sheet of white paper, opening up the crease, and trace along the cut line. Draw this out an appropriate length for the arm pattern. Add 1/8" seam allowance (fig. D). Pin your pattern to a double-fold layer of black fabric and cut along the pattern lines. You now have two matching sleeves (figs. E+F).
3) Align the edge of your sleeve with the edge of the torso as shown in (fig. G). Make sure both of the I-sides are facing you. Get ready, it's time for some hand-stitching. Instead of screen printing on the black of this costume (which is what I'm sure Mego would have done), we are actually going to sew it on. But it is a tricky stitch, and a little complicated for a sewing machine, so I'm going to save you all a headache and show you how to do it by hand. It's very important to work very slowly when handstitching and to be patient so as not to make mistakes.
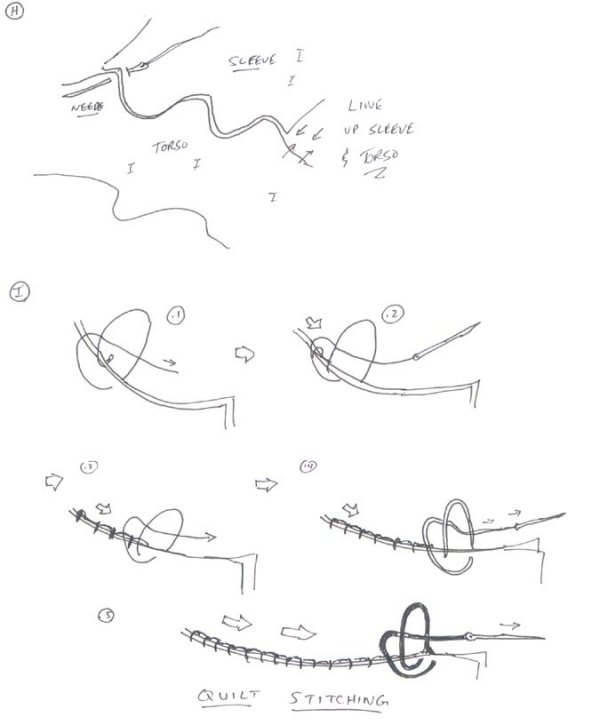
4) The type of stitch we are going to use is called a "quilt stitch." This is very similar to a normal "loop-running stitch" which many of you may know without actually knowing the name of it, however, with one slight modification. With a quilt stitch, you stitch a loop, but before pulling it closed, you begin another one and feed the end of the thread through the previous loop, and then pull the loop closed. This ties off each individual stitch and makes for a stitch that won't unravel on you and is very strong. It also makes for a straight line across the top of the stitch. Refer to (figs. H+I). So your two pieces of fabric are aligned as seen. I stick the needle through the black first, then through the green (fig. H). My thread has a knot in the end so it won't pull through. I make a loop away from myself (fig. I.1), go back through the green, then the black, but before pulling loop 1 closed, I feed the end of the thread through loop 1 (fig. I.1), and then pull it closed over the thread. (Figs. I.2-I.5) details a series of quilt stitches. Again, the order of the stitch is: Over, Back, Around, Through the loop, Pull closed. This is easily remembered with the mnemonic; "Our Baby Always Talks Preciously..." Stitches should be spaced about 1/16" a part and should begin about 1/8" below the edge of the fabric. Keep your stitches small and tight or they will show dramatically on the other side when the garment is turned right side out.
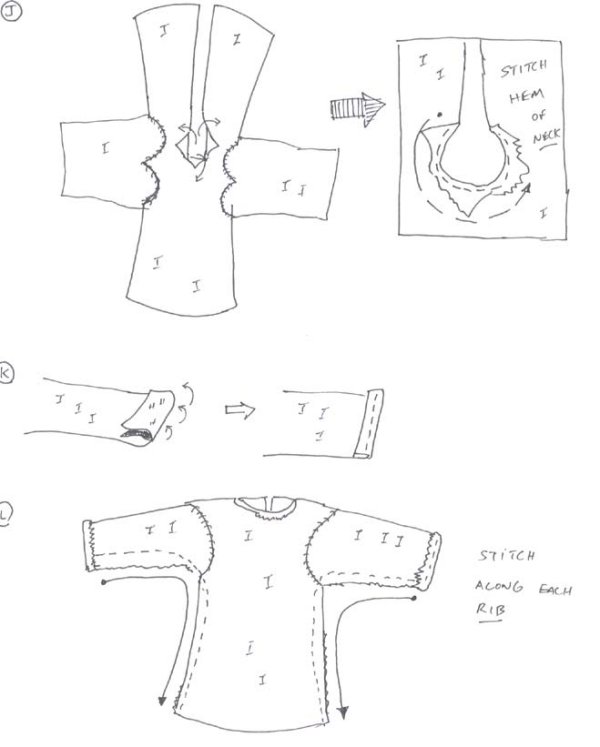
5) Okay, now you've stitched on both black sleeves. Now fold down the hem of the neck and stitch it as shown in (fig. J) Fold back the hems of the sleeves toward you and stitch them as well (fig. K). Repeat for other sleeve.
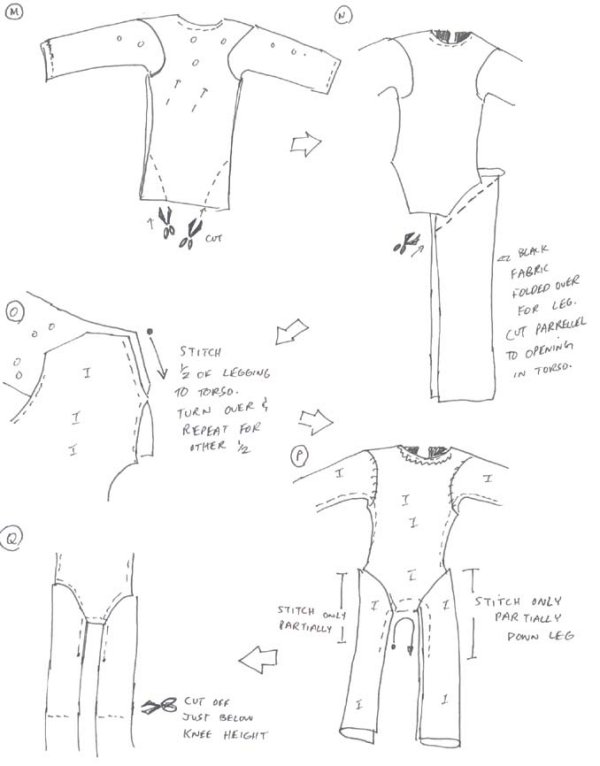
6) Turn your torso inside out so all of the I-sides are facing you and align the seams of the ribs and arms. Use pins to keep in place while stitching from the wrists towards the hips (fig. L). Keep in mind that Spandex STRETCHES, so it is okay to sew the arms narrower than the actual size of the Megos arms. It will stretch and show off the musculature quite nicely. Turn your garment right side out again and cut two right triangles out of the lower corners on each side of the torso while it is pinned in place (fig. M). Take along strip of black fabric that, when when folded over, is enough to fit one leg inside. Lay your torso over the fabric fold as shown in (fig. N) and cut the black fabric parallel to the leg openings in the torso (fig. N). Repeat for the other leg.
7) Turn your torso inside out again and with the I-side facing you, lay it down on the opened up legging whose O-side was facing you. The legging now resembles a long tower with a "roof." align the edge of the roof with the appropriate edge on the trunk of the torso. Stitch one half, or one "roof edge." Stitch the other "roof edge." Repeat fort he other leg (fig O).
8) Stitch the crotch and legs partially closed. Only stitch each leg as far down as mid thigh. See (fig. P). Cut off the excess black spandex just below where the knee would be (fig Q). Cut a short strip of green spandex the same width as the black. Turn the legs right side out so that the O-sides of the legs are facing you. Align the edge of the green fabric whose I-side is facing you with the edge of the black fabric leg (fig R.). Stitch the green to the black (fig. R). Repeat for the other leg.