Hi all--
Well I've finally followed through-- here is the long-awaited article on "Learning How to sculpt your own Mego heads."
I had originally envisioned this as being a sort of photo essay, but none of the photos I would take ever would turn out nice and clear and sharp. I will amend this article one day with photos (perhaps when I get a digital camera or someone lends me theirs), but for now this article is entirely pen and ink-illustrated. Though I have tried to be clear as possible.
Okay, now onto the sculpting. The very first, most important lesson I could teach you is to BE PATIENT! Sculpting is hard.... but it can be learned with practice and patience, and especially if you learn to keep a clear head and not get frustrated.
But, more than anything else, it is a task which requires the proper tools. Without the right instruments, you simply won't be able to produce much that looks good. So, you might as well prepare yourself for the financial hit of picking up some of the following items. Were possible, I have included some cost-cutting measures.
TOOLS YOU WILL NEED: Many of my tools were customized by me to fill my exact needs. Many people will swear by old dental tools, but I have found little use for them and you will pay a lot for them many times at the flea markets. The ones I've listed below are the only ones I even use, and they more than get the job done. Here is a brief description of each.
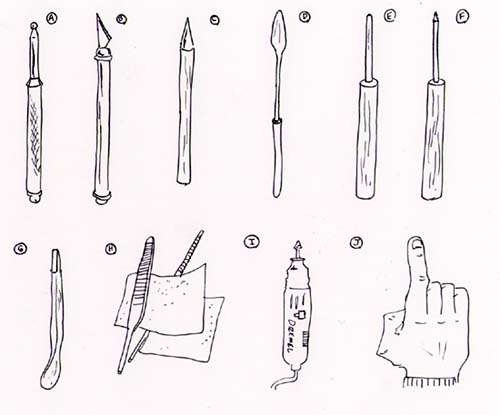
A) BALL-POINT STYLUS (BP-Stylus). This tool is made of stainless steel and is good for a number of uses such as rolling seams with the beveled tip or pressing in indentations for things like dimples. It is available from crafts stores in the sculpting and clay aisle. Price is $2-4.
B) X-ACTO BLADE. Highly important tool with a number of uses which will be seen later. Good for cutting hard and soft material and for fine detail work. I actually have two with different size blades. Make sure you have a package of spare blades, because you will go through a few. Price: (knife with spare blades) $6-7.
C) PENCIL TIP ROLLER. This is good for flattening clay and for rolling out imperfections or fingerprints or smoothing seams. I made mine by simply sticking one end of an old wood paintbrush handle into a pencil sharpener, and then sanding it to a nice fine point. price: negligible
D) MICRO-SPATULA. It is not necessary that your equivalent tool to this actually be a micro-spatula (a tool used in chemistry labs to measure out fine amounts of powderous materials), mine just happens to be one, so that is what I will call it. Many times they are available from college book supply stores. If not, simply make one by sanding down an old pop-sickle stick into the indicated shape with sandpaper. This is a great tool with many uses. price: 0-$5
E) REGULAR STYLUS. (R-stylus) This will be your most versatile and best tool for fine detail work. It can shape clay, remove it, drag lines, press in indentations, and round surfaces. They are very hard to fine, so had to make my own. It is different from the BP-stylus in that it has no ball-point tip. It simply has a straight, rounded, blunt tip. I made mine by sticking a rounded, blunt, heavy knitting needle into a piece of 3/4" doweling that was about 3.5" long. You can sand the doweling down to give a comfortable grip to your hand. Price: needle and dowel rod: $2-3.
F) POINTER (THIN STYLUS). Even though this is basically the same as the last tool, only thinner and with a sharper point, I call it a pointer b/c its functions are different. This is very similar to a tool found in most dissection kits which you can pick up at some hobby stores. Though I just made mine by sticking a large (though smaller than the one in E), sharp needle into a piece of 1/2" doweling cut about 3.5" long. Price: $2-3
G) 2-PART SMOOTHER. This tool comes from boxwood clay modeling set. You can buy a set like I did for around eight bucks, but this is the only tool I use out of it. It has a fin smoother on one end (like the fin of a fish), and a semi-circle smoother on the other end. I use the small end for indentations such as, at times, eye sockets. I use the large end for smoothing out large areas of clay. You will probably find, however, that the semi-circle end is too large for your purposes. No matter, simply sand it down until it is about 1/8"-1/16" wide and more flat. Remember, the smaller the tool, the finer the detail you'll be able to achieve. Price of a whole set: $7-9.
H) NEEDLE-POINT FILES AND SANDPAPER. These are very critical to have. Needle point files are used for such things as fixing eye-glasses or sharpening the teeth of saws. They can be found at the hardware store and a set usually includes about 6 files: a round file, a square file, a flat files, a semi-circle file, and two others. Sandpaper should be bought in coarse and fine grades, a lot of it. You will use it quickly.
Price: (for sandpaper and file set) $20.
I) DREMEL.* This is the microwave oven of customizing/sculpting--you'll never understand how you got along without it. I worked for a year and a half on customs before I got mine, using only files and sandpaper-- this thing was like the holy hand grenade. It made so many things so much easier. The Dremel is similar to a drill but is smaller and handles more like an electric screwdriver than like a drill with bits. It can fitted with a number of specialty bits which can sand, file, smooth, saw, engrave, and polish almost any plastic surface, save vinyl. You may need to buy some small fine bits for it, but much of what you need will already be packaged with a standard set. Remember, you are not doing woodworking or embossing marble, so the Dremel you get does not need much torque (rotational force), so you really don't need to get the super-duper top of the line model. However, I would recommend AGAINST a cordless model because what you gain in ease of handling, you lose in life as any one battery pack only gives about 25 mins of work time for every 3 hours you take to charge it. At this rate, you'd want a second battery to be charging while you discharge the first one, and then you're starting to talk some major dollars when you start buying extra batteries. Plus you always have to have a free outlet to plug it into to keep it charged. All in all, I'd say go with a standard, two-speed Dremel.
CAUTION: It is important that you use appropriate eyewear when working with this thing, few things have ever hurt worse than a stray shaving of plastic in the eye!
Price: $45-60 (keep an eye out for sales at Wal-Mart). Stick with the "Dremel" brand--don't let them try and sell you on a Black and Decker equivalent--finding the parts will be a pain in the ass! Note: a fine point craft extension arm can be bought for a standard dremel for finer detailing work and ease of movement when working. I have bought one, though have yet to try it out. It runs around $30.
Note*: Though I recommend anyone who is serious about sculpting/customizing to pick one up, I will write this article assuming you don't own one, and then you can decide for yourself if it's worth your money.
J) YOUR FINGER: Believe it or not, this is the single most important tool in your sculpting arsenal. The majority of all the shaping, smoothing and general application of clay will be done by your finger. Keep it smooth and free of calluses. Use hand lotion and nail files so that it will not snag the clay when you work. And the best part is you already have it.
Okay-- so there's the tools... But what about the Medium? What do we Sculpt in?
We will use what is known as a polymer clay. This is a plastic-based clay that hardens when it bakes yet has the resiliency and feel of plastic. There are several brands on the market. Some people swear by Fimo, but it chips too easily for my taste.
Some people like regular Sculpey, and are drawn to it because it is available in so many different colors, but it just doesn't have the reliability of...
.... the customizer's best friend, SUPER SCULPEY. It is exceedingly easy to work with, rather inexpensive, has many great uses, can continuously be added onto, can easily be sanded and painted, and is (its best feature) highly Chip and Shatter Resistant. When it cures it is very lightweight as well. It is available at most crafts stores for around $10 per box. It may remind you a bit of silly putty.
Okay, so now that you know what you need, get up off your can and go get it. When you return, I'll show you how to begin with the basics.... What're you still sitting at your computer for, reading?!? Get going!

