
 Tweet
Tweet
I Would like to know how to use cardboard boxes to make custom mego playsets.
-
-
I haven actually done this yet, but I have given it some thought. I would start with pictures, drawings or whatever you are basing it on. Then draw out plans on large sheets of paper making templates of the pieces you wish to make. Then use those to cut pieces out of the cardboard - I would use some good thick and sturdy cardboard- and paint/detail as desired. From there you could assemble using any number of cardboard safe glues. Or use rivets to give that Mego feel to it. You might even check around to see if the pieces can be laminated before assembling. This would really look more like a vintage set then. From there, add accessories and so on. Anyway, that's my two cents...Looking for:
--Lion Rock "Mr Rock's" shoes/ boots (these may also be the same as the lion rock monster line boots)
--Mystery Astronaught -
>I Would like to know how to use cardboard boxes to make custom mego playsets.
That covers a lot of ground.... For a good start, get a copy of the "Woman's Day Book of Best Loved Toys and Dolls." It has the plans for Supercity; greatest 8" Mego playset ever. You might be able to find the book at the library. If not, I got one on ebay for less than $5. (It has the plans for a 3.5" space station playset too.) That'll get you started, and give you an idea of what sort of stuff you need to plan, and how stuff should fit together. Be careful though; some of the numbers are a bit off. (Nothing serious, but a few things need a little tweaking to get right.)
Poke around appliance stores and ask if they'll let you have the empty crates. Sometimes they do, sometimes they don't; but it's a good way to get the large corrugated pieces you'll need.
Oddly enough, I've never posted complete pics of the city, but there are some shots of parts of it here:
It takes up a LOT of room.
Don C.Comment
-
City Building
Ah, cardboard playsets! I love those, but as ctc says, they take up a lot of room, especially if you're making them for 8" figures. To set up a nice cityscape, it would take up a whole room.
It all depends on what you want to do... did you want to stage bank robberies, where the action is actually outside the bank as the criminals try to speed away? Or are you trying to set your action indoors, like a Batcave, or a Swan Station from "LOST"?
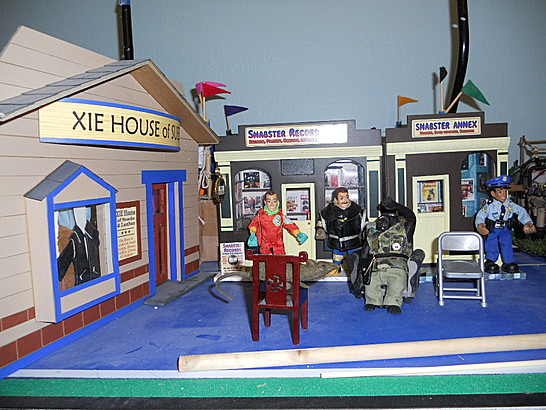
So, the alternative is to take some cues from movie setmakers and Disneyland. They make false-front building just to film exterior shots. The buildings don't actually have true depth. Here's an example of part of my miniature world. The clothing store is made from cardboard, but it is a false front with no actual store to go in. The record shops are actually only 1.5" deep- just enough for the illusion of an actual store, but nobody is really going to shop in it.

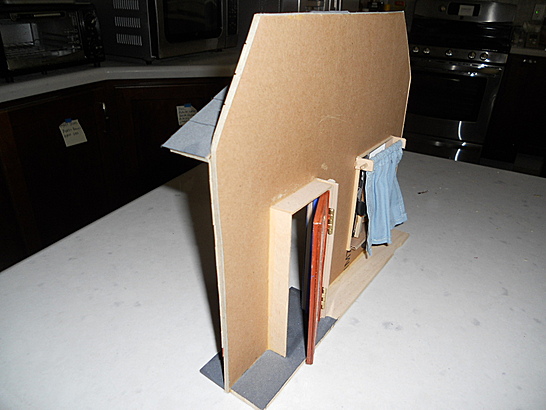
You could make a bunch of false-front buildings, put them against a wall, and set the action on the floor in front of the buildings. No one will know the difference. Then, you can make only 1 or 2 truly 3-dimensional buildings for things to really happen indoors. It is possible to create them in a way so they fold up when you're not using them. There is a whole science behind cardboard boxes, and how to make ones that fold up for storage, but can be quickly unfolded, filled with merchandise and then mailed. They have diagonal folds on the bottom, and require no tape to assemble. Certain office moving boxes are like that, and our office admin had gotten shipments from Staples in those kinds of boxes.
Then a false front can be added. You could add tabs to the false fronts, and then drill holes in the cardboard boxes and use Mr. McGroovy's cardboard rivets (Google them) to attach them.Comment
-
-
Copies of the Woman's Day book with the Super City plans are plentiful and inexpensive on Amazon: https://smile.amazon.com/Womans-Book...Toys+and+Dolls
Even if you have no intention of building the thing, the plans and pictures are fab.I have never kissed the editor of the Radio TimesComment
-
You can do the facade method ZMOQ used for exteriors and apply them to an interior display as well. I have used craft paper from Michaels to simulate wallpaper for indoor scenes.Comment
-
Depending on how you put it together, you can "laminate" the surface with clear Con-Tact adhesive covering. Keeps it safe and keeps anything from rubbing off on figures if they brush up against it. I made a big monster castle facade that way, basically drawing up a repeatable stone pattern and copying it off multiple times to basically piece it together like a jigsaw puzzle on the thick cardboard (this was back before I actually had a computer and a printer). I then covered the whole surface with the Con-Tact and assembled it (it was made to slot together and could then be taken apart and stored relatively flat). Seemed to work well. Nowadays I probably would have used foamboard for the main walls and such rather than cardboard as it's a bit thicker and stronger.Comment
-
I went to our TRU over the weekend (I hadn't been in years because it's clear out in what used to be the country), and they had a thing called the (deep breath) Playmation Marvel Avengers Home Base Stand Activator & Repulsor. It's a playset meant to go with an action figure/gaming system. The interesting bits are two transparent background panels made to look like MCU computer displays, and a floor that I can only describe as Tron-ish. It could be useful as a playset or photo background, especially if you put something behind the transparent panels to look techy or outside or whatever you like. (If you're good at small-scale lighting I imagine you'd have a grand time.) Make it some more walls, use it as a backdrop, whatever. It's quite large when set up, and while it doesn't fold flat, the box is the size of a couple-three LP box sets. Best of all, at least in the store, it was marked down to a budget-friendly $1.98. For that, I'm happy to experiment and bust out the duct tape.I have never kissed the editor of the Radio TimesComment
-
Greetings Fun Guy!
I have had a small amount of experience making playsets / dioramas using cardboard as a base. In the tradition of MEGO’s vintage playsets, you can spruce up the look of the final product by dressing up the plain cardboard with basic arts and crafts skills and adding nice accessories around it.
Two years ago, I decided that I wanted to showcase my 9Art Brand of Custom Action Figures at MEGO Meet by posing them within fun, impressive playset / dioramas that would be really eye catching.
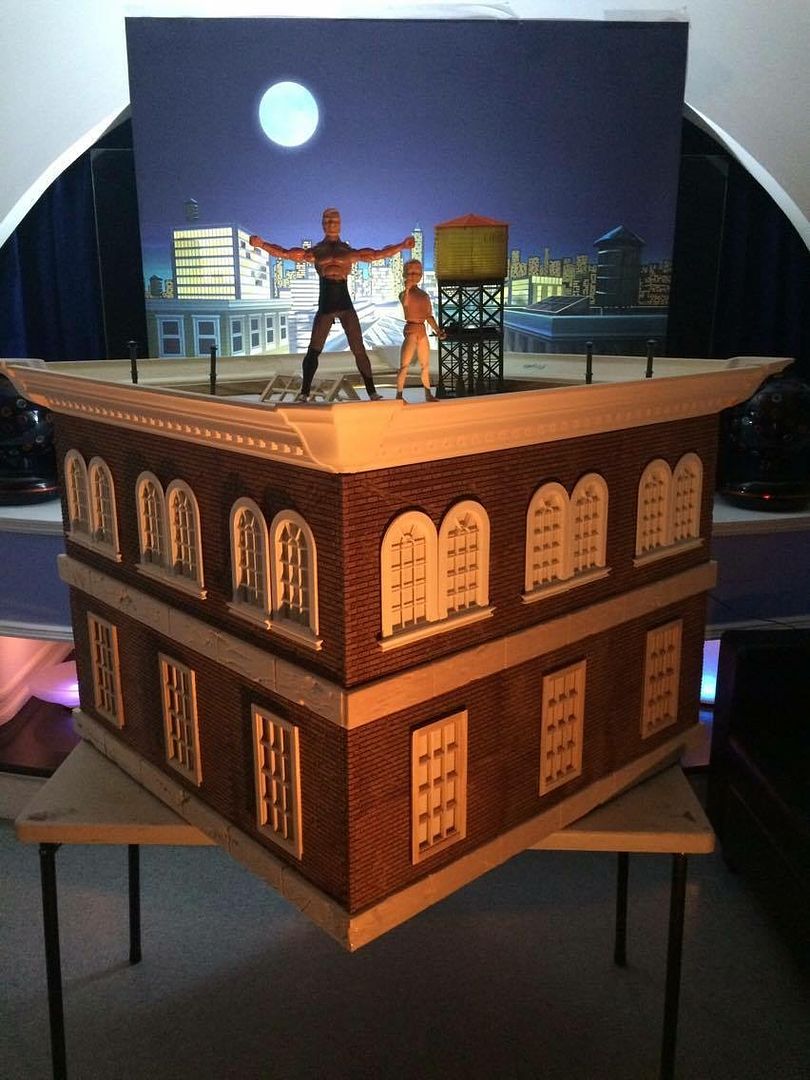
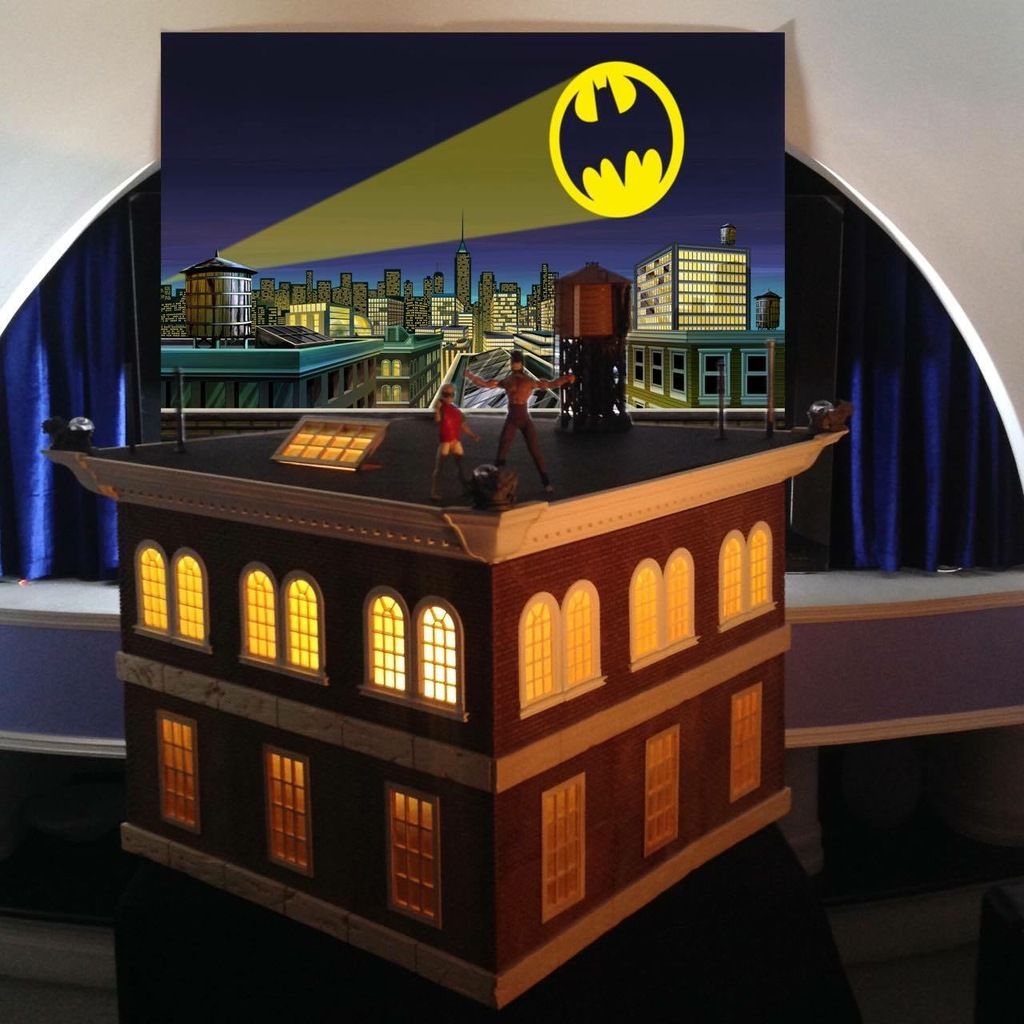
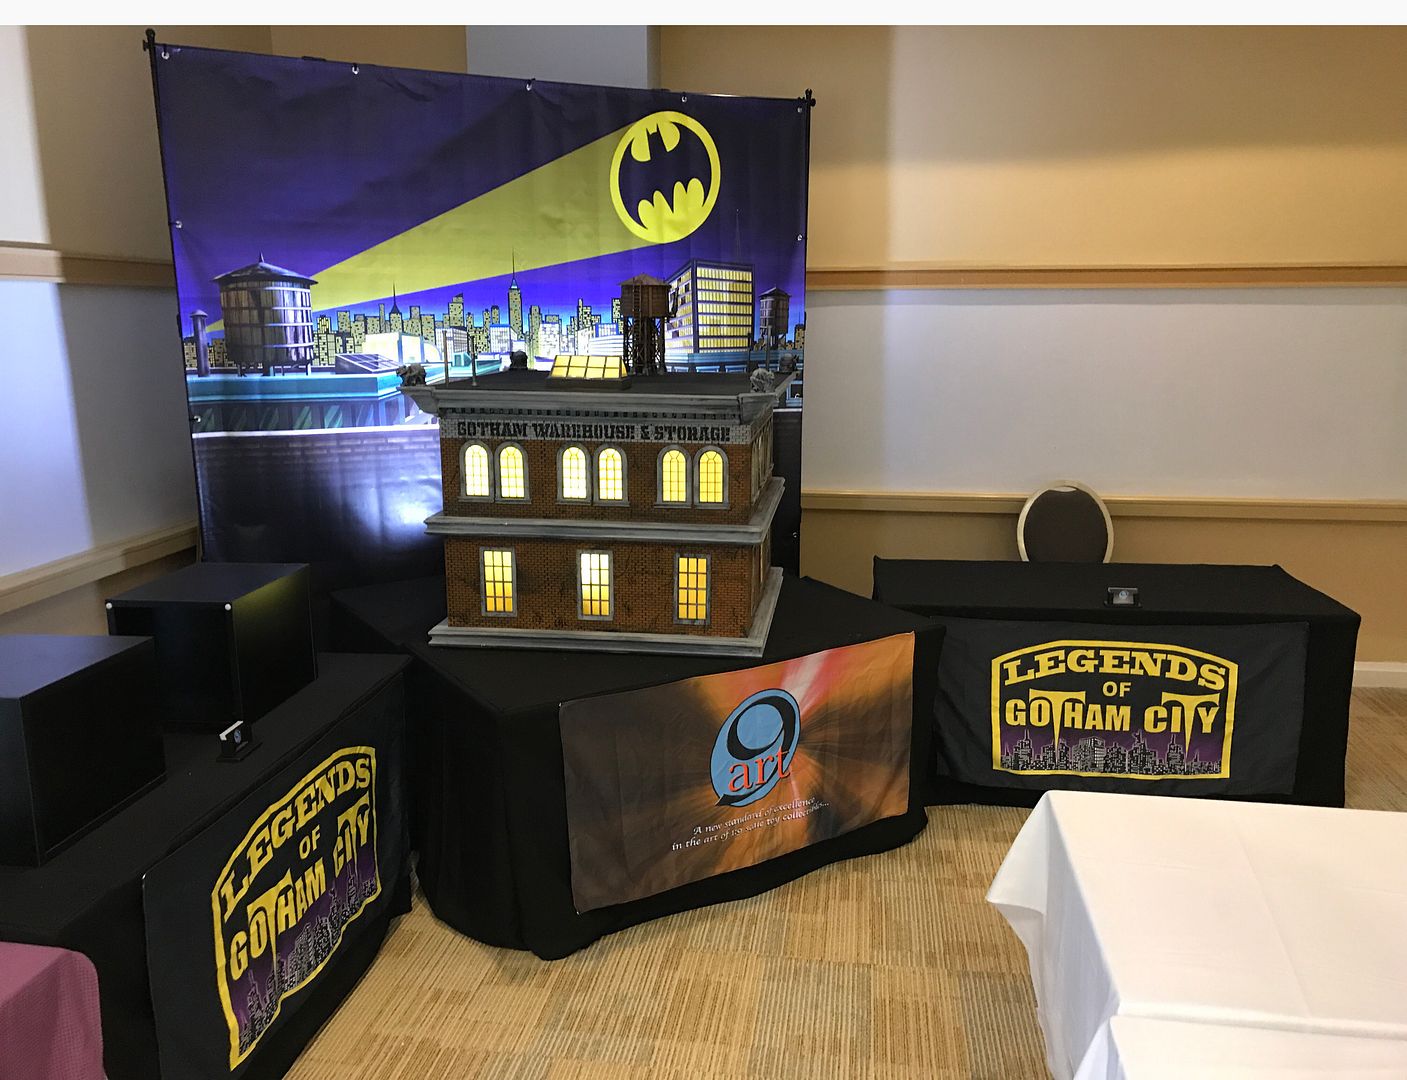
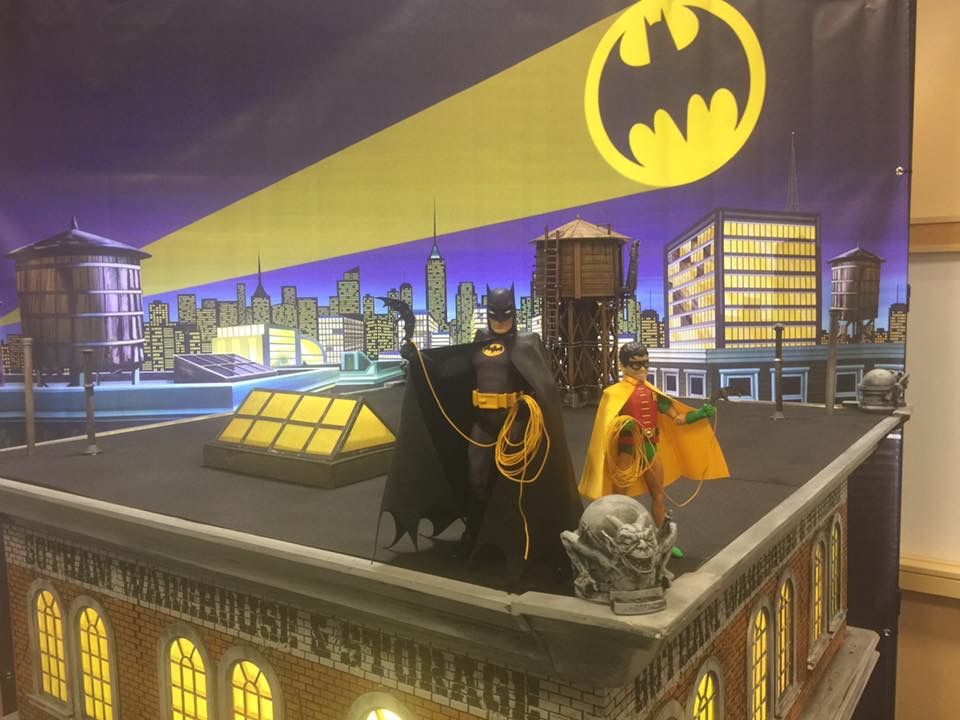
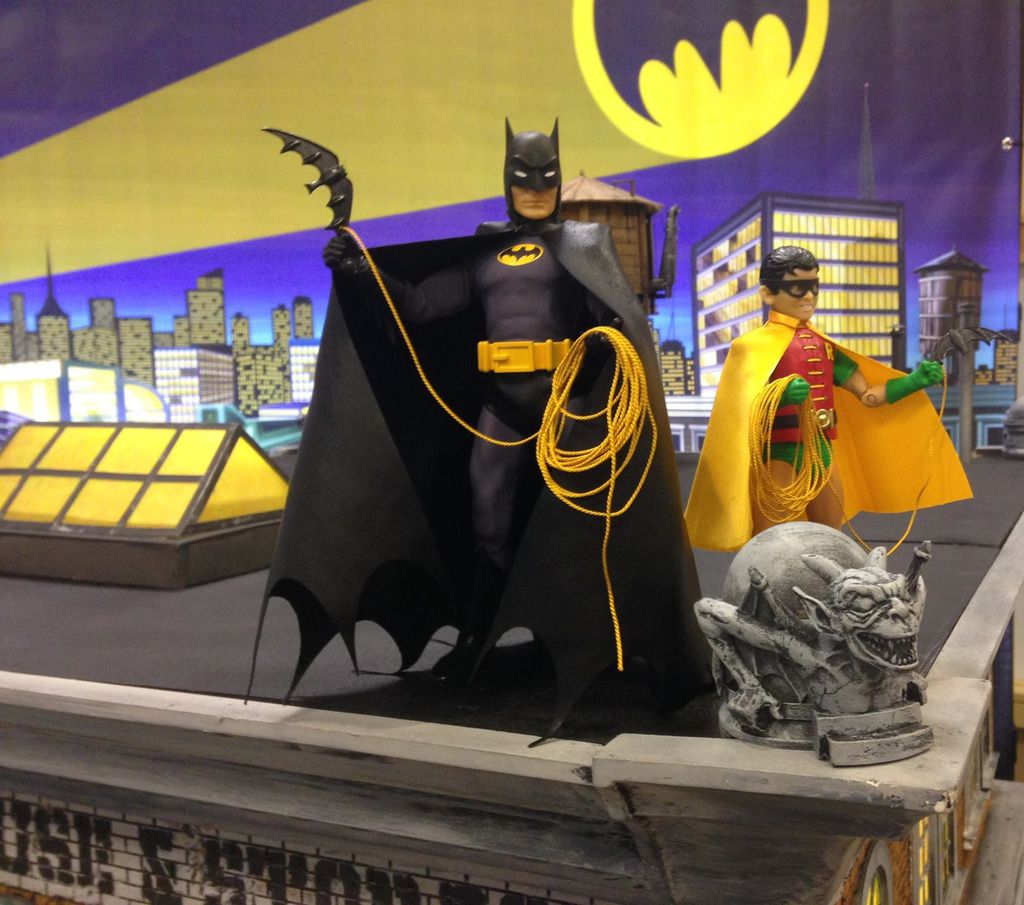
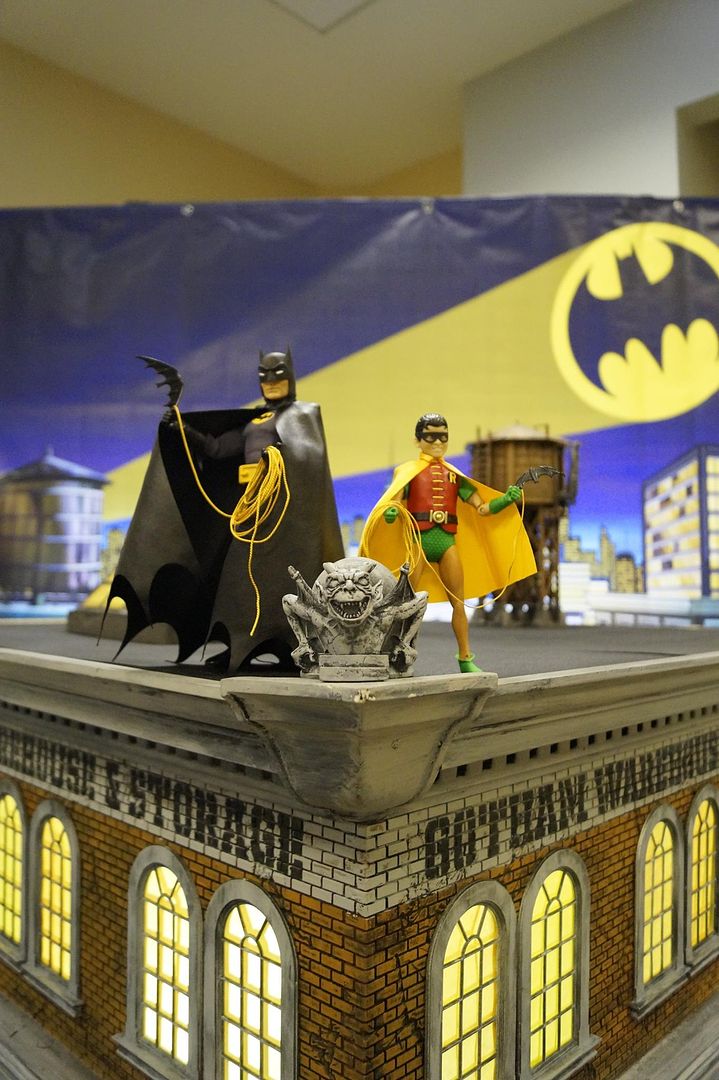
For my biggest playset, I decided to construct the top two floors of a warehouse building in Gotham City (with a fully detailed rooftop) to showcase the custom Batman and Robin figures I was planning to display.
I actually began by purchasing a large white corrugated cardboard box measuring 36” wide X 28” tall X 36” deep. This would be the structural basis for my Gotham City Warehouse.
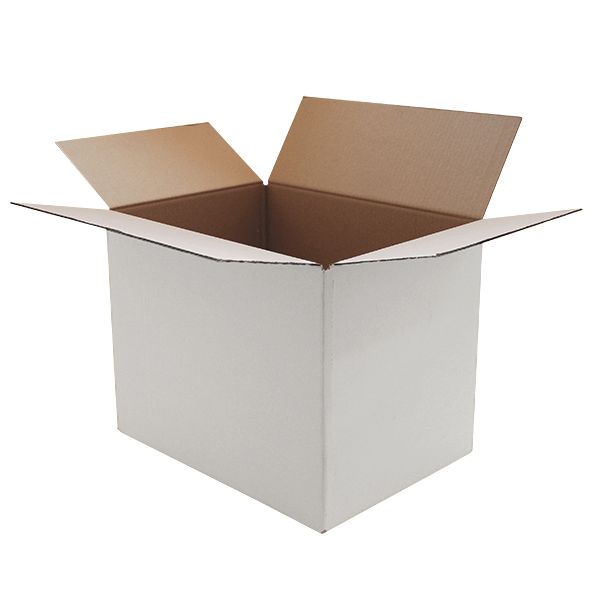
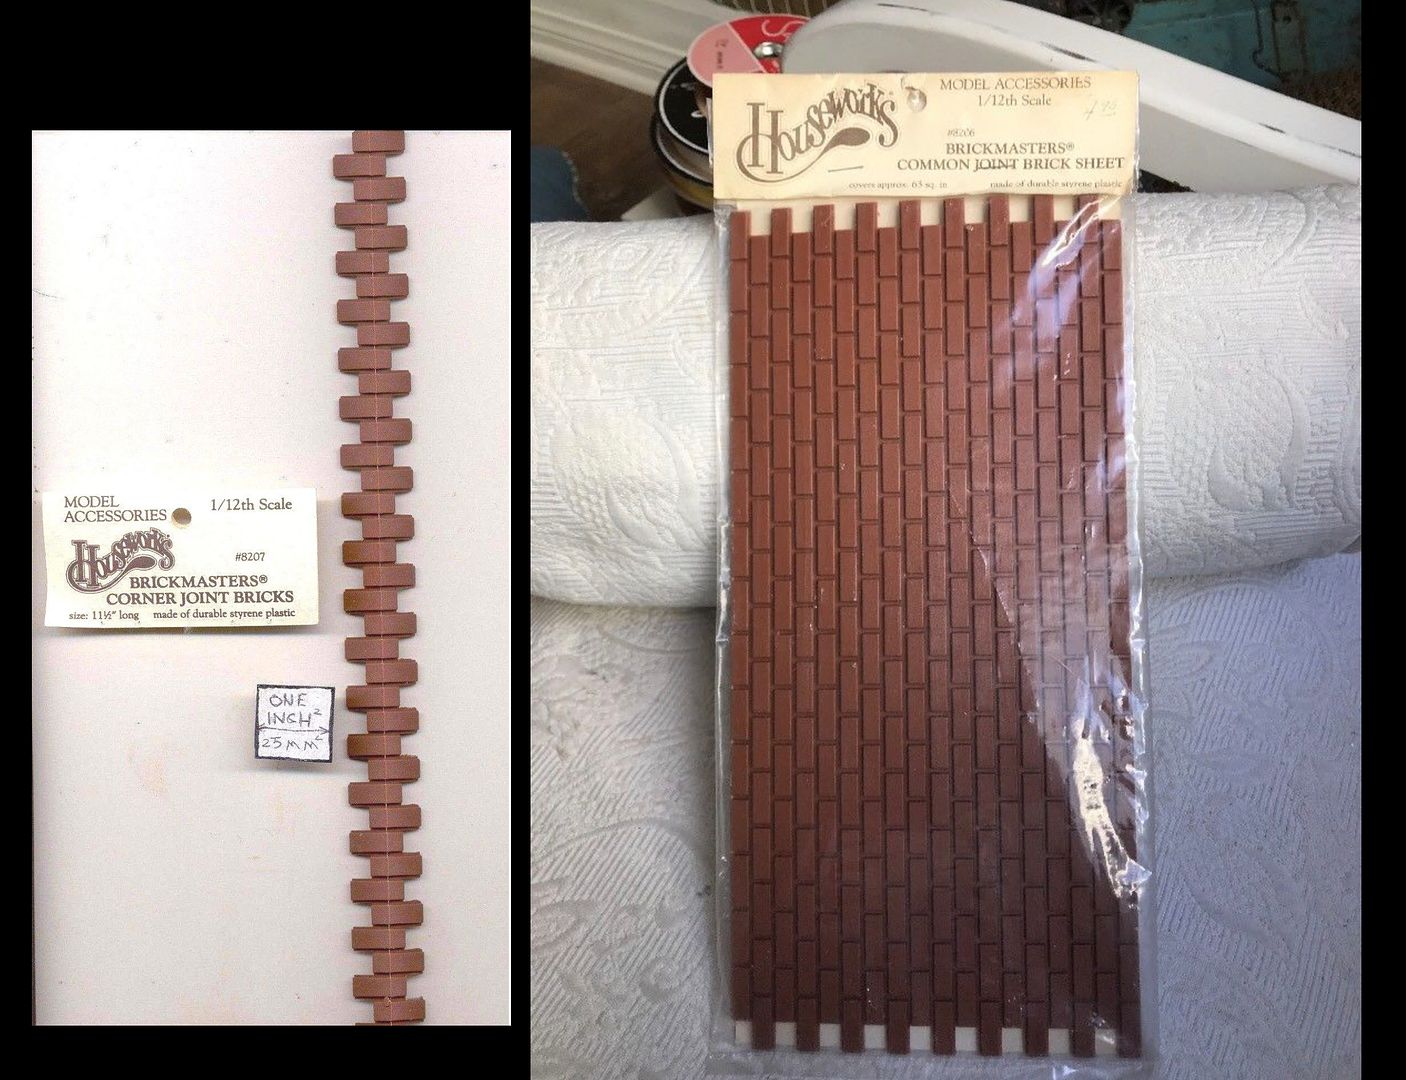
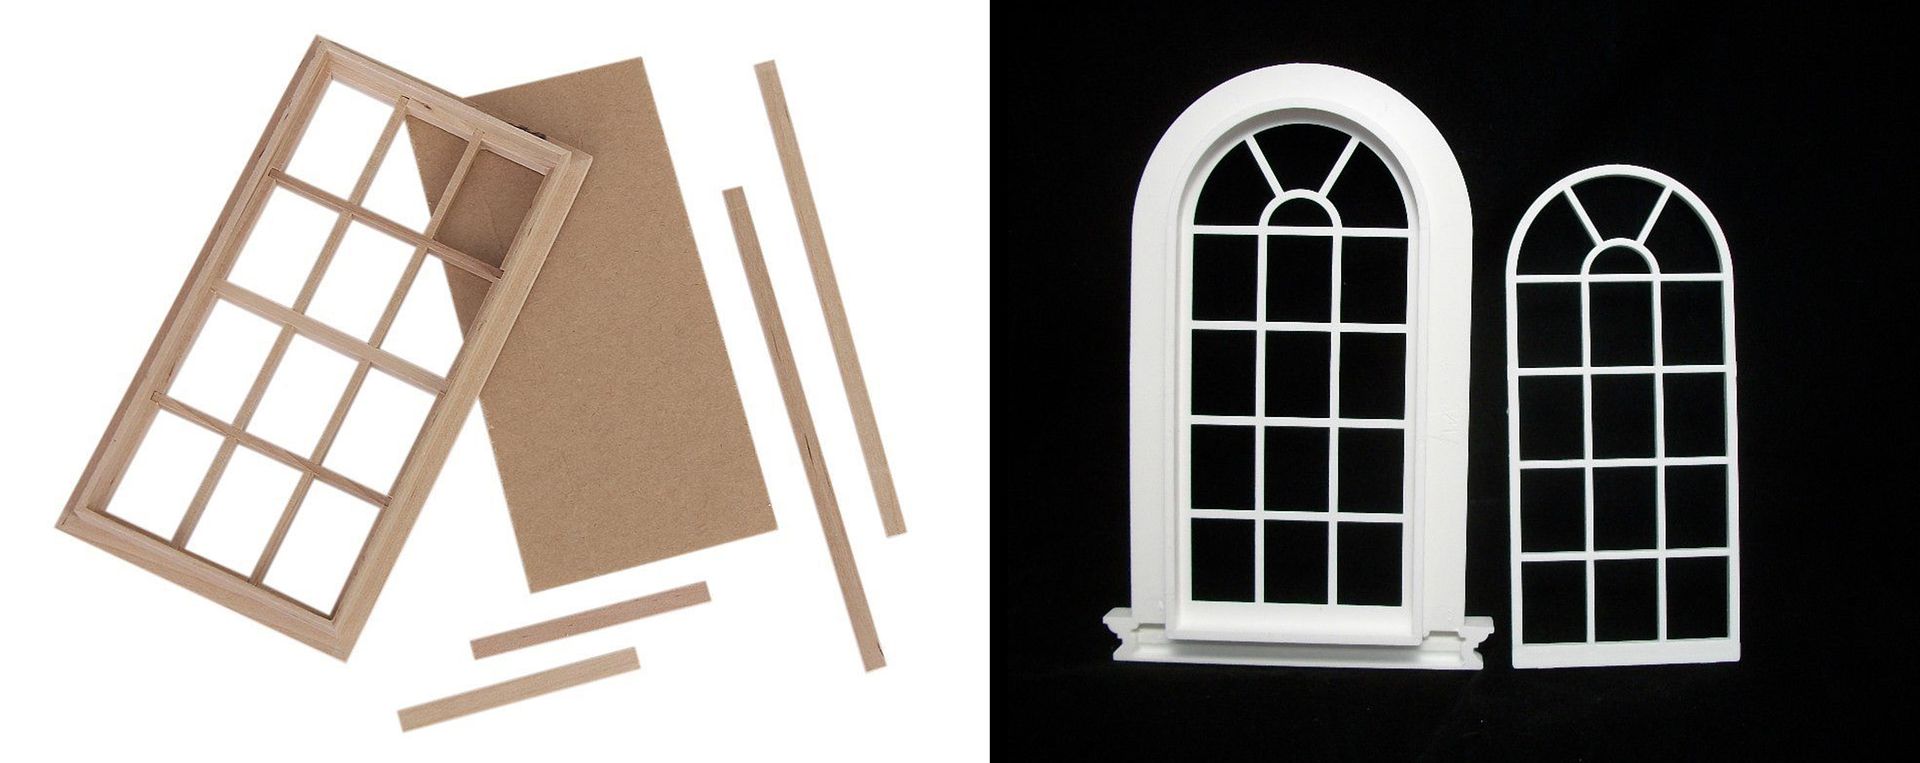
I used industrial spray adhesive to permanently seal the box’s top flaps closed, and I carefully cut off the bottom flaps, resulting in an open bottom cube. Then, I used brick pattern sheet and dollhouse windows to dress up the surface of the big cardboard box. Using some left-over crown molding that was stored in my basement, I also created a decorative cornice around the rooftop!
Unfortunately, the cardboard box flaps did NOT make for a very sturdy rooftop for my custom figures to stand on. As a result, I created some “asphalt” panels (made from black textured ABS sheet) to function as the roof deck. With some items from my parts bin, I created small vents and smoke stacks, a water tank mounted atop a tall girder tower, and gargoyles at each corner.
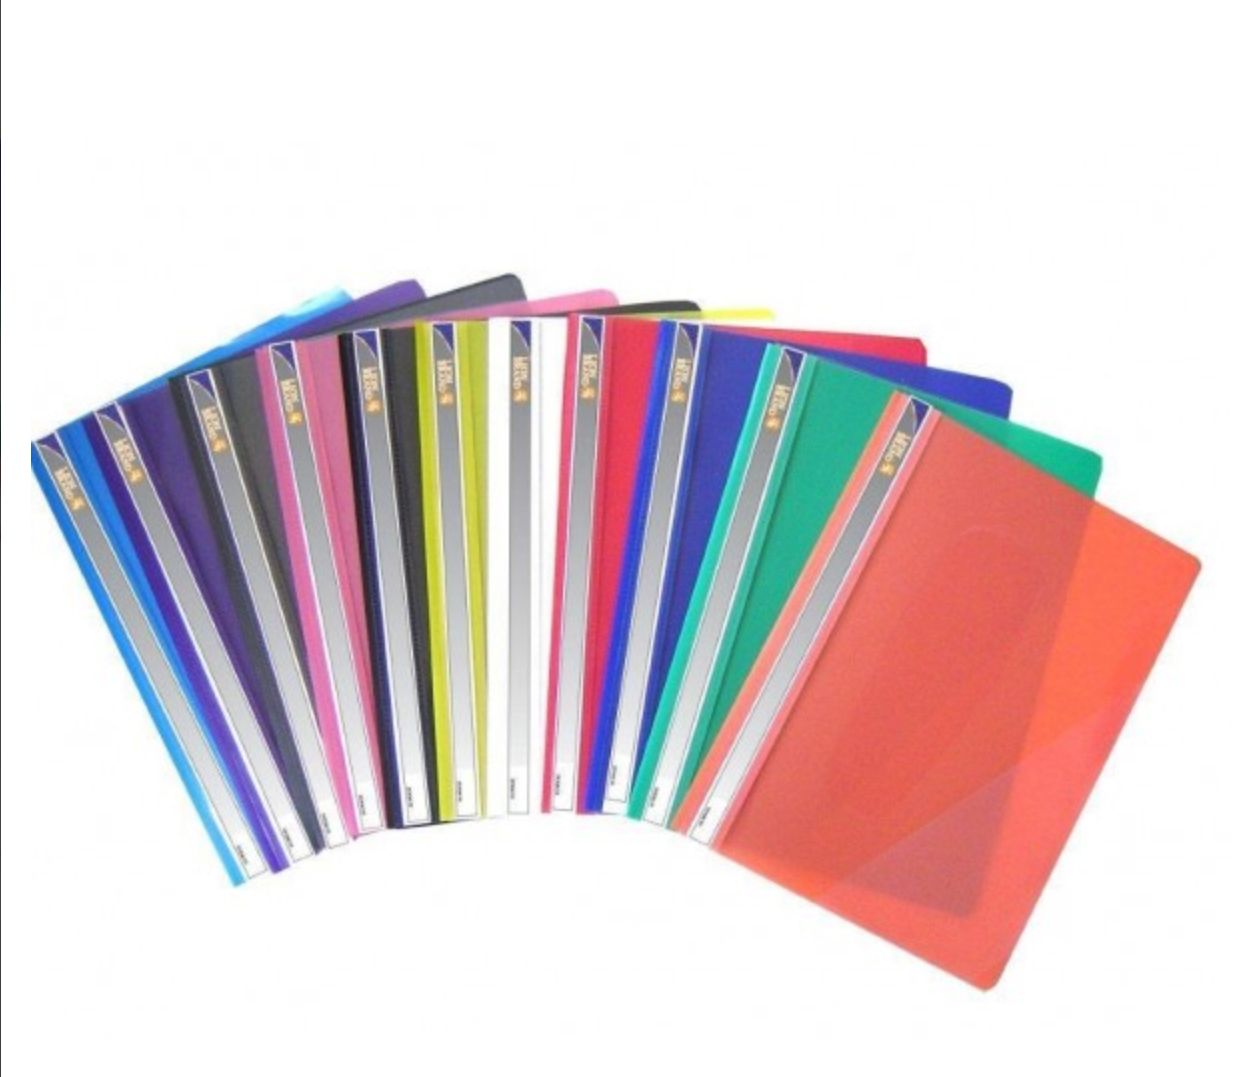
With my X-Acto blade, I cut open all the windows right through the cardboard. Then I used the translucent colored sheets from yellow report covers to make all the window panes.
I had plenty of yellow report covers left over after I made the windows, so I crafted a simple pattern, then cut and folded one of the sheets into a working skylight! When I placed a small lit desk lamp up inside the open end of the box (lighting up the windows and skylight), and placed my diorama playset building in front of a small printed Gotham City backdrop, I got really excited about how my show display was going to come to life!
By the time I finally got to MEGO Meet, and showcased my custom Batman And Robin figures, the playset / diorama building had been fully detailed, painted, and weathered, and the small Gotham City backdrop was remade into a massive 8 foot X 8 foot front-lit display!
About The Gotham City Backdrop image: When putting together my display for the Meet, my basic concept was to have the Gotham Warehouse Building seeming to "emerge" out of a flat comic book panel image of the night rooftops of Gotham. I did an online web search for "comic book art rooftops" and (as luck would have it) I chanced upon the Mego Museum's own Robin Scott Adams's digital artwork web page. Robin had created an AMAZING digital art piece study of a nightime city rooftops landscape by moonlight that immediately caught my eye. But i did not dare utilize the image for my display without asking first. So I contacted Robin, and she generously granted her permission for me to use the image. She even provided a hi-res digital file for me to work from. Once I had the file, I spent a couple of days re-arranging the positions of the buildings, and water towers of the image so that they worked more harmoniously with my intended big Gotham building. Then, in a move to make the display more Gotham City-like, I replaced Robin's original full moon with the Bat-Signal beam emblazoned dramatically across the night sky.
I re-created the entire image into an 8 foot X 8 foot file, and printed it as a massive vinyl banner. At the meet, I stretch-mounted the banner onto a large portable backdrop frame that I brought along. I was quite pleased with the final result! So, as always, a HUGE thank you shout out to Robin Scott Adams for her generosity and kindness during my project.

 Last edited by darklord1967; Mar 4, '18, 3:59 PM.I... am an action figure customizer
Comment
-
-
^^^^ "Meh"??? GASP!!!! Well, I never!!!I... am an action figure customizerComment
-
Holy gape!I have never kissed the editor of the Radio TimesComment


Comment