

 Tweet
Tweet
Hi! As discussed in my Analysis of the Mattel Retro Action Body - Mego Talk, the Mattel Retro Action body does not look as bad as many worship. Granted, that we all expected a much better body design from the number one toy manufacturer in the world... But only the Lord knows how glad and thankful I am to Mattel and everyone's favorite Dr. Mego, that we once again have the opportunity to grab renditions of our favorite DC heroes in the Mego Like format. Whatsoever, it is undeniable that there exists a problem with the bodies that Mattel is launching to the mass market as these would not stand a pose, mainly due to problems with the waist and leg articulation joints. This would not represent a problem to collectors who keep their figures carded, but to those who get them out of the package and display them in poses will by all means result frustrating. A lot of folks end up transplanting the Retro Action figure head, costume and accessories; to either a Mego, Cast-A-Way, EMCE or ZICA body and despite there is nothing wrong with this, they have to incur into an additional cost (body plus shipping).
The following tutorial is meant to provide you with a means to repair the Mattel Retro Action body and consequently to save you some money by using the same body your figure came with. The tutorial is both verbalized and illustrated but if at anytime you have a question feel free to either REPLY to thread or PM me. I really hope you find it useful...
OK, here we go... We are looking forward to tighten the articulation joints at both legs and at the torso/waist. The main problem with the Retro Action body is that there is not enough friction exerted between both parts of the joint at their contact surfaces. This is true for both leg-pelvis and torso-pelvis articulation joints. As a consequence, any or both parts of the joint would slip loosely. Furthermore, the factory body stringing is made using black elastic bands that do not exert appropriate pull force to tighten the articulation joint. The combination of both factors inhibits the figure from standing a pose... Even the original Mego bodies were designed with rough surfaces at these particular articulation joints. Remember the tiny & ugly plastic spikes that were present in the torso ball joint and at the leg end?
In this tutorial we will be developing vinyl gaskets to provide the desirable friction at these joints and we will strengthen the figure stringing to tighten the joint. Following are the steps to accomplish these:
Step #1 - Remove the figure head using the boiling water method and a bit of patience...
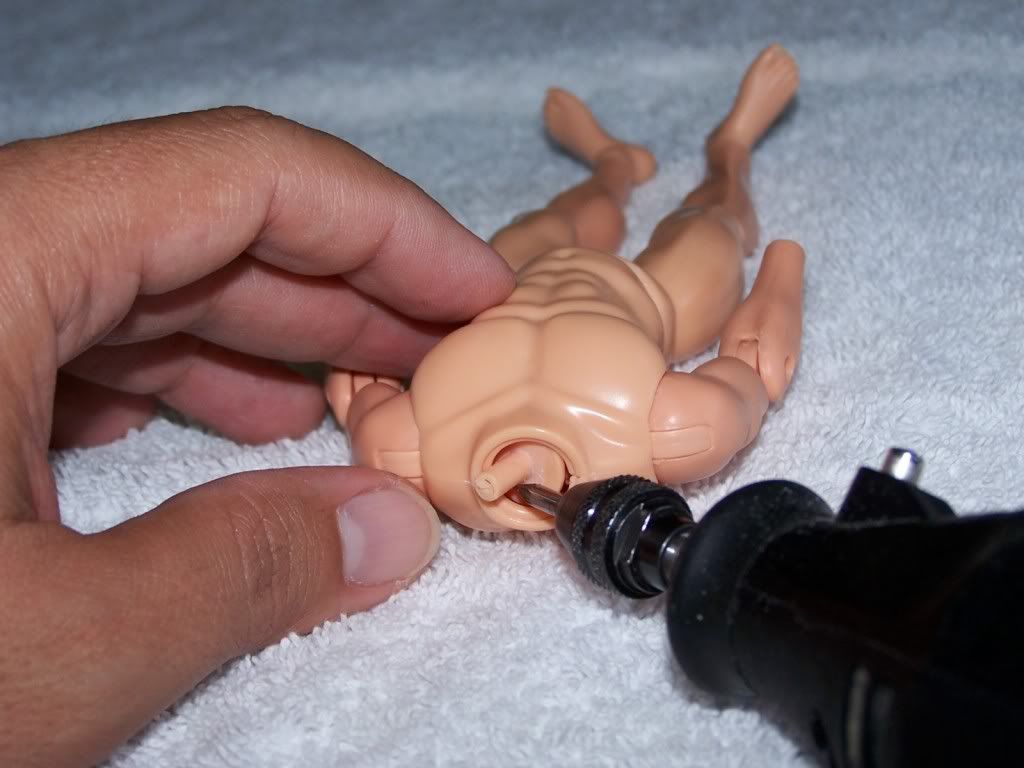
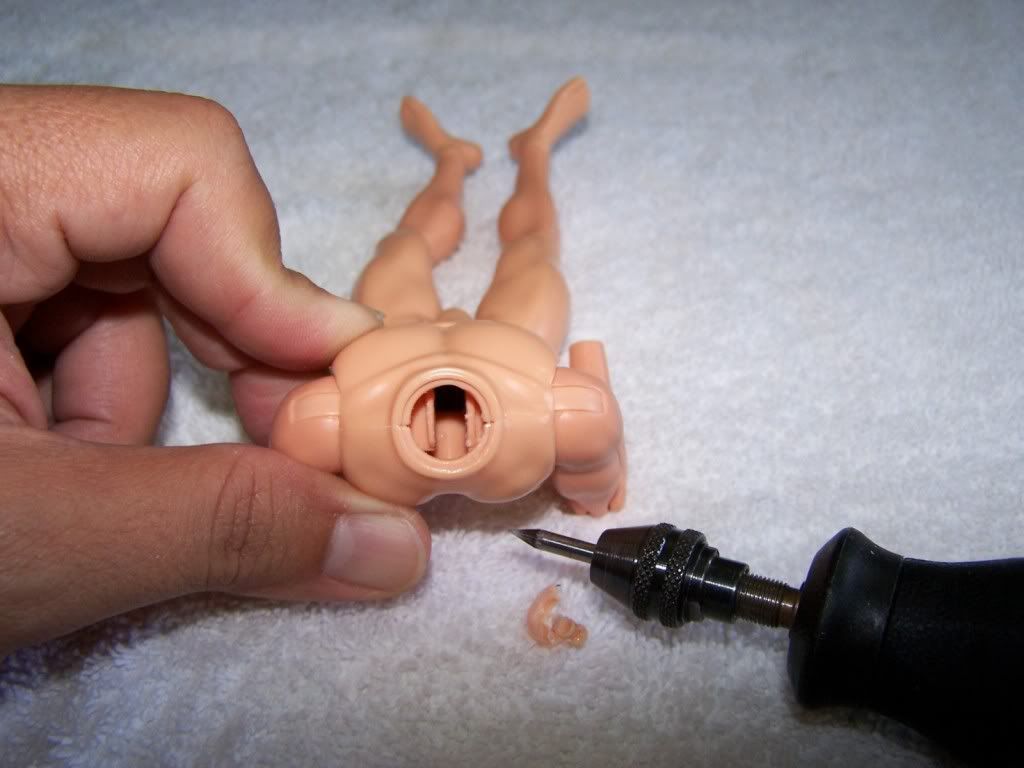
Step #2 - Using a Dremmel or any other Rotary Tool, remove the neck plug pin that remains attached to the body. Refer to the following pictures:
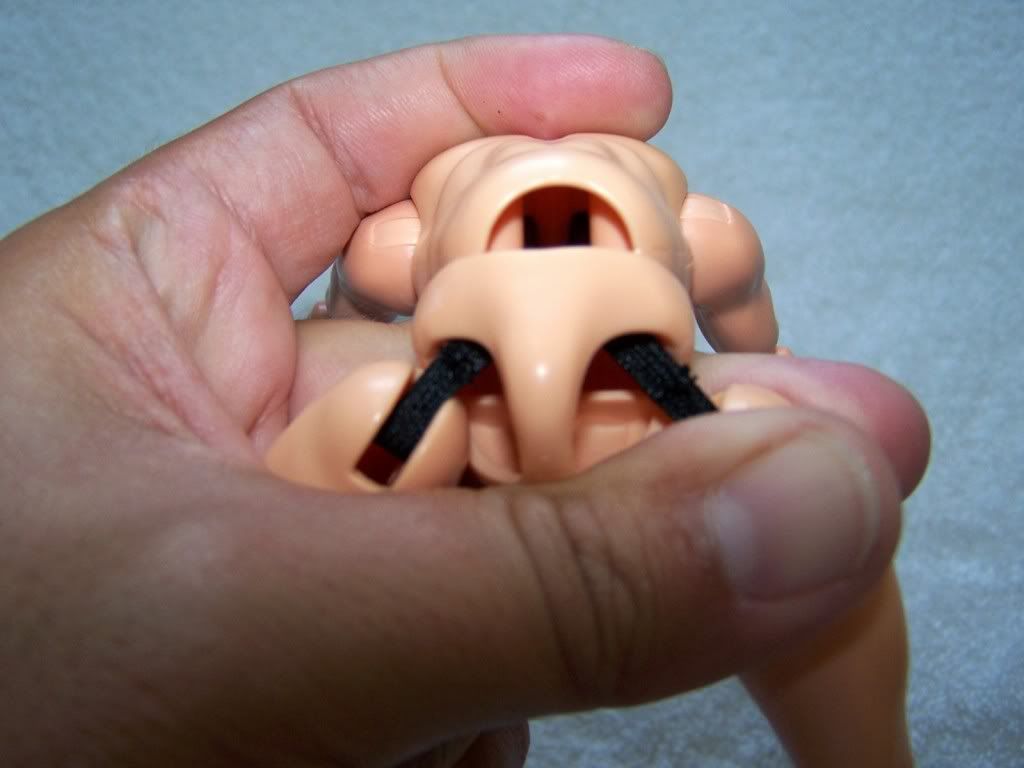
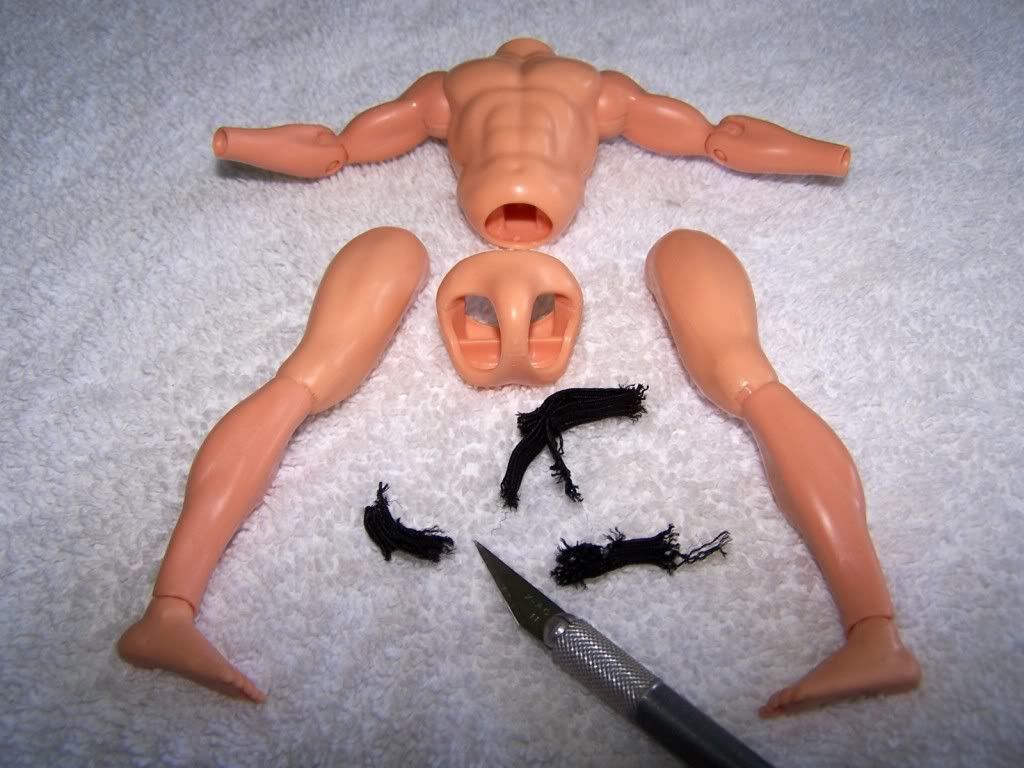
Step #3 - Bend the figure at the targeted joints and cut the elastic bands. Plain and simply eliminate the factory stringing. Refer to the following pictures:
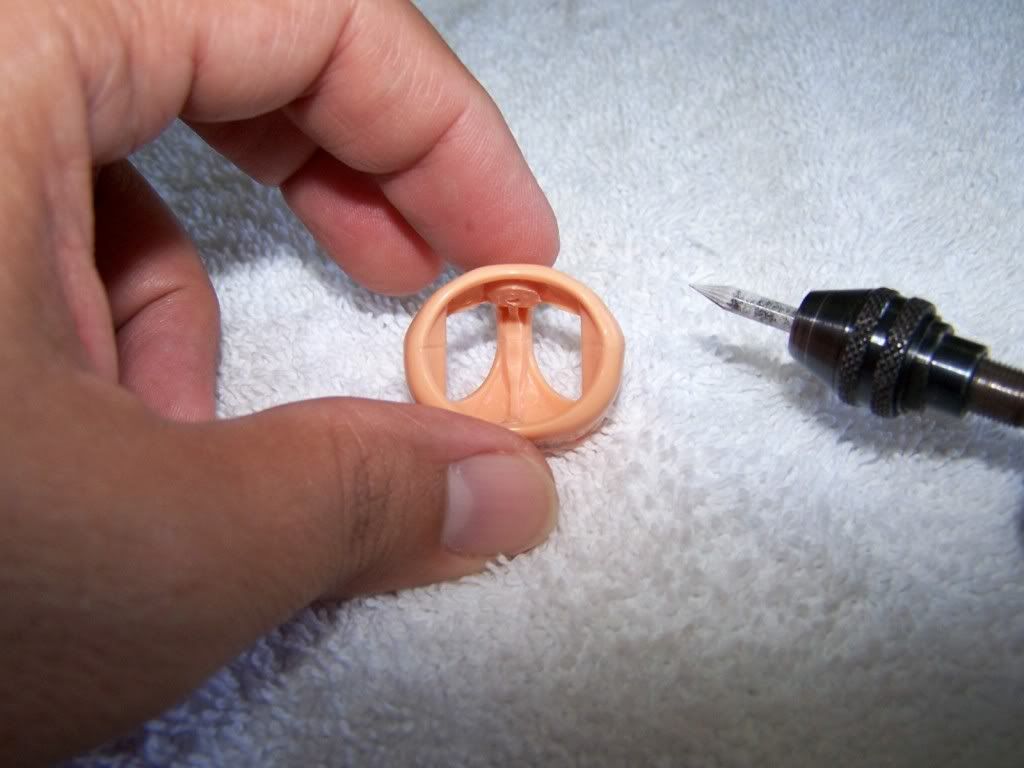
Step #4 - Using a Dremmel or Rotary Tool remove the attaching post at the pelvis from wall to wall. Refer to the following pictures:

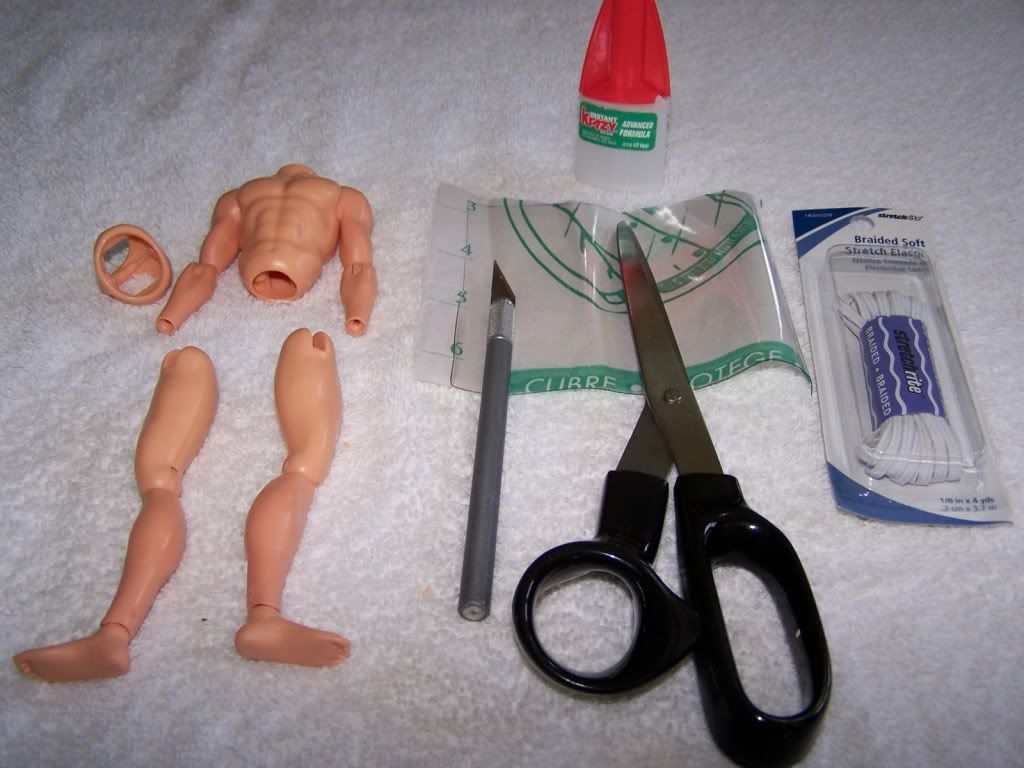
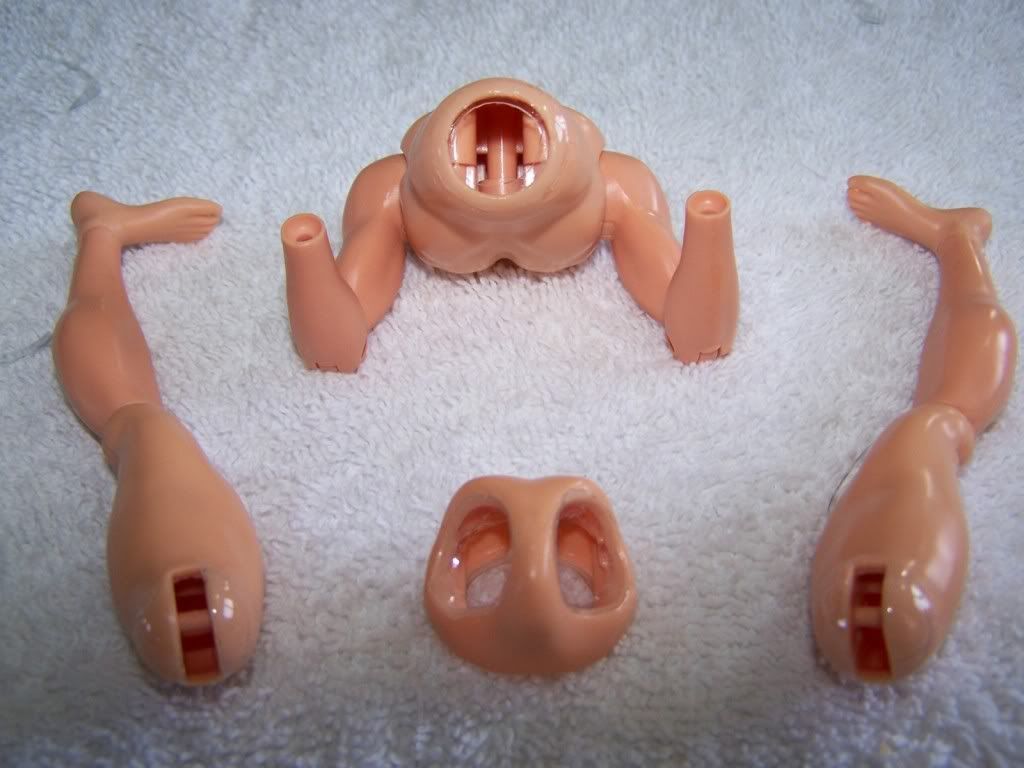
Step #5 - Ok... At this stage you have all your retro body parts loose with the pelvis and the torso parts modified (pelvis without attaching post and torso without neck plug pin). Now you need to find yourself some clear vinyl sheet (fabrics department at Walmart), flat elastic band, scissors, X-acto knife, and precision tip "Crazy Glue" or any other cyanoacrylate compound. We are going to use these to construct and bond vinyl gaskets at the pelvis, torso and legs joint contact surfaces in order to develop joint friction. The flat elastic band is meant to tightly re-string figure back at the end of our jobs. Refer to the following picture.
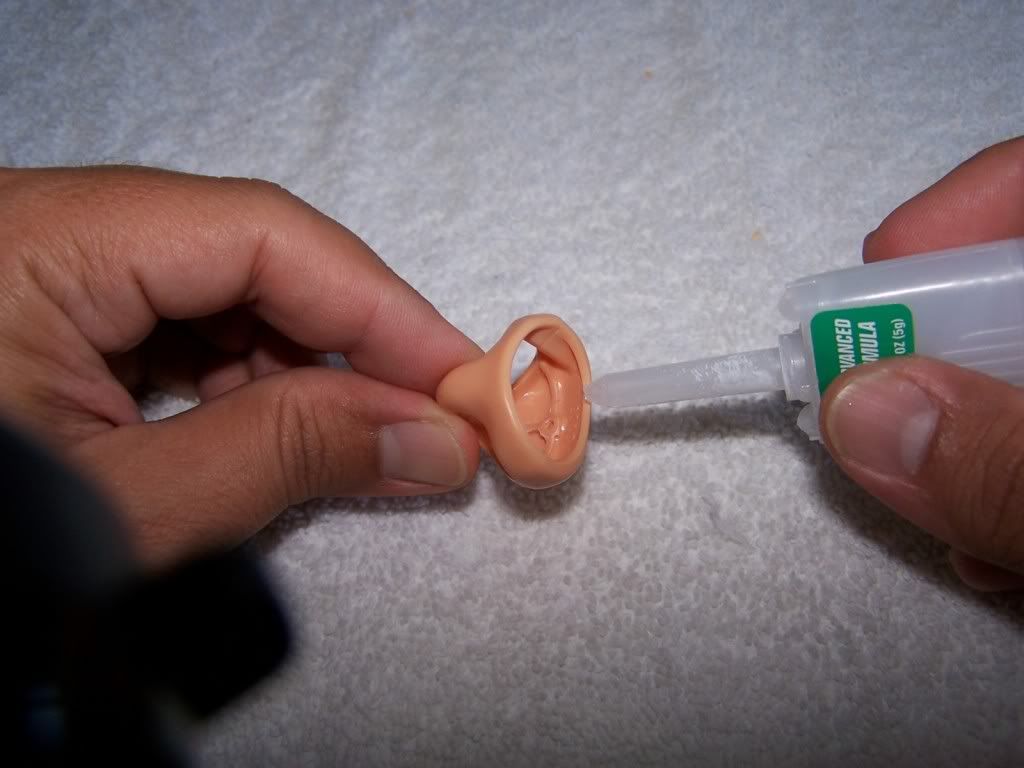
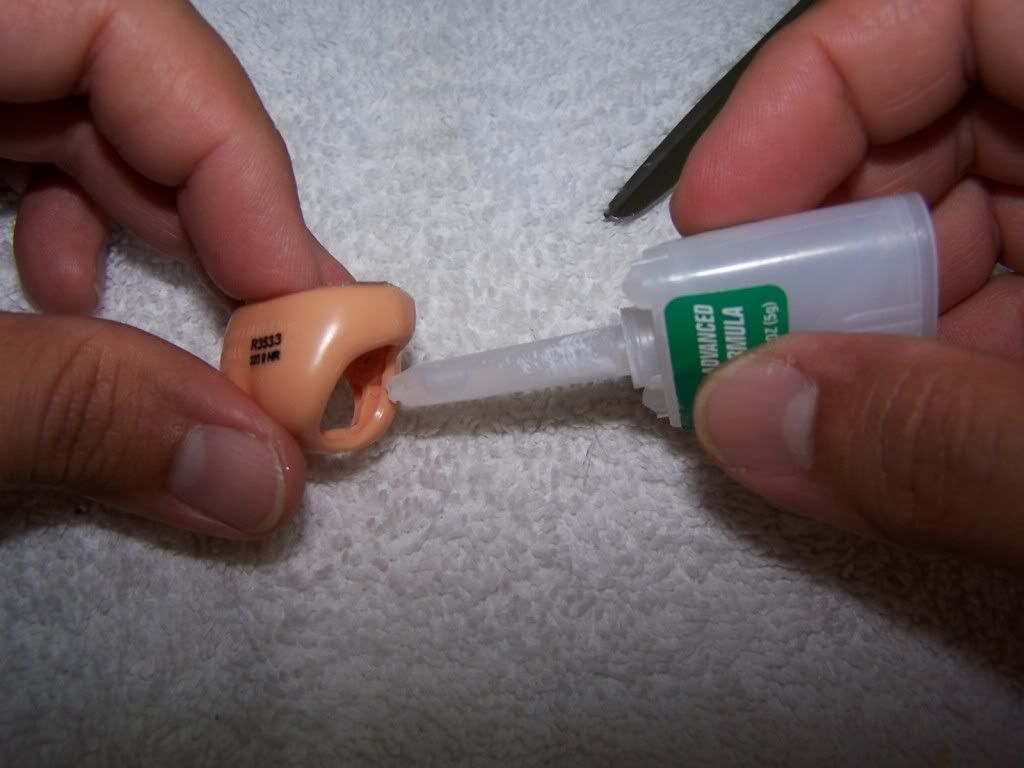
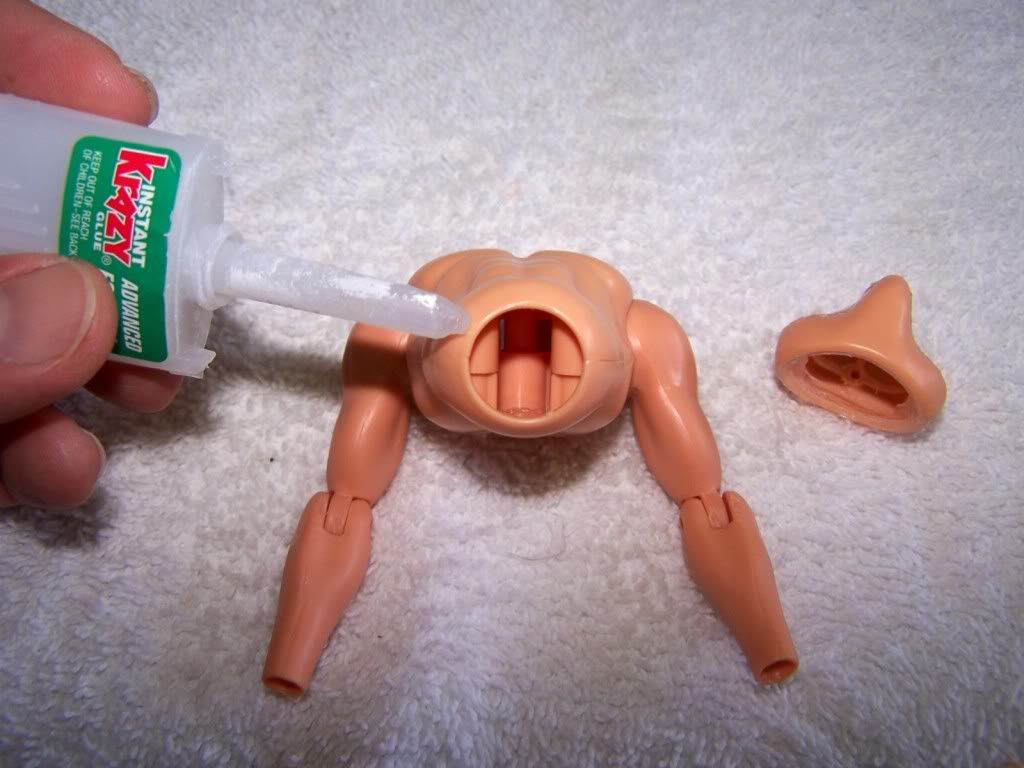
Step #6 - Cut a 2 inch by 2 inch sheet of vinyl (approx). Leave it at hand since you will be dispensing adhesive and you will need it right away. Carefully dispense cyanocrylate around the inner rim of the pelvis where it meets with the torso. Refer to the following picture:
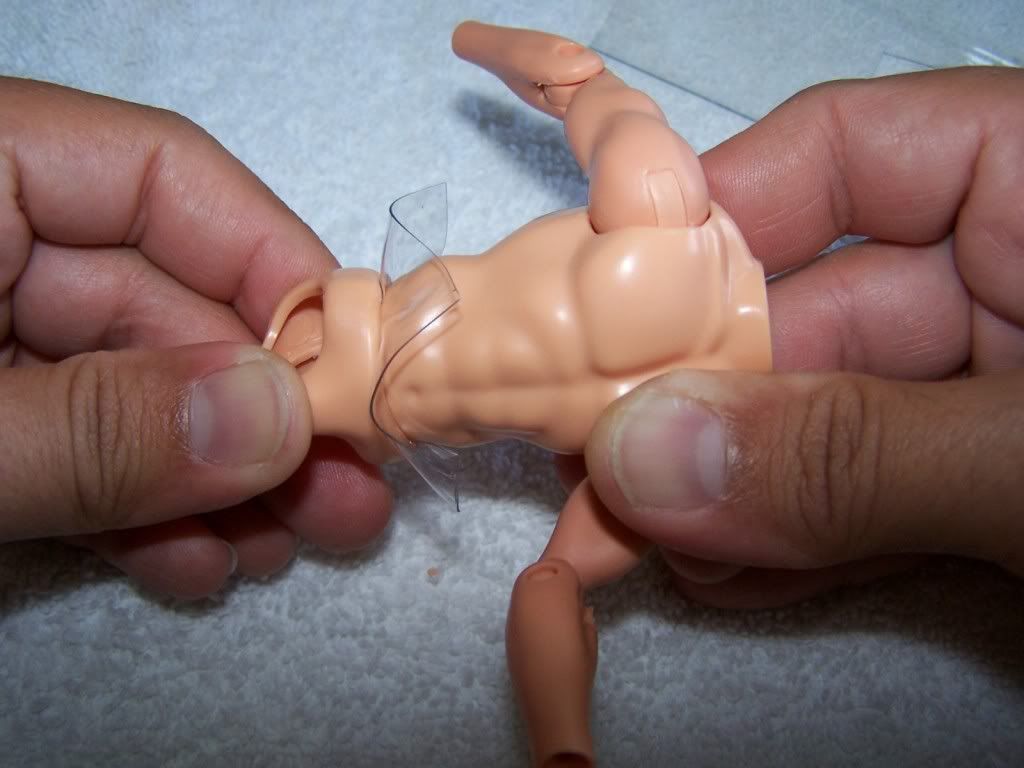
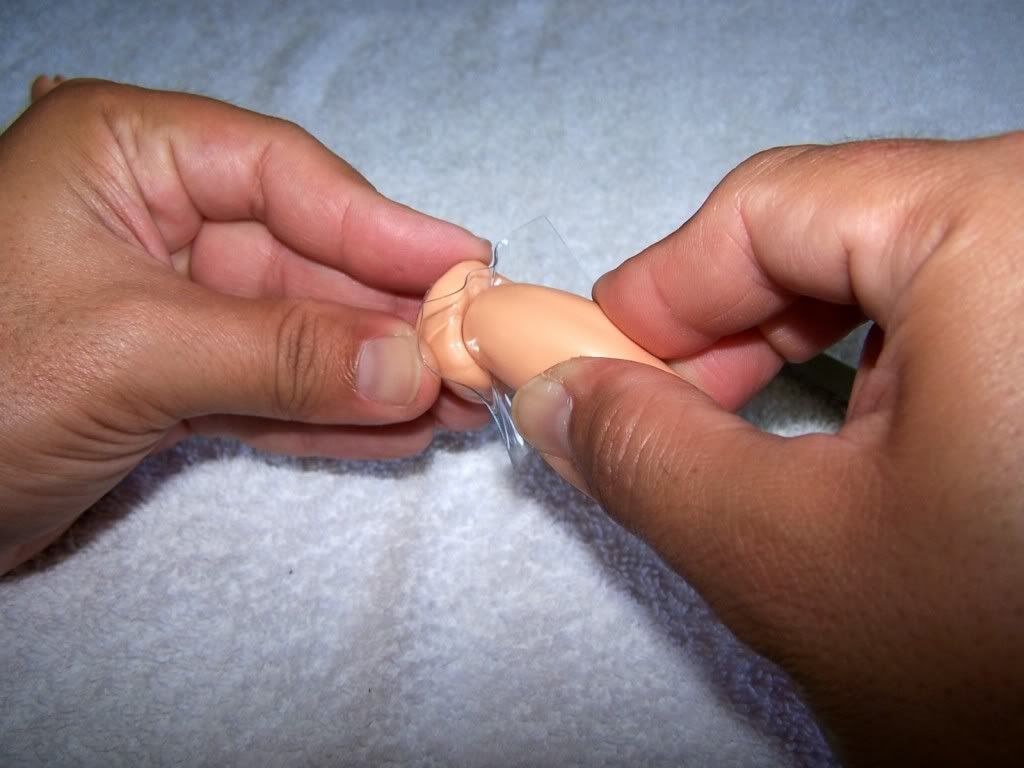
Step #7 - Take the piece of vinyl sheet and place it over the pelvis with glue on it. Then take the figure torso and press fit into the pelvis with the vinyl sheet caught in between. Wait a couple of seconds allowing the bond to dry. Refer to the following picture:
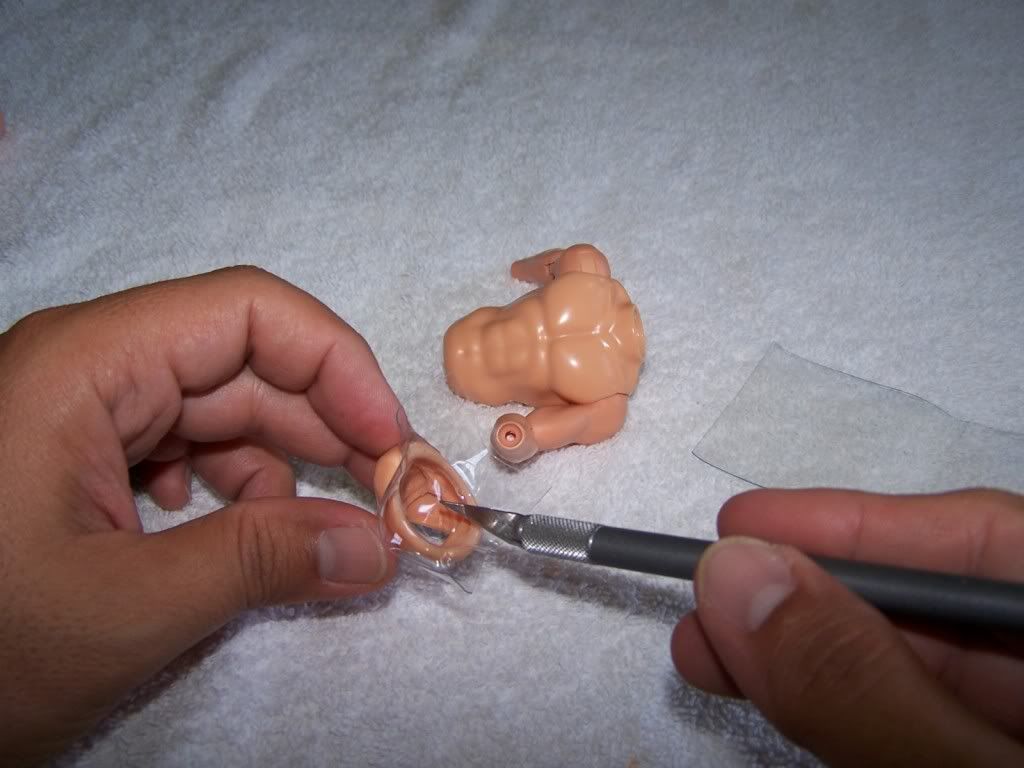
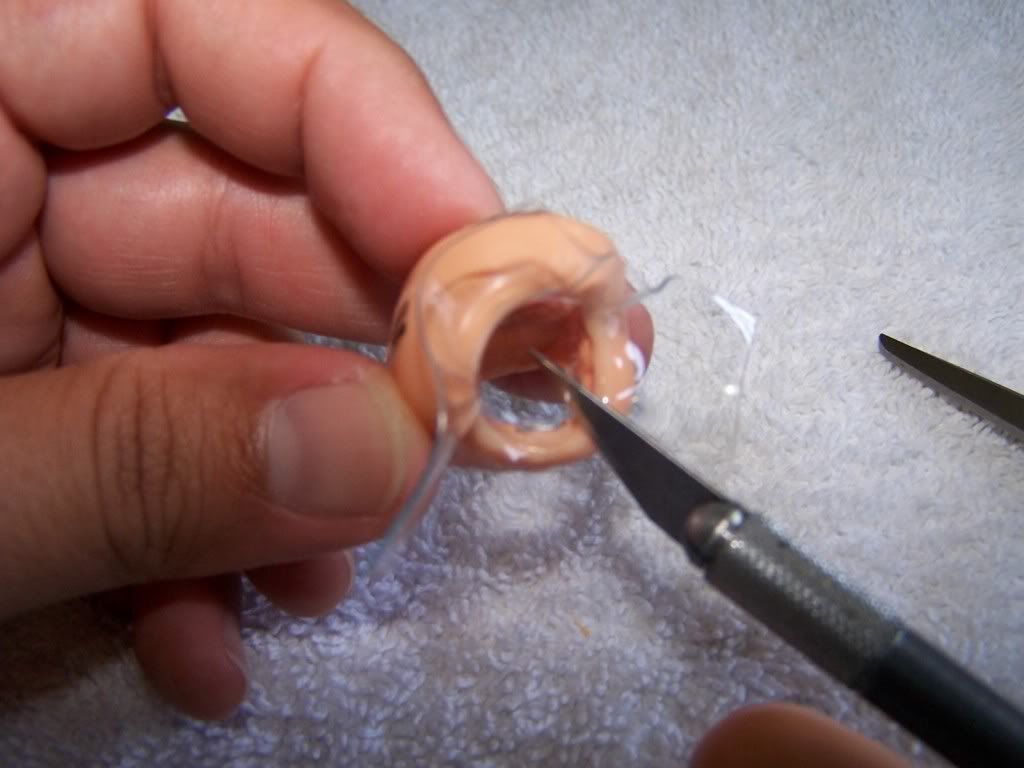
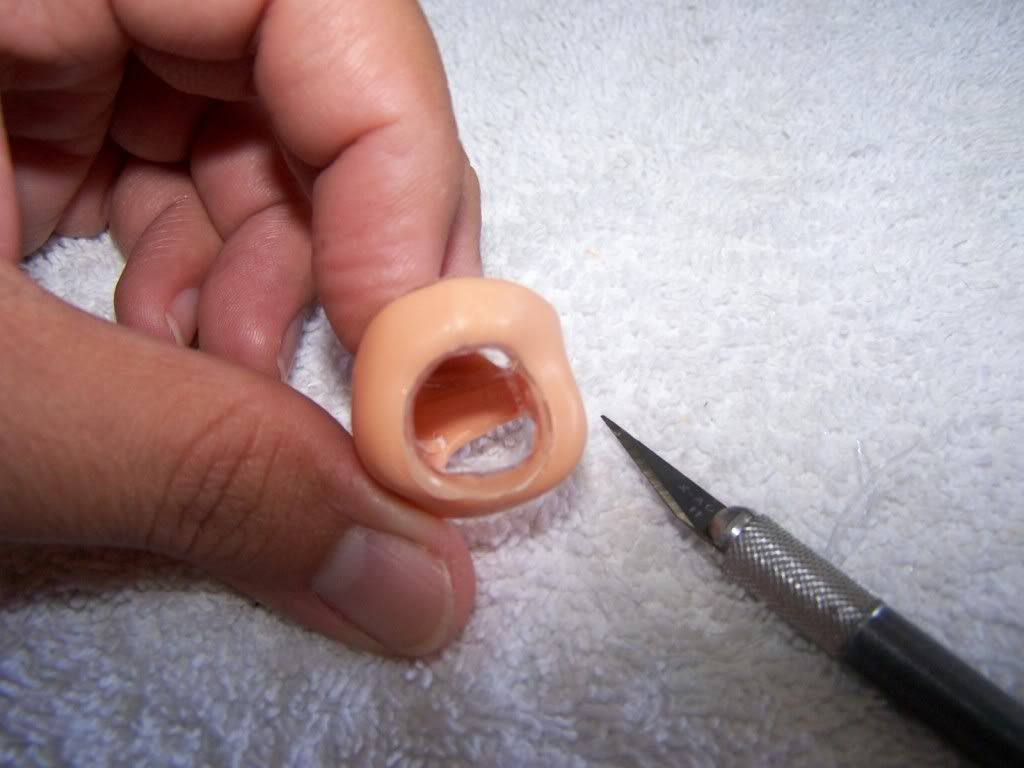
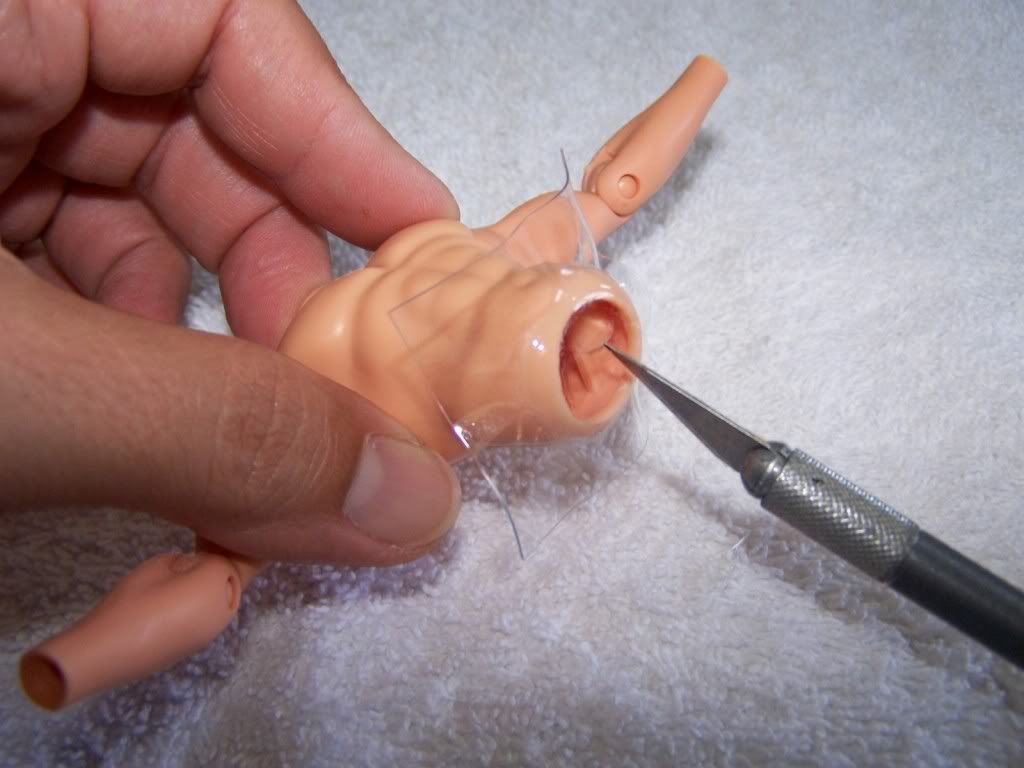
Step #8 - Withdraw torso from pelvis and using the X-acto knife cut a hole at the vinyl sheet following the contour of the pelvis at the torso inlet. In addition cut off the vinyl outside the pelvis and trim to contour. Refer to the attached pictures:
Step #9 - We will be following the same approach for the both legs joint gaskets. Cut a 2 inch by 2 inch sheet of vinyl (approx). Leave it at hand since you will be dispensing adhesive and you will need it right away. Carefully dispense cyanocrylate around the inner rim of the pelvis where it meets with the leg. Start with the Right Leg (just to be consistent with my pictures). Refer to the following picture:
Step #10 - Take the piece of vinyl sheet and place it over the pelvis with glue on it. Then take the figure Right Leg and press fit into the pelvis with the vinyl sheet caught in between. Wait a couple of seconds allowing the bond to dry. Refer to the following picture:
Step #11 - Withdraw Right Leg from pelvis and using the X-acto knife cut a hole at the vinyl sheet following the contour of the pelvis at the Right Leg inlet. In addition cut off the vinyl outside the pelvis and trim to contour. Refer to the attached pictures:
Step #12 - Repeat Steps #9 to 11 for the Left Leg inlet at the pelvis.
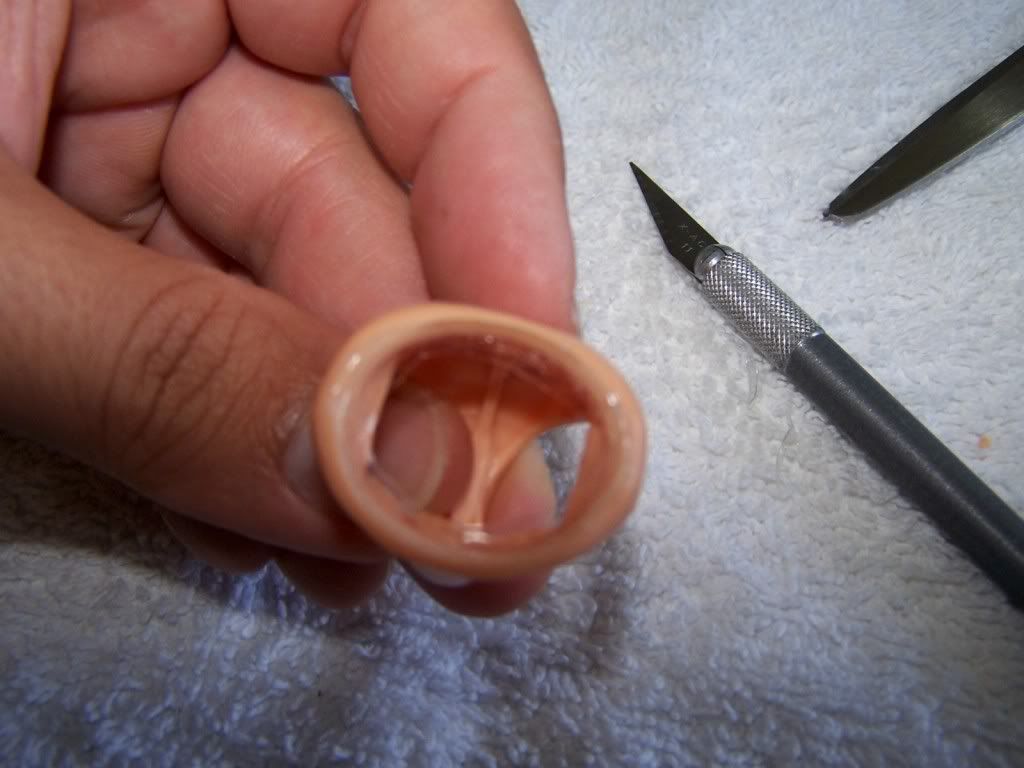
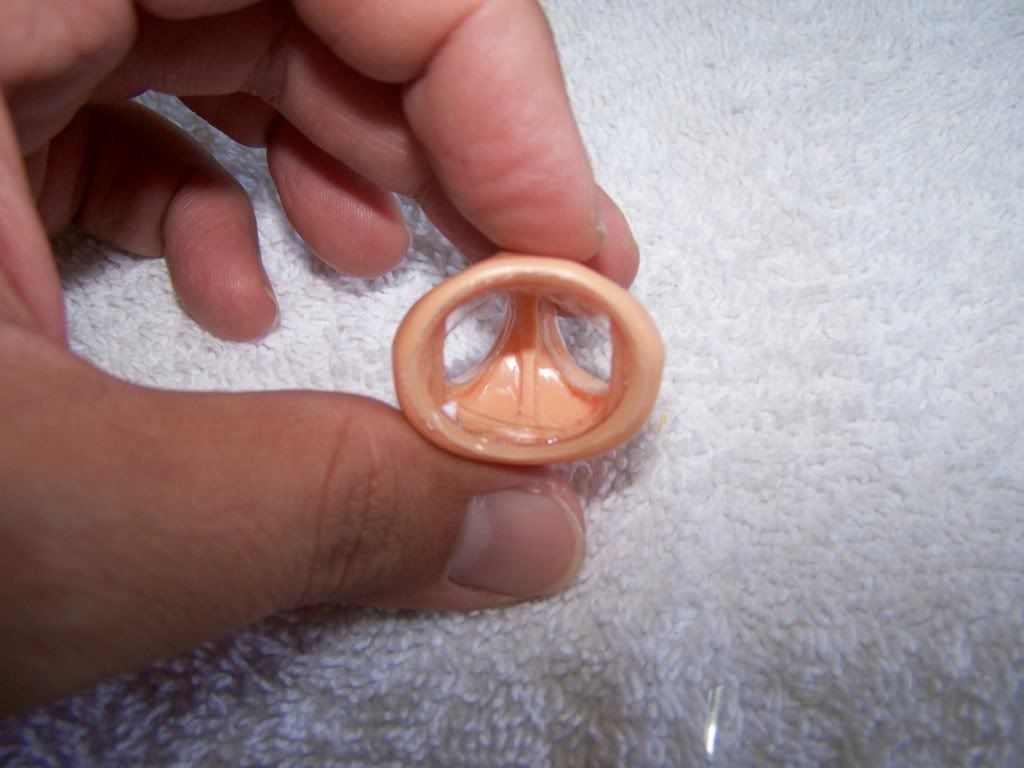
Step #13 - So far you have constructed and adhered all joint gaskets at the pelvis. Refer to the attached picture for the end result. You are now faced with two options: a) skip to the re-stringing steps or b) add increased friction by also making vinyl gaskets for the torso and both legs. It is really up to you... I'll recommend the increased friction option... To skip to re-stringing, skip to Step # X. To proceed with increased friction continue with Step #14.
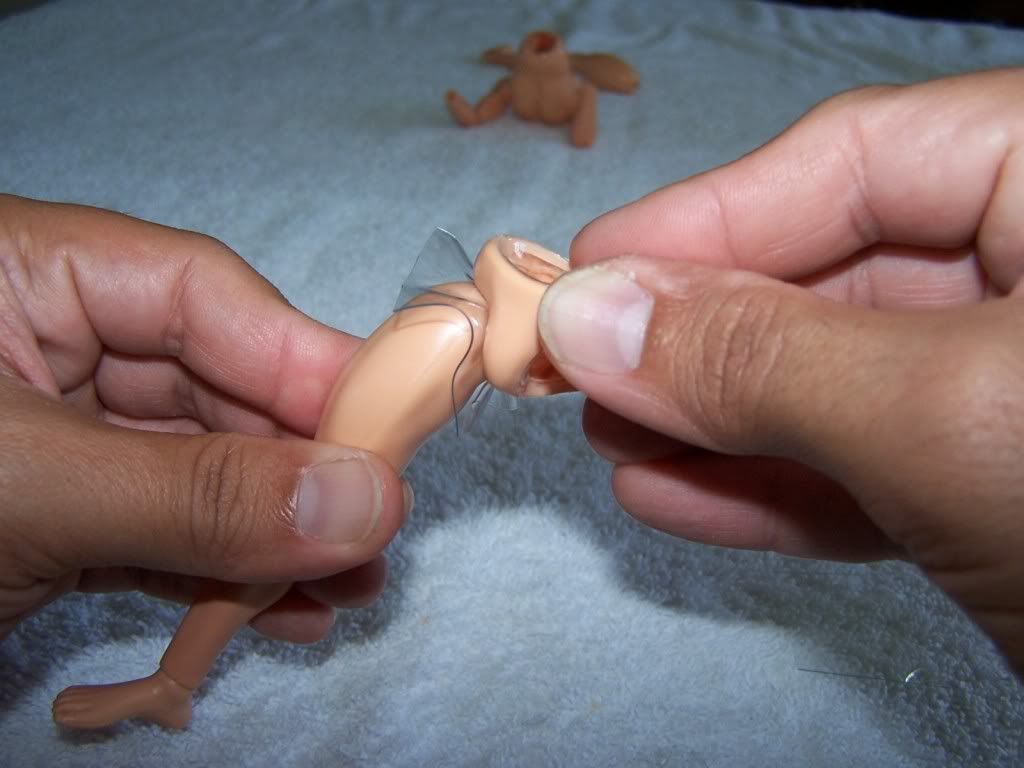
Step #14 - Now we will be repeating the previous steps only that at the other joint component (torso or leg) instead of the pelvis... Cut a 2 inch by 2 inch sheet of vinyl (approx). Leave it at hand since you will be dispensing adhesive and you will need it right away. Carefully dispense cyanocrylate around the waist rim of the torso where it meets with the pelvis. Refer to the following picture:
Step #15 - Take the piece of vinyl sheet and place it over the torso with glue on it. Then take the figure pelvis and press fit into the torso with the vinyl sheet caught in between. Wait a couple of seconds allowing the bond to dry. Refer to the following picture:

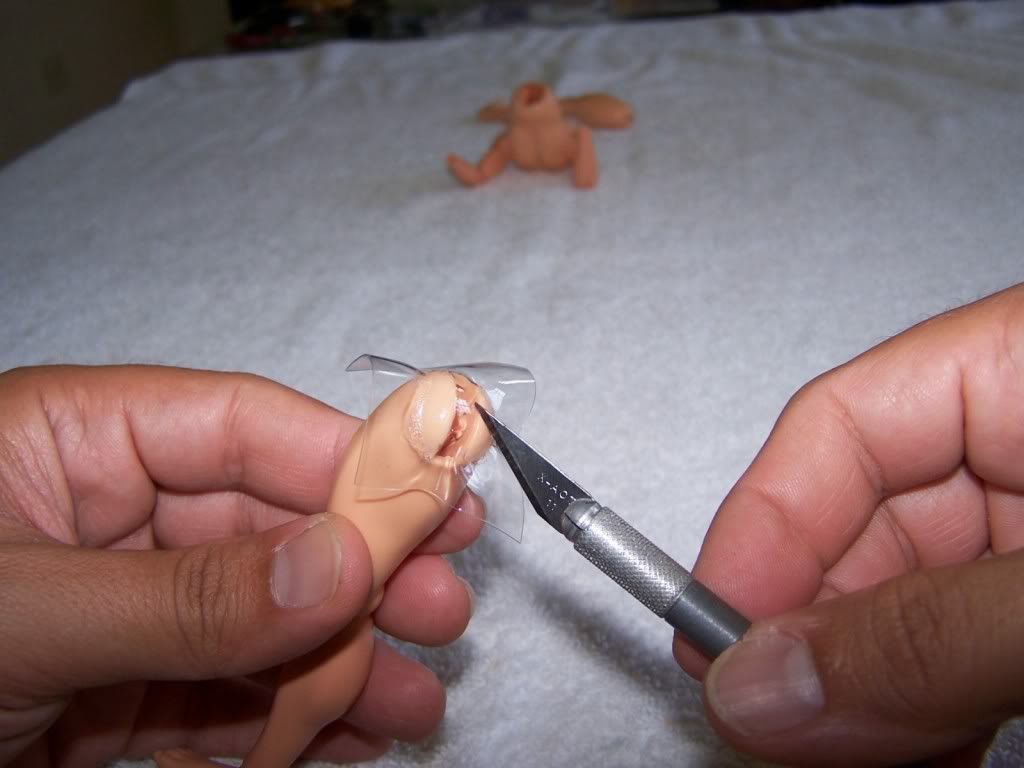
Step #16 - Withdraw pelvis from torso and using the X-acto knife cut a hole at the vinyl sheet following the contour of the torso hole. In addition cut off the excess vinyl protruding from the torso and trim nicely at the waist area leaving adhered a vinyl gasket where the torso waist meets the pelvis. Refer to the attached pictures:

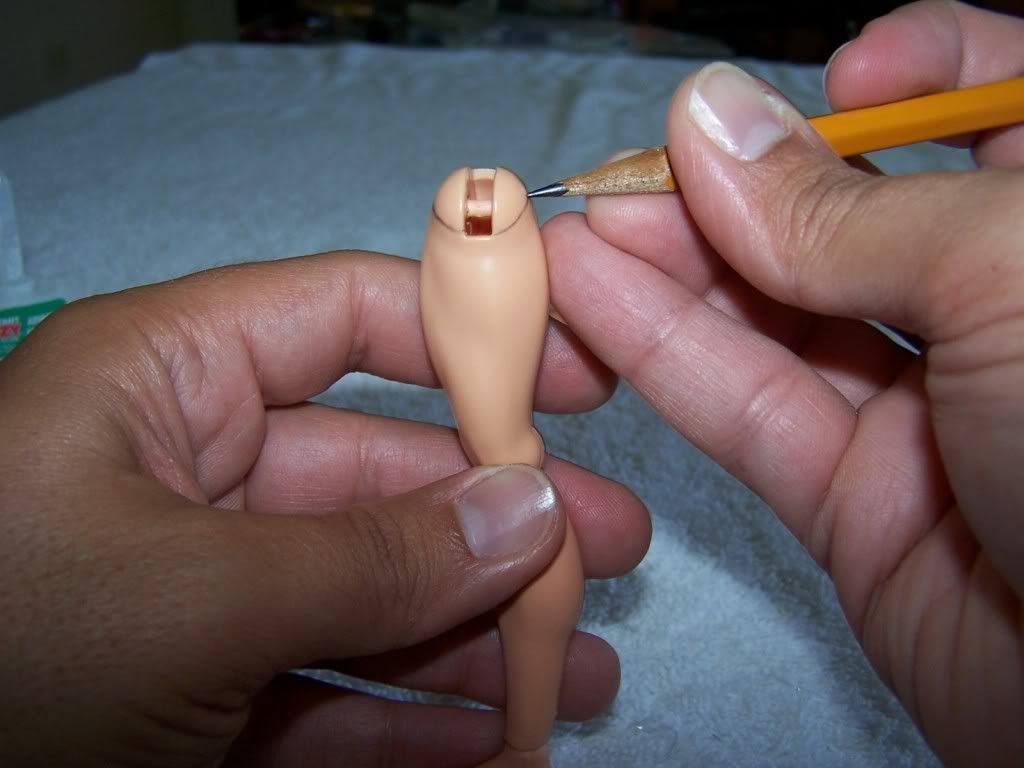
Step #17 - Pick up the Right Leg and using a pencil, draw a circle with the leg slot as the circle diameter. It really doesn't matter which leg you start with but just to be consistent with our pictures and discussion pick up the Right Leg. Refer to the following picture.
Step #18 - Cut a 2 inch by 2 inch piece of vinyl (approx). Leave it at hand since you will be dispensing adhesive and you will need it right away. Carefully dispense cyanocrylate around and inside the circle you just drew. Refer to the following picture:

Step #19 - Take the piece of vinyl sheet and place it over the Right Leg with glue on it. Then take the figure pelvis and press fit into the Right Leg with the vinyl sheet caught in between. Wait a couple of seconds allowing the bond to dry. Refer to the following picture:
Step #20 - Withdraw pelvis from Right Leg and cut off the vinyl excess. Using the X-acto knife, trim nicely the non bonded vinyl leaving adhered a vinyl gasket where the Right Leg meets the pelvis. Also cut and trim the vinyl covering the leg slot. Refer to the attached pictures:

Step #21 - Now pick the Left Leg and repeat Step #17 to 20.
Step #22 - Ok, all vinyl gaskets have been done and bonded. These would definitely increase friction at the torso to pelvis and legs to pelvis joints. It is now vinyl to vinyl contact surface friction as opposed to polished plastic to polished plastic friction. Now we are ready for Re- stringing. refer to the attached picture:
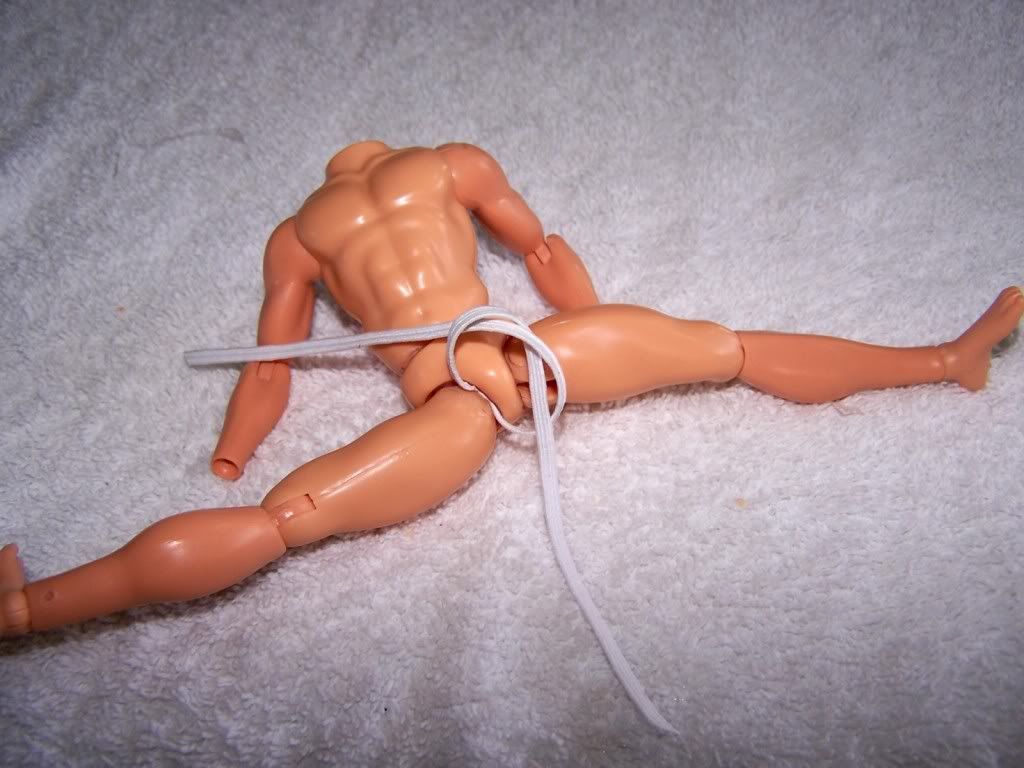
Step #23 - Thread the body parts using some flat elastic band as indicated on the picture below. You are looking forward to leave both elastic band ends coming from the legs. Make sure you pivot around the attaching post inside the chest during threading.
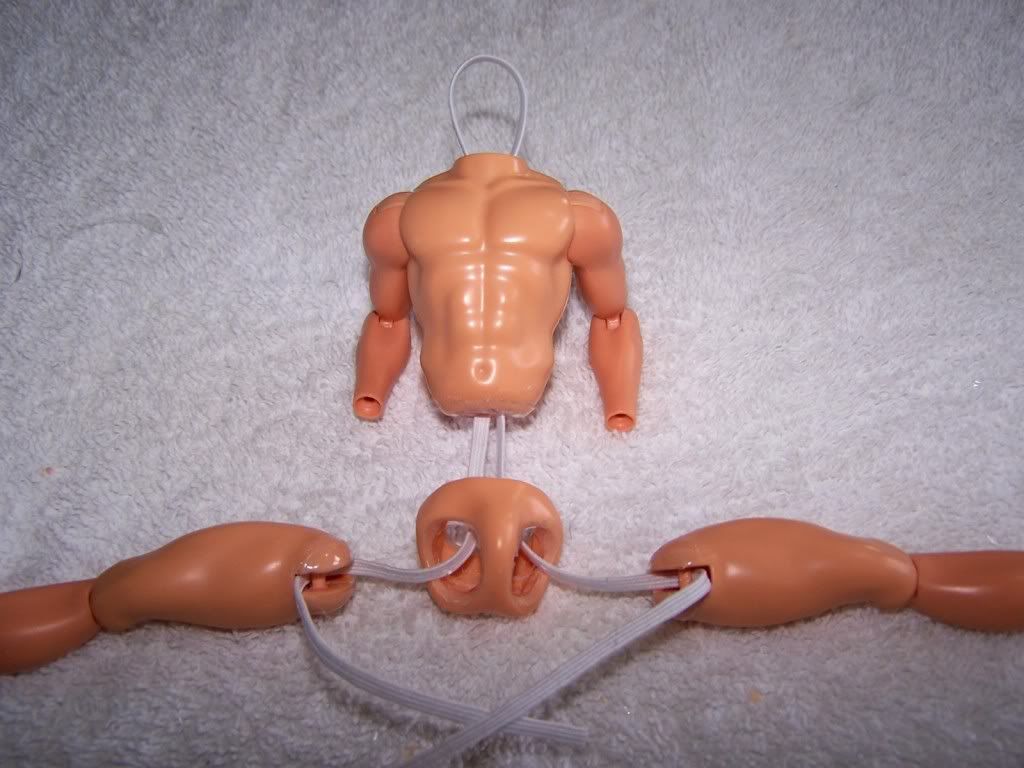
Step #24 - You are now looking forward to tighten both elastic ends and make a knot in between either leg and the pelvis. For consistency with pictures and discussion we will do it between the body Right Leg and pelvis. Thread the elastic band end coming from the Left Leg and thread it inside the pelvis entering the Left Leg inlet and exiting the Right Leg inlet. Grab both ends with your hands. Refer to the following picture.
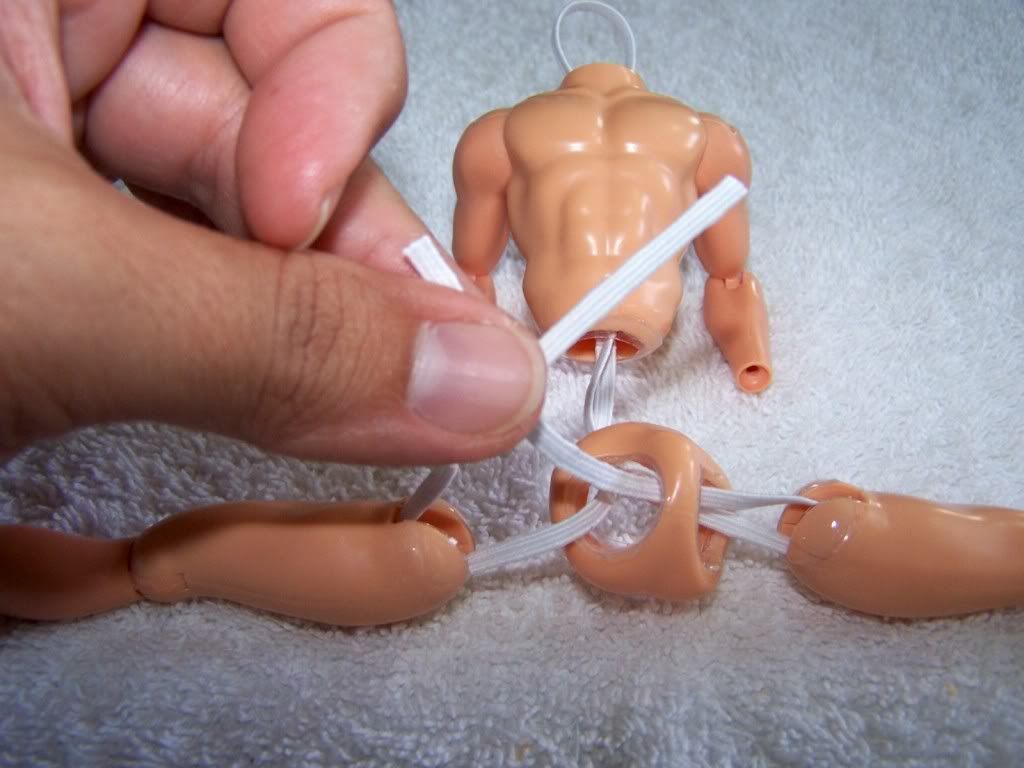
Step #25 - Cross both elastic ends and tighten at will. Refer to the following picture:
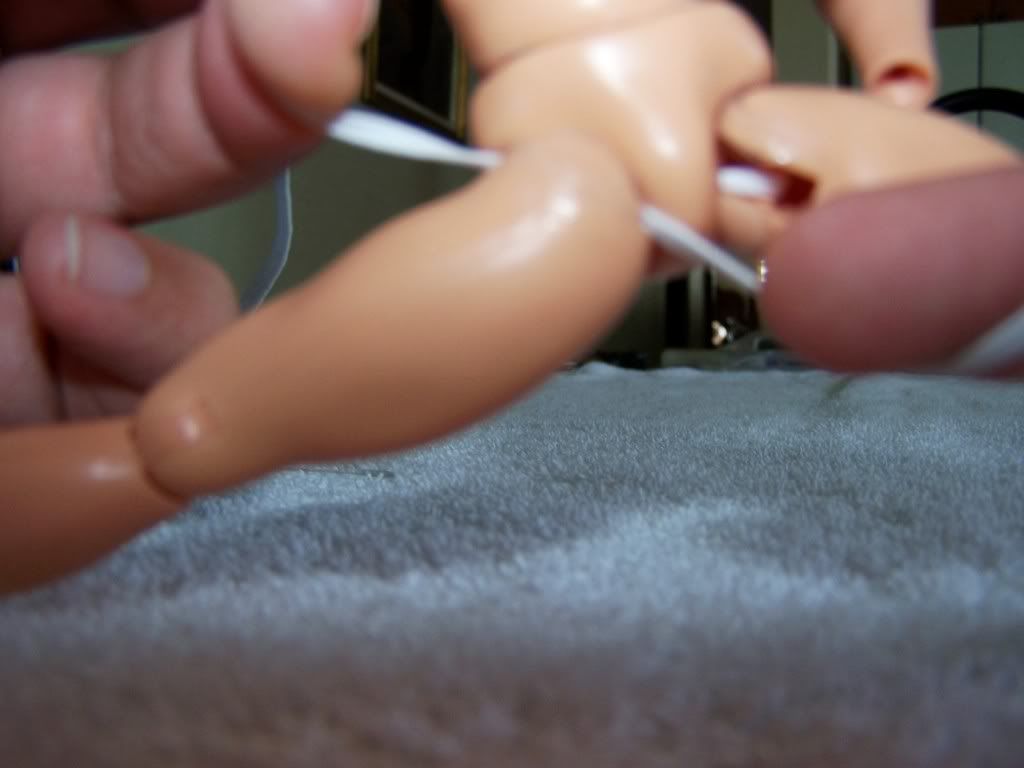
Step #26 - Make a knot and cut the elastic band excess. Refer to the following picture:
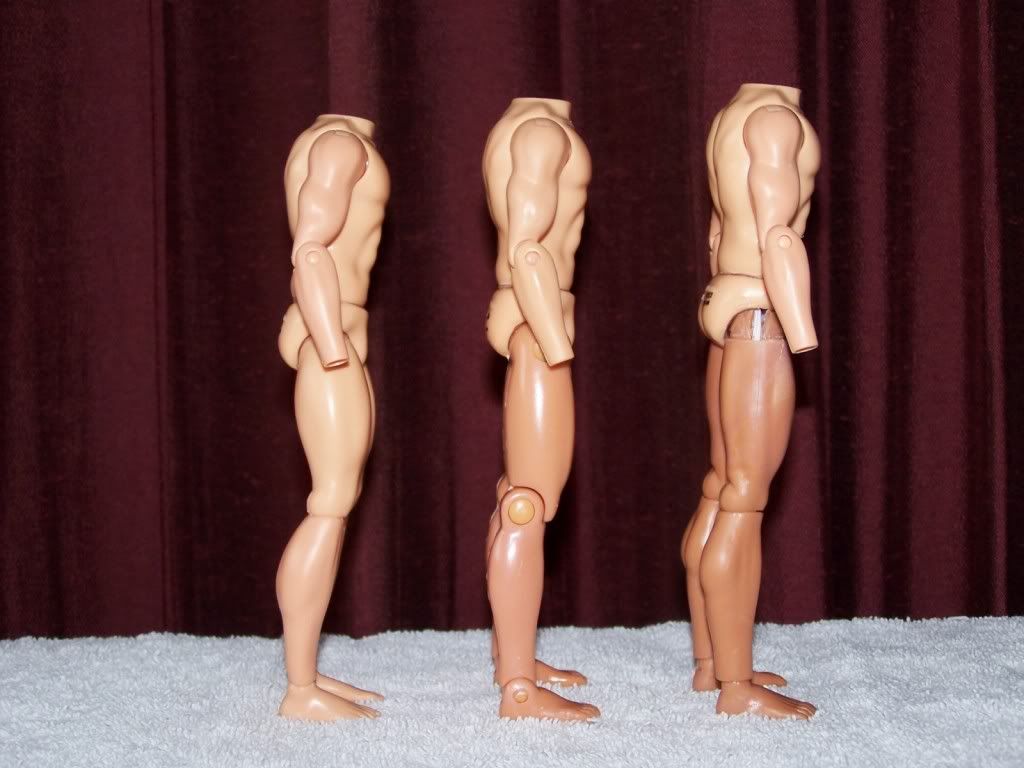
Well, this is it! You now have a repaired Retro Action body capable of withstanding any pose and real tight. It also makes the figure look aesthetically much better and gets rid of the bowed legs look. You may find this repair method a bit long but once you do it once the others would be cream cheese... And since every effort has its reward, reward yourself with the end results! The icing to the cake is that with this repair method, you may chose to attach legs from other Mego Like bodies instead of the Mattel Retro Action legs. The attached pictures speak for themselves.
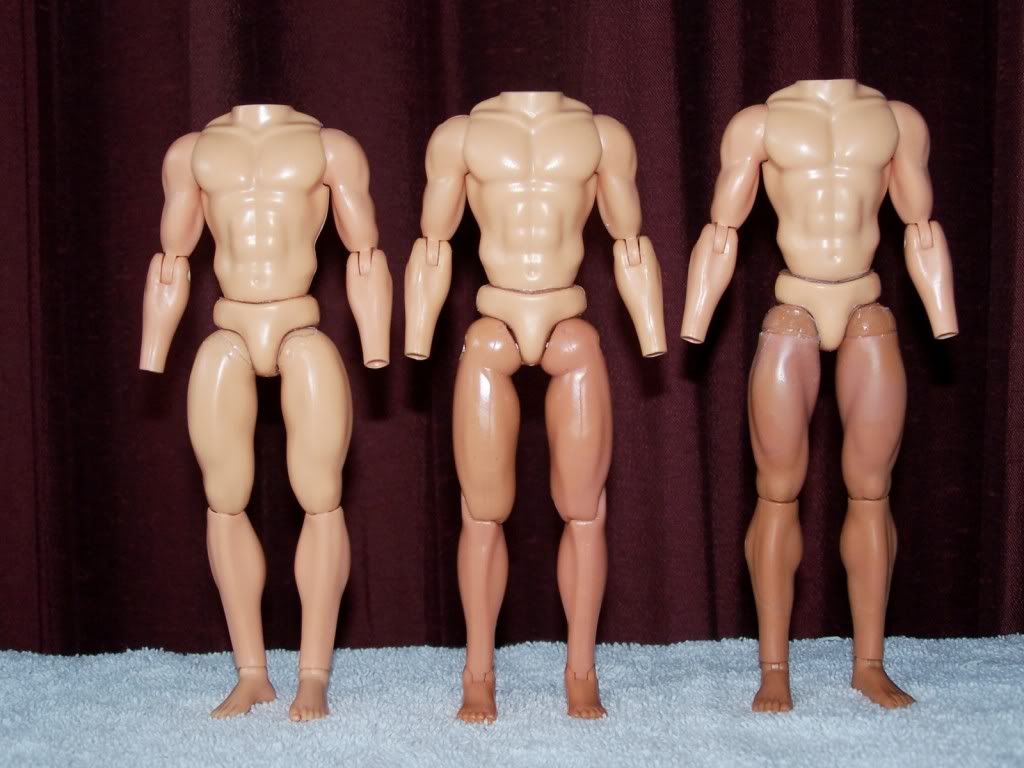
From Left to Right, Repair using the Mattel Retro Action legs, Repair using the EMCE legs and Repair using the ZICA legs
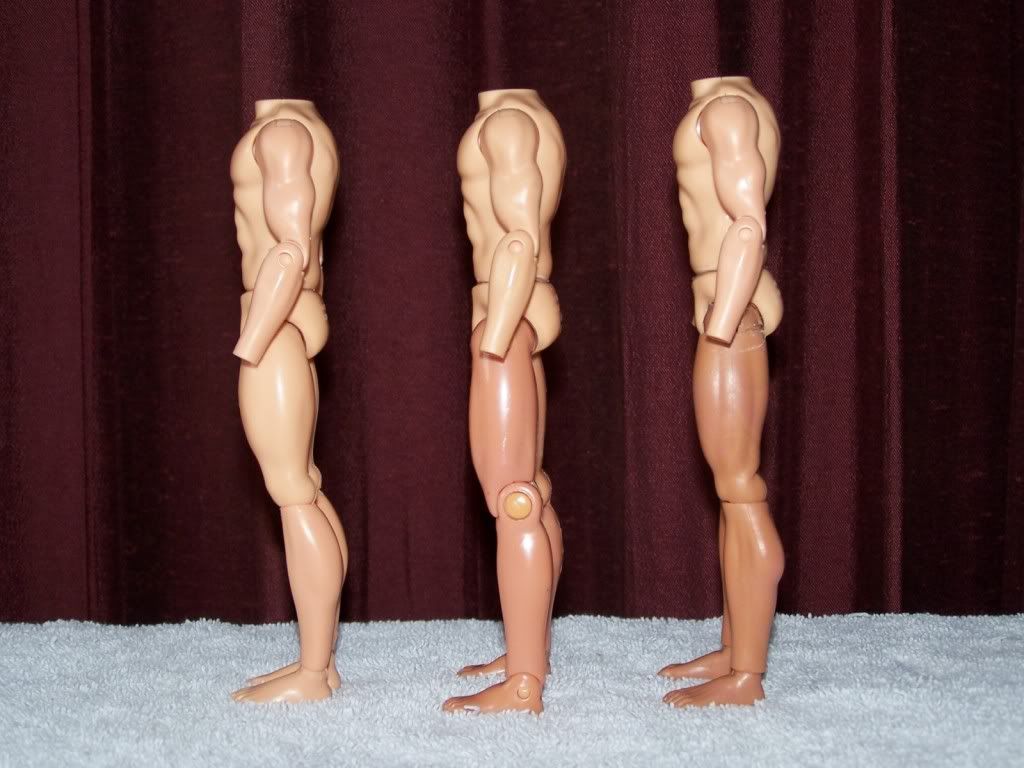
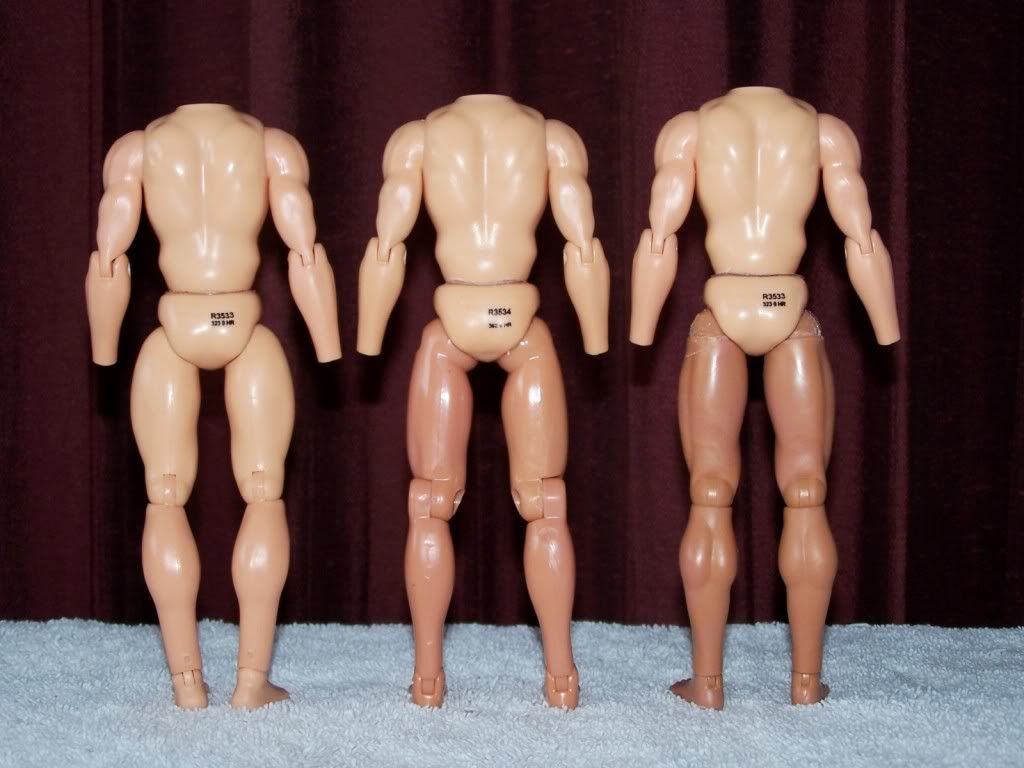
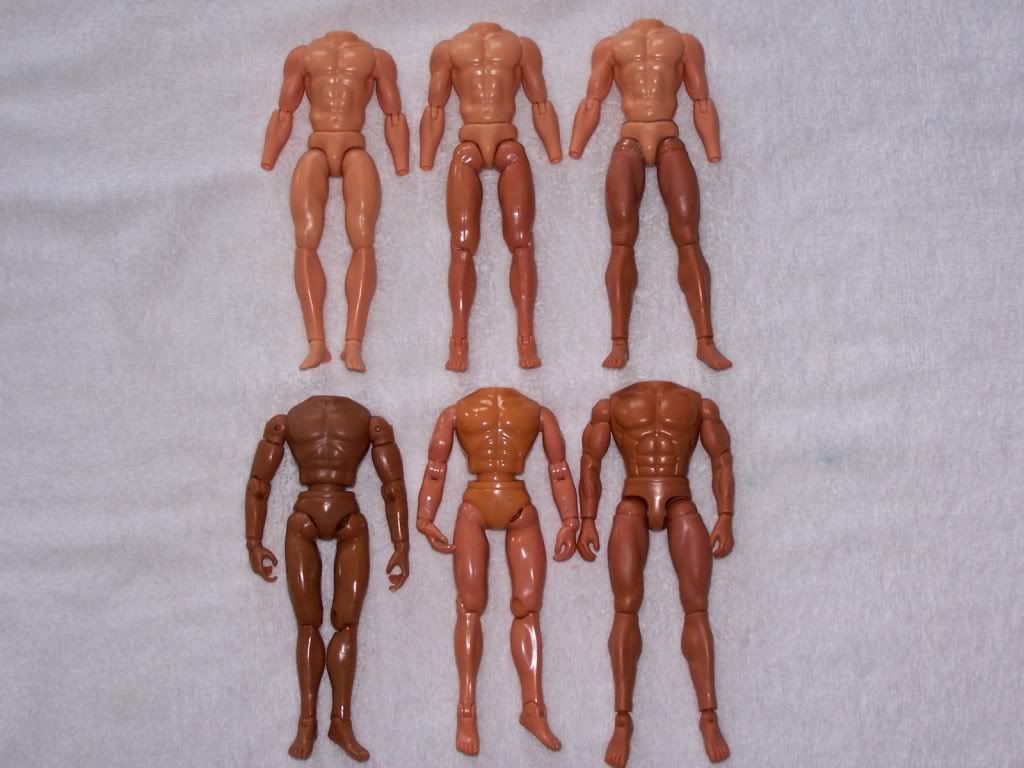
And to prove that the Mattel retro Action body does not look bad at all, here are comparisons to the other Mego Like bodies out there:

To all: I hope you find this tutorial of benefit...
To the Mods: Feel free to locate this thread where you deem appropriate. I just didn't know if posting in Buzz, Customs, or EMCE...
Thanks!
The following tutorial is meant to provide you with a means to repair the Mattel Retro Action body and consequently to save you some money by using the same body your figure came with. The tutorial is both verbalized and illustrated but if at anytime you have a question feel free to either REPLY to thread or PM me. I really hope you find it useful...
OK, here we go... We are looking forward to tighten the articulation joints at both legs and at the torso/waist. The main problem with the Retro Action body is that there is not enough friction exerted between both parts of the joint at their contact surfaces. This is true for both leg-pelvis and torso-pelvis articulation joints. As a consequence, any or both parts of the joint would slip loosely. Furthermore, the factory body stringing is made using black elastic bands that do not exert appropriate pull force to tighten the articulation joint. The combination of both factors inhibits the figure from standing a pose... Even the original Mego bodies were designed with rough surfaces at these particular articulation joints. Remember the tiny & ugly plastic spikes that were present in the torso ball joint and at the leg end?
In this tutorial we will be developing vinyl gaskets to provide the desirable friction at these joints and we will strengthen the figure stringing to tighten the joint. Following are the steps to accomplish these:
Step #1 - Remove the figure head using the boiling water method and a bit of patience...
Step #2 - Using a Dremmel or any other Rotary Tool, remove the neck plug pin that remains attached to the body. Refer to the following pictures:
Step #3 - Bend the figure at the targeted joints and cut the elastic bands. Plain and simply eliminate the factory stringing. Refer to the following pictures:
Step #4 - Using a Dremmel or Rotary Tool remove the attaching post at the pelvis from wall to wall. Refer to the following pictures:
Step #5 - Ok... At this stage you have all your retro body parts loose with the pelvis and the torso parts modified (pelvis without attaching post and torso without neck plug pin). Now you need to find yourself some clear vinyl sheet (fabrics department at Walmart), flat elastic band, scissors, X-acto knife, and precision tip "Crazy Glue" or any other cyanoacrylate compound. We are going to use these to construct and bond vinyl gaskets at the pelvis, torso and legs joint contact surfaces in order to develop joint friction. The flat elastic band is meant to tightly re-string figure back at the end of our jobs. Refer to the following picture.
Step #6 - Cut a 2 inch by 2 inch sheet of vinyl (approx). Leave it at hand since you will be dispensing adhesive and you will need it right away. Carefully dispense cyanocrylate around the inner rim of the pelvis where it meets with the torso. Refer to the following picture:
Step #7 - Take the piece of vinyl sheet and place it over the pelvis with glue on it. Then take the figure torso and press fit into the pelvis with the vinyl sheet caught in between. Wait a couple of seconds allowing the bond to dry. Refer to the following picture:
Step #8 - Withdraw torso from pelvis and using the X-acto knife cut a hole at the vinyl sheet following the contour of the pelvis at the torso inlet. In addition cut off the vinyl outside the pelvis and trim to contour. Refer to the attached pictures:
Step #9 - We will be following the same approach for the both legs joint gaskets. Cut a 2 inch by 2 inch sheet of vinyl (approx). Leave it at hand since you will be dispensing adhesive and you will need it right away. Carefully dispense cyanocrylate around the inner rim of the pelvis where it meets with the leg. Start with the Right Leg (just to be consistent with my pictures). Refer to the following picture:
Step #10 - Take the piece of vinyl sheet and place it over the pelvis with glue on it. Then take the figure Right Leg and press fit into the pelvis with the vinyl sheet caught in between. Wait a couple of seconds allowing the bond to dry. Refer to the following picture:
Step #11 - Withdraw Right Leg from pelvis and using the X-acto knife cut a hole at the vinyl sheet following the contour of the pelvis at the Right Leg inlet. In addition cut off the vinyl outside the pelvis and trim to contour. Refer to the attached pictures:
Step #12 - Repeat Steps #9 to 11 for the Left Leg inlet at the pelvis.
Step #13 - So far you have constructed and adhered all joint gaskets at the pelvis. Refer to the attached picture for the end result. You are now faced with two options: a) skip to the re-stringing steps or b) add increased friction by also making vinyl gaskets for the torso and both legs. It is really up to you... I'll recommend the increased friction option... To skip to re-stringing, skip to Step # X. To proceed with increased friction continue with Step #14.
Step #14 - Now we will be repeating the previous steps only that at the other joint component (torso or leg) instead of the pelvis... Cut a 2 inch by 2 inch sheet of vinyl (approx). Leave it at hand since you will be dispensing adhesive and you will need it right away. Carefully dispense cyanocrylate around the waist rim of the torso where it meets with the pelvis. Refer to the following picture:
Step #15 - Take the piece of vinyl sheet and place it over the torso with glue on it. Then take the figure pelvis and press fit into the torso with the vinyl sheet caught in between. Wait a couple of seconds allowing the bond to dry. Refer to the following picture:
Step #16 - Withdraw pelvis from torso and using the X-acto knife cut a hole at the vinyl sheet following the contour of the torso hole. In addition cut off the excess vinyl protruding from the torso and trim nicely at the waist area leaving adhered a vinyl gasket where the torso waist meets the pelvis. Refer to the attached pictures:
Step #17 - Pick up the Right Leg and using a pencil, draw a circle with the leg slot as the circle diameter. It really doesn't matter which leg you start with but just to be consistent with our pictures and discussion pick up the Right Leg. Refer to the following picture.
Step #18 - Cut a 2 inch by 2 inch piece of vinyl (approx). Leave it at hand since you will be dispensing adhesive and you will need it right away. Carefully dispense cyanocrylate around and inside the circle you just drew. Refer to the following picture:
Step #19 - Take the piece of vinyl sheet and place it over the Right Leg with glue on it. Then take the figure pelvis and press fit into the Right Leg with the vinyl sheet caught in between. Wait a couple of seconds allowing the bond to dry. Refer to the following picture:
Step #20 - Withdraw pelvis from Right Leg and cut off the vinyl excess. Using the X-acto knife, trim nicely the non bonded vinyl leaving adhered a vinyl gasket where the Right Leg meets the pelvis. Also cut and trim the vinyl covering the leg slot. Refer to the attached pictures:
Step #21 - Now pick the Left Leg and repeat Step #17 to 20.
Step #22 - Ok, all vinyl gaskets have been done and bonded. These would definitely increase friction at the torso to pelvis and legs to pelvis joints. It is now vinyl to vinyl contact surface friction as opposed to polished plastic to polished plastic friction. Now we are ready for Re- stringing. refer to the attached picture:
Step #23 - Thread the body parts using some flat elastic band as indicated on the picture below. You are looking forward to leave both elastic band ends coming from the legs. Make sure you pivot around the attaching post inside the chest during threading.
Step #24 - You are now looking forward to tighten both elastic ends and make a knot in between either leg and the pelvis. For consistency with pictures and discussion we will do it between the body Right Leg and pelvis. Thread the elastic band end coming from the Left Leg and thread it inside the pelvis entering the Left Leg inlet and exiting the Right Leg inlet. Grab both ends with your hands. Refer to the following picture.
Step #25 - Cross both elastic ends and tighten at will. Refer to the following picture:
Step #26 - Make a knot and cut the elastic band excess. Refer to the following picture:
Well, this is it! You now have a repaired Retro Action body capable of withstanding any pose and real tight. It also makes the figure look aesthetically much better and gets rid of the bowed legs look. You may find this repair method a bit long but once you do it once the others would be cream cheese... And since every effort has its reward, reward yourself with the end results! The icing to the cake is that with this repair method, you may chose to attach legs from other Mego Like bodies instead of the Mattel Retro Action legs. The attached pictures speak for themselves.
From Left to Right, Repair using the Mattel Retro Action legs, Repair using the EMCE legs and Repair using the ZICA legs
And to prove that the Mattel retro Action body does not look bad at all, here are comparisons to the other Mego Like bodies out there:
To all: I hope you find this tutorial of benefit...
To the Mods: Feel free to locate this thread where you deem appropriate. I just didn't know if posting in Buzz, Customs, or EMCE...
Thanks!

 Really great job though...well thought out.


 I personally like the Mattel body and this shows how Mattel should approach a fix

Comment