Help support the Mego Museum

Announcement

Collapse
No announcement yet.

1979 Kenner ALIEN Complete Restoration - ADULTS ONLY

Collapse
X
 
  • Time
  • Show
Clear All
new posts
  • windebieste
    Museum Patron
    • Dec 31, 2015
    • 115

    Now that the initial preparation of the upper leg is done, we can move on to reconstructing the joint. We don't need to be orthopedic surgeons, but the process is similar. We have to remove all the banged up and worn out parts and replace them with some custom made fittings that will perform exactly the same as the original hip joint. So let's continue with this hip replacement, shall we? First we will need a new surface to work on and this process will be covered in this post.


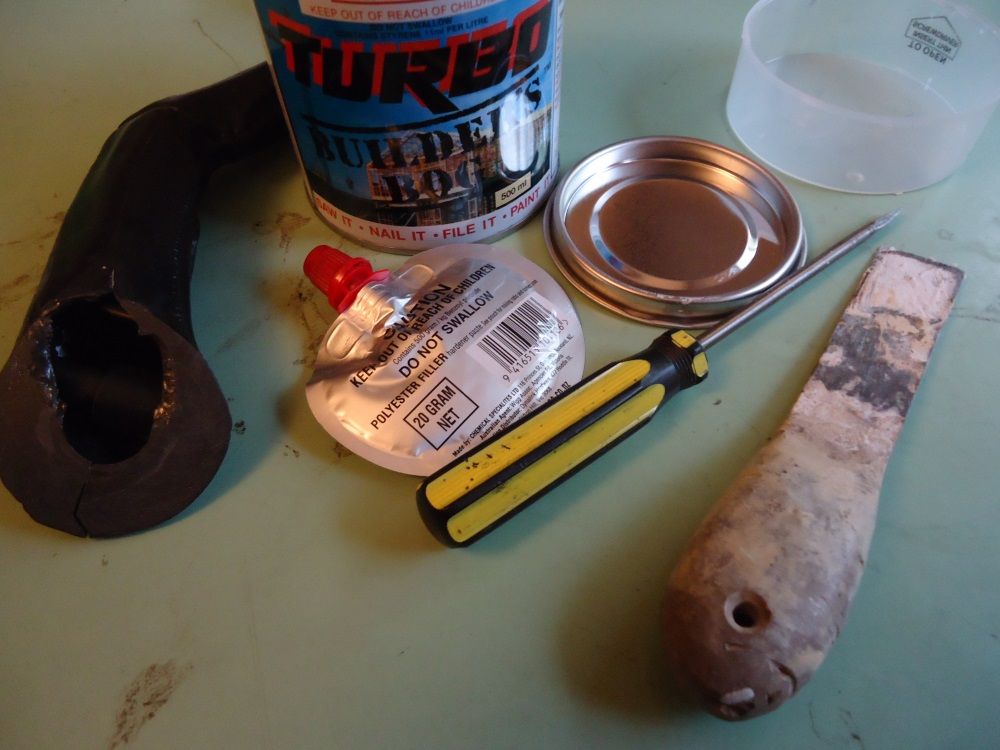
    We need to mix up some filler. This is basically a putty and catalyst that's used to fill in holes on anything ranging from wood to vehicle damage. It sets hard once mixed.
    I'm using 'Builder's Bog' here. Great name, huh. I like this particular brand because it will set hard like a plastic; and not rock hard, like granite. It's easier to drill and more
    importantly, it won't crack, either. This stuff (or something very much like it) can be bought from your local hardware store.


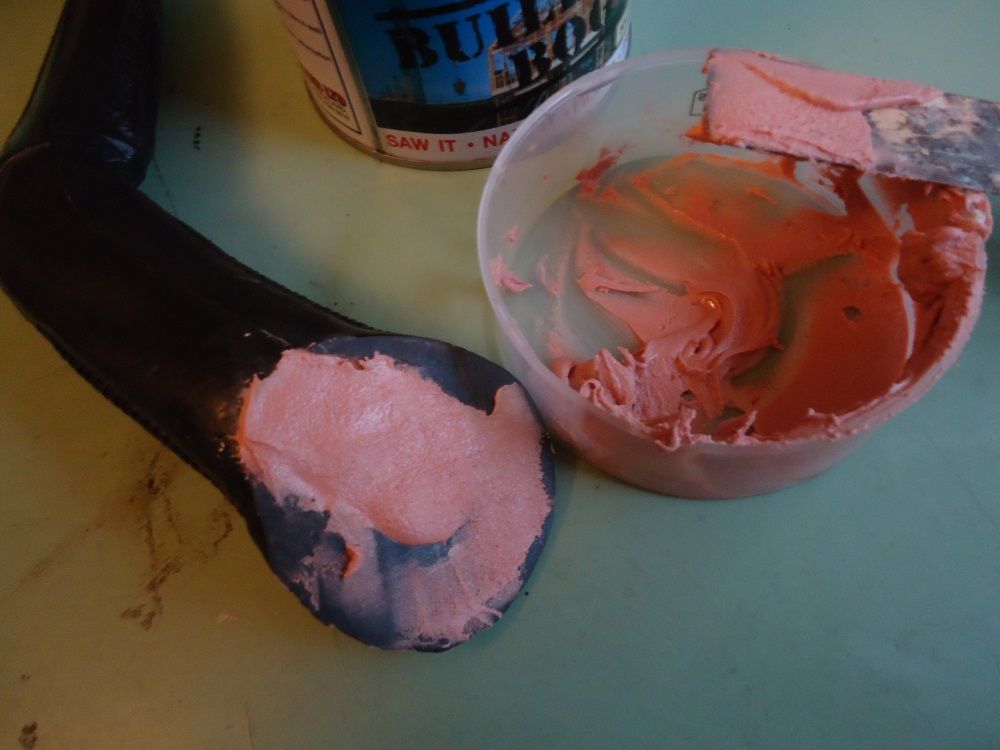
    So here is the filler all mixed up and applied into the joint. I've liberally filled the the upper thigh area to make sure the filler anchors around the thick plastic post inside
    the upper thigh. I always mix up more of this stuff than I need. Firstly, you want to get it done on the one pass; and secondly, it's good to have some leftover so you
    can assess how the hardening process is progressing by testing the excess material rather than the actual item being worked on.


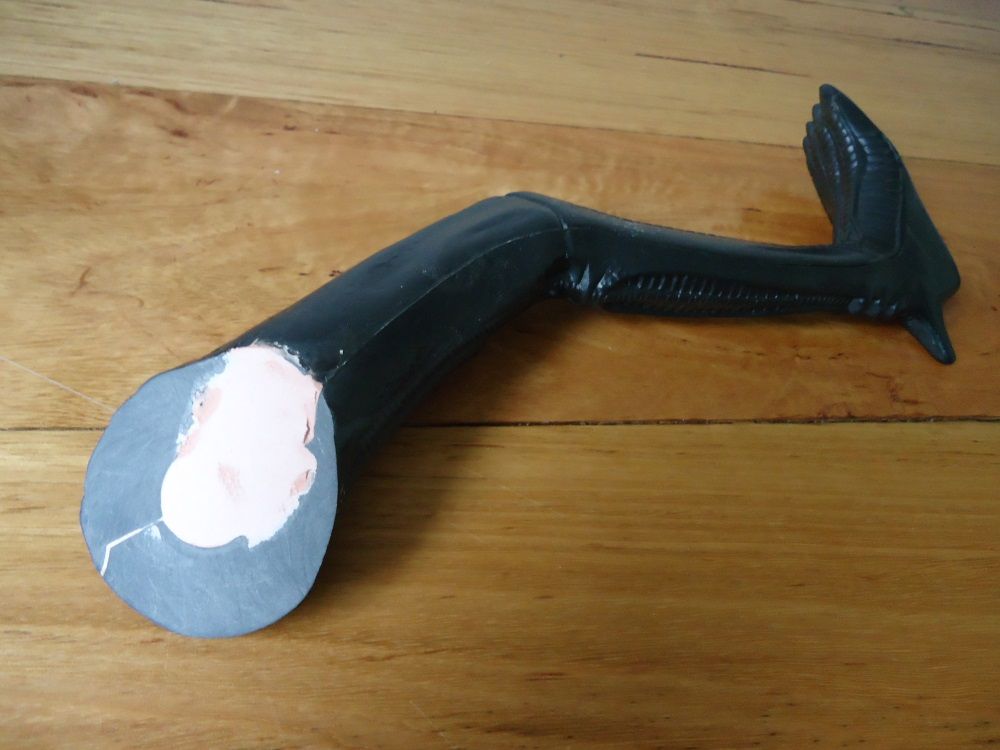
    Once fully hardened, I can sand back the excess. Once that is done, it will leave a nice flat surface to sit flush on the hip joint and we are now able to reconstruct the remainder of
    the joint on this surface.


    Now that we've got the upper leg filled in and sanded back we can move onto the next stage. We now have a terrific flat surface that will sit flush against the torso joint and it's also a good foundation to fit a new spindle onto. I'll be covering the completion of this procedure in the next post. Tomorrow, if I have time.

    -Windebieste.

    Comment

    • windebieste
      Museum Patron
      • Dec 31, 2015
      • 115

      OK, getting back to this little task. Let's finish this repair.

      Before we continue, we are going to need a couple of dimensions. The first one is critical but the second is more of a guideline.


      The first dimension we need is the diameter of the hole in the torso for the spindle to sit in. As we want the spindle to fit and rotate
      with ease, this dimension has to be accurate. Well, luckily 1 inch is easy to remember.


      The second dimension we need is for the outer flange on the leg that we need to use to hold the spindle in place. Of course the
      one on the leg we are repairing is completely destroyed. We can grab this dimension from the other leg. It's 1 1/2 inches in diameter.
      Or there abouts. This dimension isn't as critical and more of a guide to what you will need to hold the spindle inside the torso.


      Great! We've got the dimensions we need and can now continue with repairing this damaged piece. In order to return the leg to the figure we will have to construct the remainder of the joint with 100% improvisation. Luckily, materials and tools should be easy for you to find if you need to do this. You will need:

      1x Pair of scissors. The sharper, the better.
      1x Screwdriver.
      1x Leather hole puncher.
      1x Drill.
      3x Screws.
      1x ALIENS vs PREDATOR REQUIEM on DVD.
      ...and a very small amount of glue.

      The first thing we do is open up the DVD and throw out the crappy movie. Believe me you don't want that thing in your life but the important thing is you now have a spare DVD case. Perfect. It's just what we need. Any old DVD case will do but disposing of copies of that movie will mean you are also doing the World a favor.

      Anyway, you'll need a plastic DVD case.

      Using the dimensions we acquired earlier we mark a pair of circles on a flat area of the DVD case. There should be ample room on the case despite all the ridges and such. Mark the circles on the case and cut them out with a pair of sharp scissors.


      Here's an old DVD case with a pair of discs cut from it. The smaller 1 inch disk should be as accurate as you can make it in shape and size.
      The second disk is more or less only used to hold it in place inside the torso but an approximate size of 1 1/2 inches should be your goal.


      With both disks cut to size I can dab a small amount of glue on them to cement them together. In the finished assembly, the glue will do nothing
      but I need to fasten them together now so they won't ride around while I punch 3 holes in them. It just makes the process easier.


      We now have everything for that final assembly of the reconstructed hip joint. We locate the correct place to drill the holes in the filler by penciling in
      and completing the circle where the spindle has to go on the leg. This then becomes a guide to help use the new improvised spindle as a template to
      mark the position of the holes. This may take a few attempts but when it all looks centered, we then drill the holes for the screws. Simple, really.


      From this point it's a simple matter of placing the smaller disk onto the face of the leg and driving all 3 screws into place. They do need to be tight - but
      not too tight - you're not replacing a car tire here. ...and that's it. The completely repaired spindle joint should now be ready to reassemble onto the rest
      of the figure. If you find it's a little off center, or too loose or too tight this entire process is repeatable. I like repeatable processes. Unlike a lot of things
      in life, they provide me with the opportunity to get things right once in a while. lol.


      Admittedly, the screws I used here were a little short and I could have used longer ones but these were the best I had on hand. I could have cut another pair of disks from the DVD and aligned them a little more accurately, too, if I wanted to. Nonetheless, the screws are long enough to hold the leg in place securely and the spindle is going to work perfectly despite being glued a little off center. No one is going to see it, anyway, but that is never an excuse for work done poorly. If at any point I wanted to redo any of this process, I can go right back to the beginning, fill in the holes I've made and cut a fresh pair of disks until I get it right. For the point of this demonstration exercise, however, this is more than adequate. Hey, I don't expect everyone to get it perfect on their first try and knowing that it's easily repeatable may give someone the confidence to just try it.

      One last post to go regarding this repair. Let's show off how well this worked tomorrow.

      -Windebieste.

      Comment

      • LonnieFisher
        Eloquent Member
        • Jan 19, 2008
        • 10829

        This thread makes me want to get a thrashed, old Alien figure and do some reconstruction...

        Comment

        • windebieste
          Museum Patron
          • Dec 31, 2015
          • 115

          They're fun to mess around with. I've covered most problems you'll encounter if you do decide to take one on.

          Anyway, let's take a look at how this repair went. The damaged left leg joint has been completely rebuilt but the real test is in the finish. Let's see if it fulfills all of our criteria outlined above.


          From the front, the leg now connects to the torso cleanly and the repair is almost undetectable. It's a great finish. Especially considering the
          mess the joint was in.


          The view from the side is also acceptable. The positioning of the left leg on the torso is good without being off center and sits flush on the surface.


          Getting up close and personal reveals a hint of the work that's been carried out on the limb. Nothing too detracting and certainly nothing that
          can't be concealed with just the smallest lick of paint.


          It's only when we rotate the leg well outside of the standing position does it in any way substantially reveal any work has been done to it.


          It's a good repair. Firm and centered on the join as it should be. The thickness of the DVD case plastic is a perfect match for the task at hand. Rotation is easy but not loose. It's an excellent reconditioning of a limb that previously looked like a candidate for the rubbish bin. This wasn't a difficult repair despite the initial condition of the limb and it does serve to demonstrate that no matter how broken something is, there may just be a way to get it working once again.

          You'll notice the figure I am using here is incomplete. This figure is being built up from scratch using parts I've swapped out from other Kenner Aliens. Everything on this figure is a little bit, well, ruined. Obviously the tail is damaged with a couple inches missing. There's only 3 of the 5 dorsal appendages present and it's obviously missing both arms and the head. Now that the leg has been attached to the torso it reaches a significant milestone. It can now stand upright. The other pieces that comprise the figure at this stage are also damaged. Both of the rear torso halves have issues and the right leg, well, that has a splint inside to support the cracked internal spindle and flange.

          In terms of what I wanted to achieve here, yeah. I think it's a success. It'll pass a casual inspection when standing and it operates the way it should. It's clean, has full 360 degree mobility and it's sturdy. This isn't coming undone without forcing it unduly. The repair only becomes visible if rotated well outside of the figure's ability to stand. I'm happy with this result.

          Eventually, I'll have enough pieces to complete this fellow. It will end up becoming another FrankenKenner monster, a figure made up from leftovers of other rebuilds - and each piece added to it represents another figure elsewhere that has been improved accordingly. I haven't decide if I will customise this item further as one 1980's inspired punk arse Alien already in the house is quite enough. lol.

          Thank you for reading.

          -Windebieste.

          Comment

          • windebieste
            Museum Patron
            • Dec 31, 2015
            • 115

            Awright... on with the show.

            I had a box full of stuff arrive from the US, ummm... yesterday. Here's the contents:


            A bunch of old toys, including an IDEAL 'Jaws - the Game' shark along with a bag of its tokens and gaff hook. A 15 inch tall 1978
            Kenner Darth Vader was also in the package. Both of these items are for another Project I am working on, so we'll just put them
            aside for now and concentrate on the other stuff that's present here, the Kenner Alien figures and miscellaneous debris. By the way,
            that shark and it's accompanying pieces are 40 years old now. wow...


            First, let's look at this item. The Alien standing up is in average condition for its age. Figures in this condition are common. The carapace
            and crest are both missing and the arms and legs are all loose. This is typical and very standard. I'll get around to refurbishing it one day -
            that's going to be some time off so he's being put aside, too. So, let's move on to the pile of rubble that was also packaged in the box.


            Also in the box was this assortment of pieces. There's a severely degraded figure amongst this pile of rubble and some spare
            parts that will be put to good use in the near future. Lets separate this stuff out.


            Here's the loose parts, all of which will come in handy for some refurbishments I have on the go. The head, tail, dorsal quad appendage
            assembly and one of the right arms are perfect parts to this end. The other right arm (Yeah, I got 2 right arms here.) is a little damaged.
            There's some ugly forced markings present (Red arrow) where someone has attempted to repair this arm and gouged it with a screw driver.
            Well, that's a bit of a bummer but not a problem under these circumstances. This suits my purposes, perfectly. You'll see.


            Here's the near complete figure. Well, notwithstanding it's sub par condition, it is 'near complete'. It's badly beaten up and in a dreadful
            state, for sure; but it's mostly there. Mostly. It's hip is shattered which isn't a real problem for me as I have recently documented; and there is
            also a small rent above the ankle on this leg. The wrist is broken (a small piece is missing but I'm confident this can be fixed.) The figure
            has a number of other issues that need to be addressed. It's basically a Karcass and only good for parts stripping or customising; and in this
            case, both practices, actually. Anyway, it's a mess. I'm going to call him 'Mel'. Hi, Mel! Nice to meet you.


            So, Mel has come into my life at a perfect time. He's such a beat up individual, I'm going to treat him a little different than the other restorations. Since I restored a number of other figures and had enough busted up parts to build another figure, those sub-standartd pieces were reassembled became the marvel that is now GG Alien as documented earlier in this thread. I'm going to do something similar with Mel. He's going to undergo a transformation and become my 2nd FrankenKenner monster. When I built GG Alien, I really loved the ambience of the figure when it was first coated with white primer prior to painting it black. Since then, I really wanted to take another pile of wreckage, just like this one I have recently received, rebuild it and give it a finished coat of gloss white.

            I'm looking forward to doing this and sharing the results with you.

            By the way, I'd like to thank WorkingJoe90 who responded to my request on this on this post to acquire some of this stuff and Mr. Shank for sending it to me from the US. Thanks Guys! I really appreciate your efforts!

            Now I just need a couple of left arms to finish off some other figures I have on the go elsewhere; but I certainly won't say no to anything else that gets offered to me, either.

            Once again, thank you for reading. More later.

            -Windebieste.

            Comment

            • windebieste
              Museum Patron
              • Dec 31, 2015
              • 115

              Let's take a closer look at Mel. See what we are up against.

              Firstly, here's his ugly mug:


              Mel's head is in good shape. It's a little worse for wear but OK. Importantly, there's no damage, deformations, scratches or other physical issues.
              The trigger that operates the jaw mechanism is working perfectly, too. Unfortunately, the head is still a long way from being perfect. The tongue
              is missing as is the carapace. Hell, I can replace those if I wanted to. More important is the quality of the paintwork. The glow in the dark paint
              is severely degraded as is the chrome coatings of the teeth on both jaws. The head is let down seriously in both these regards and diminish the
              overall appearance of the head dramatically.


              Here's the figure from the back. Mel is not just missing his left leg and hand, he's also displaying some damage to the mounting slot for the crest.
              A damaged slot is all to common on these old figures. Also of importance is the orientation of the upper pair of quad dorsal appendages. As both
              of these are out of alignment, they will need to be repaired internally. Easily done.


              Here's a close up of that hand that's damaged at the wrist. This issue is uncommon and only the 2nd time I've encountered it. If I had a spare
              left arm, I'd delegate this part to the other junk figure I have in my possession. As I don't have a spare (I need all the left arms I can get at the
              moment!) left arm, I'm going to have to repair this one and hope for the best. This is one occasion I will need to rely on glue to re-affix the shard
              back in place. It should be OK and if it isn't, I'll have to resort to more creative measures. This will entail fixing the hand back to the wrist by
              lengthening the spindle shaft with a long narrow bolt and securing the bolt head deeper inside the arm with some filler. I'd rather not have to do
              that as it's a fussy operation and may result in losing any articulation in the wrist if not done carefully.

              I'll get stuck into these and other repairs and post them all tomorrow. Too much fun to be had with this figure.

              -Windebieste.

              Comment

              • windebieste
                Museum Patron
                • Dec 31, 2015
                • 115

                The first thing I did with the figure is dismantle it and wash it. Washing each piece individually is a lot easier than trying to wash the figure as a whole unit. Even if I was to just clean the figure without performing any other repairs, I'd still dismantle it. It's just so much easier to handle each part individually. Then there's the issue of drying it. With the figure completely disassembled and open to the World, it dries out a lot faster and thoroughly than when it's fully assembled.

                Taking it apart also means I can assess the figure internally and fortunately it's all clean inside. Nice. No arthropods have taken up residence in this old figure. Given the condition of this figure and Lord knows where it's been 'stored' during the past 30+ years anything may have crawled inside, started a family and died in there. I dread the day where I open up on of these thngs and find a dead mouse inside. Anyway, taking it apart also means I can decide which pieces I actually want to use on this figure - and which ones should be put aside, allocated elsewhere and used on another figure that isn't so messed up. Remember, this figure is going to to get a full coat of gloss white paint and I'd prefer to use any good pieces currently on Mel on a restoration figure that needs them more. Any banged up pieces will be used here. For example, this figure has an excellent right arm and there was another right arm in the box but it had been damaged. It makes no sense to use a good arm when I can repair the damage on the other one and paint that instead. So, I'm swapping the arms around. Mel's good condition right arm is going to someone else and the damaged arm is getting fixed and used here.


                Included in the box was this right arm. It's had a nasty gouge in it at the shoulder joint so I've filled in the damage and swapped it with Mel's
                good right arm and I'll use that better arm elsewhere. Here, the gouging has been filled and filed back. It will get painted over and won't be
                noticeable. This means a good piece won't get wasted here when this damaged piece will do just perfectly.


                Mel's tail was still attached to his back torso half and this is desirable. I have another pair of these matching parts handy but they have since been broken at the spindle joint and become separated. So, I'm going to swap Mel's better quality back torso half and tail assembly out for the slightly other degraded one. It won't make any external difference but it means another figure will be more complete. With Mel's right arm along with his torso half and tail assembly going elsewhere, that makes other improvements to a pair of other figures. I think that's a good result.


                Instead of being fastened with the serrated washer that originally held the tail in place, Mel now has a screw and plate holding the tail onto
                the torso. Note that both previously damaged and misaligned upper dorsal appendages are now fastened back in place with a pair of screws.


                Here's the leg. It's been repaired at the spindle and the rent above the ankle has also been filled in.


                There's other repairs on this figure that need attention, too. The left hand needs to be fitted back onto the wrist and secured with some glue applied to the fractured joint; and I need to prepare a pair of improvised anchors to fit both arms back on to each shoulder. I'll also have to repaint the silver teeth as the current finish is severely degraded. Then there's fixing a crest between the figure's shoulder's for which I'll use a facsimile/reproduction part. Keeping in mind this figure is getting painted, there's no good reason to use a genuine part. I'm not going to document all of these processes here. That's all been done previously and if you read back through this thread you find all of these issues are already covered. Well, I think they are, anyway.

                Instead, in the next couple of posts I'll just skip ahead to how the figure looks when it's fully painted and re-assembled, which I haven't done just yet. It will take me a few days to apply an undercoat and spray several light finishing coats of gloss on top of that. Mind you, I might re-assemble the figure tomorrow prior to painting and take a couple of photos of Mel in his current 'raw' state just to show off how ragged and scarred he is with all his mangy head, gammy teeth, filled in bits and glued on wrist. It'll make for a nice first entry in a 'Before and After' comparison set of images.

                Once again, thanks for reading.

                -Windebieste.

                Comment

                • windebieste
                  Museum Patron
                  • Dec 31, 2015
                  • 115

                  Here's Mel. He's been temporarily reassembled prior to his first undercoating. Let's take a look at him in his current state.


                  Poor Mel. He's in a pretty rough state. You can see across the top of his head how much of his glow in the dark paintwork has perished.
                  If this had been in good condition, this head wouldn't have been considered for this customisation; but alas, it's kind of mangy and in less
                  than average condition. He's missing a few other parts, too. Most notably, the carapace, dorsal crest and all 4 of his mouth parts are absent.
                  From this shot you can also see the rent in his left leg above the ankle where it is now filled in. Gluing his left wrist back together has worked
                  and his hand can rotate freely upon its spindle without any restriction. Both arms have been reattached using some improvised anchors so
                  they can hold a pose without an issue. So far, so good.


                  Here's a view of Mel at an angle. You can see where he's had the gap filled in at his right shoulder joint as well as the point just above his left
                  ankle. It's glaringly obvious his teeth are absent. Poor bugger.


                  Here's Mel's upper and lower set of dentures. You can plainly see how perished the chrome paint work is on these pieces. These are going
                  to have to be repainted. Also present, is the dorsal crest I will be using on this figure. I'm using a nice cheap facsimile here. There's no point
                  using a better quality one when it's going to get painted. I'll fasten this in place, no problem.


                  Poor Mel. Here's the rundown on what his problems are...

                  Carapace is missing - I'll add one later. It will be a reproduction part. I have the perfect piece in mind for him.
                  Head paint work is deteriorated - I'm just going to globally coat the figure evenly so this will no longer be a problem.
                  Teeth chrome work is deteriorated - Once again, I'll have to recoat these.
                  Right arm - This was in reasonably good state so I didn't want to paint it. I swapped it out for a damaged right arm that can only benefit from being painted. The original piece will get used elsewhere.
                  Left arm - The wrist was fractured and is now glued back together. Rotation for the hand has been retained. Very happy about that.
                  Dorsal crest is missing - Once again, I'll have to reattach a reproduction part.
                  Dorsal quad appendages - The upper pair of appendages were broken from their mounting plate and been re-affixed. They are now no longer limp and nor do they freely rotate out of alignment.
                  Left leg - Shattered at the hip and repaired; it's also been filled in just above the ankle.
                  Rear torso half and tail assembly - These were both in good condition and were still attached together. I've swapped them out for a matching set that had been broken at the join. The original pieces will get used elsewhere.

                  This actually doesn't leave very many parts on the figure that are undamaged or otherwise incomplete. The right leg and front torso half can be said to be good and all my other WiP figures have good versions of these so allocating them here is not a problem at all. The important thing is, there's so many issues this figure has, it doesn't trouble me to dedicate fully coating the figure in gloss white. Seeing as most of the parts present are already degraded to varying degrees, fully repainting the figure thus changing it substantially even from from its original condition isn't such a negative activity.

                  There is no way I would even contemplate doing this with a figure that is in average condition; and doing it to one that is complete or even mint is absolutely out of the question! Please don't paint figures that are in excellent condition - if you do want to paint one, go find a beat up piece of sh*t figure like this one here and use that. No one is going to miss it. Average and poor condition figures are easy to come by. Just ask me, I've handled so many of these things in this state that any notion of them being considered rare is completely erroneous! They are NOT rare. They can be pricy, for sure, especially good quality figures can fetch good money. There's various reasons for that, but don't equate price to availability.

                  Anyway, I think it will take me a good few days at the very least to get Mel fully coated. I will post the results in the next week sometime.

                  Once again, thank you for reading. I know someone reads this thread. It's currently had over 10300 views. Wow...

                  -Windebieste.

                  Comment

                  • windebieste
                    Museum Patron
                    • Dec 31, 2015
                    • 115

                    Here he is, Melvin the Albino Xeno. Or, Mel Blanc, if you prefer. Either way, he's almost complete.

                    Almost complete, I say, because even though all of work is done, he's still missing a tongue. It's no big deal. I will be adding one at a later date but other than that, Mel's general overall body appearance is finished. The painting took a little longer than I expected and I'm not 100% happy with it but it's done now. I did mess up a little along the way and had to correct it. There's still some touch up work to be done on him that will get done soon. The reproduction dome looks suits him, too. All in all, a reasonable effort. Not perfect, but still very acceptable.

                    The white gloss plays to the figure's strengths with the coating aiding to enhance the sculptural forms of the figure's details. The figure is natively cast in gun metal grey plastic without any painted features (aside from the glow in the dark finish upon the head, of course) to highlight the presentation. The presentation is highly reliant upon the bold details of the figure and being cast in such a dark material tends to hide these features as shadows are thrown across the difficult to discern features, losing much of the information that this figure is generously imbued with. Painting the figure completely white allows those dark shadows to play off the light surfaces and provide the much needed contrast to really show off the integument this figure has to offer. As we see in these photos, that detail is in abundance.


                    Full views of the white figure next to an untouched figure.


                    A closer look at both figures. The details become more obvious on the white coated figure.


                    A profile of the custom figure's torso. It would make a fine marble bust, hey. (NOTE: The carapace and teeth are all reproduction parts.)


                    The white figure in its entirety from another angle.


                    The same angle as above but with the reproduction head carapace removed.


                    The front of the torso reveals it's detailed glory.


                    Viewed from the rear, you can easily see the 4 screw holes in the figure's back that clamps both torso halves together keeping all the figure's limbs in place.


                    All the detail on the dorsal appendages is terrific (NOTE: The upper dorsal crest is a reproduction part and is also painted white.) I still have some minor touch up
                    work to do on the figure as is evidenced by the paint that was scrapped off during assembly from the base of the lower quad appendage.


                    Detailing on the thigh stands out when painted like this.


                    Here's the left foot. Both feet possess some of the figure's more subtle detailing.


                    Here's both hands. All 12 digits are highly detailed on both upper and lower surfaces.


                    Seeing as the figure was thoroughly coated, the interior of the mouth was not missed. Here you can see both of the
                    delicate clips that hold the split tongue halves in place.


                    Ack! A lot of photos. Sorry about that, but I need to get a move on here.

                    Despite some mis-steps, I'm very happy with how Mel has turned out. This modified figure has become a tribute to highlighting the relief detail these vintage toys possess - and I need one like this on hand for demonstration purposes. To this goal, this exercise brings up the tail end of my efforts here regarding such activities on this forum. Its time for me to move on from documenting the restoration and (to a lesser extent) customisation of these old vintage action figures and move on to another major (related) Project I need to tend to. The completion of this figure and this post brings this current set of goals to a close. For now, at the very least, anyway.

                    There's a wealth of information spread across these 12 pages that should be able to help fix most common problems these old toys often display. It's been a lot of fun on my part and I hope that someone can benefit from all this information gathered in one place. I hope the methods and repair techniques here are useful and help to get your - or someone else's - Kenner Alien back on its feet and worthy of display.

                    That's not to say that I am leaving the Mego Museum forums or won't be posting here any more. On the contrary, that's just not the case. It just means the tasks I set out to document repairs to these vintage figures, despite being incomplete, is now concluded. I still have a lot of work ahead of me elsewhere but I will continue to be active on this thread. In the Greater Scheme of Things that I have embarked upon, the goals I've set out to accomplish here in regards to repairs made to old 1979 Kenner Alien action figures is largely complete now.

                    "Mission accomplished", as they say; and to all intents and purposes, this post marks the closure of 'Phase 1' as the first part of a set of Greater Ambitions.


                    -Windebieste.

                    Comment

                    • Timothy2251
                      Jerks beef with Ten Bears
                      • Mar 15, 2008
                      • 1959

                      Nicely done, sir! Nicely done! Really enjoyed this thread!
                      "It's sad that governments are chiefed by the double tongues. There is iron in your words of death for all Comanche to see, and so there is iron in your words of life. No signed paper can hold the iron. It must come from men. The words of Ten Bears carries the same iron of life and death. It is good that warriors such as we meet in the struggle of life... or death. It shall be life."

                      Comment

                      • windebieste
                        Museum Patron
                        • Dec 31, 2015
                        • 115

                        Thank you. Greatly appreciated.

                        I noticed on Ebay today marshall_made_collectibles is selling a restring kit for these vintage figures. These kits appear to be good quality, easy to use, reliable and long lasting. They look like they are ideal solution for someone who doesn't want to mess around with making their own improvised arm anchors. I'm going to have to get a couple of them and try them out.


                        "New from ALIEN HOSPITAL and MARSHALL MADE COLLECTIBLES the 1979 Kenner 18" Alien Re-String Kit."

                        There's also a video available. You can check it out here:


                        These do look good and if anyone does try 'em out I would be very interested in knowing how it works out. Please let me know.

                        Thank you!

                        -Windebieste.

                        Comment

                        • Jase25
                          MarshallMadeCollectibles
                          • Jan 8, 2009
                          • 174

                          Thanks for the nod brother. I haven't haunted these pages in awhile. Lot of the people here might remember me from the custom figure pages. Take care!!
                          Jase
                          Marshall Made Collectibles
                          Thanks ~ Jase

                          http://stores.ebay.com/Marshall-Made...ctibles?_rdc=1

                          Comment

                          • Jase25
                            MarshallMadeCollectibles
                            • Jan 8, 2009
                            • 174

                            Just read through this entire thread....blown away. Some amazing work you've done.

                            I boil parts to reshape as well. The tails especially then lay them between cutting boards. Works like a charm everytime. I also bind my leg sockets to add friction so they are no longer loose. I was wondering what your favorite method to close gaps. I've had Figures with gaps in the arms and legs along the seams. For those that won't approximate with glue I use a product called Bondic. I can fill the gaps, smooth it out then hit it with the ultraviolet light which not only hardens but adheres the two pieces together. It cures/dries immediately and it's clear so a little black paint mixed wrought iron black paint and gaps no more.

                            Always happy to learn new and better methods though!
                            Take care ~
                            Jase

                            IMG_7280.jpgIMG_7286.jpgIMG_7285.jpgIMG_7278.jpgIMG_7279.jpg
                            Last edited by Jase25; Oct 6, '16, 11:55 PM.
                            Thanks ~ Jase

                            http://stores.ebay.com/Marshall-Made...ctibles?_rdc=1

                            Comment

                            • windebieste
                              Museum Patron
                              • Dec 31, 2015
                              • 115

                              Oh, Man. Stupidly eventful week. My Mother went into hospital, a storm knocked over some trees on my property and I gotta clear out the mess and my sister-in-law from the US has stayed with us for a few days... too much happening at once. lol.

                              I'm pleased you found this thread of value. I too, am always looking for better ways of making repairs to these figures. I'm sure other people can improve upon many of my efforts documented here.

                              Anyway. I'm not a big fan of modifying the figure beyond its original condition if it can be avoided so I tend not to fill in gaps in the legs, arms or head. I consider such treatment to border on customisation of the figure. I have nothing against it personally and I understand the joins can be ugly and in severe cases, the assembled limbs can be very unsightly. Fixing such gaps that run the entire length of the leg will be desirable for some people. On the other hand, so many of these figures left the factory in this state, the faults can be considered variations. Especially the very common gap that tapers and widens along the upper length of the thigh. It isn't present on all samples but I have seen this gap very often on the figures. They were just made that way.

                              The presence of such gaps in the limbs don't add or detract any value from the figure in general. I understand some people will want a clean finish on their figure and have a preference for one with properly sealed limbs as intended but even figures with gaps in the feet that extend fully up the leg sell at a good price without any drop in value. It's going to be a personal choice situation. After all, the dark presentation of the figure permits a certain amount of tolerance for the presence of such gaps - for most people, such anomalies won't get noticed unless such details are point out to them. I've never seen one sell for less simply because it has a gap in the thigh.

                              That doesn't meant filling in gaps isn't without a place for some of my own figures. The ones I have in mind are the customised items I have in my collection. Ones I have worked on recently, in particular, both GG Alien and Mel Blanc, have had gaps filled in throughout all their limbs and head. As these figures were extensively modified figures so filling in the gaps wasn't even a question. Especially in the case of Mel. The figure is painted white and as such any gaps in the figure that created heavy black lines was reduced. The gaps on the arms, legs and head were all filled in to give the desired clean finish. The only dark lines on the figure now are the points of articulation, screw holes in the back and all the joins that connect the torso halves and head together. I wanted to highlight these features on the figure so they were untouched as these are gaps that should always be present. Additional glaringly obvious gaps on the limbs only served to create a visual noise that detracted from these features so they were filled in. The finish on the figure highlights the gaps that are a necessary as part of the figures articulation.

                              For filling in the gaps on these 2 figures, I used plastic putty. It comes in a small squeeze bottle so it's easy to apply small amounts. The material is white, however, so a painted finish will be required. It sets pretty hard and can be sanded back to a clean finish. Other gaps, like repairs to the hip joint, I use a more robust filler material (used for filling in gaps in timber and damage to cars). It has to be sturdy and reliable to accommodate and support any newly re-constructed hip joint.

                              For an easy black finish, you might like to mix some black acrylic paint into the filler material. By doing so, you may even get away without any paint applied directly to the figure to conceal the new work. Just be aware, though, that such mixings of paint and filler together can reduce the properties of the filler material and when it sets some cracks may appear in the finish. Hell. Just fill 'em in. (This method is handy to use when filling in holes and gaps around light switches and other fiddling architectural details you don't want to paint fully.) Some experimentation on your part is strongly recommended first.


                              My Frankenkenner Monsters, GG Alien and Mel Blanc on stage for the first time! What a duet ...and who wouldn't want a rendition of 'Eat my Diarrhoea'
                              as sung in the voice of Porky Pig? Aside from that, filling in leg, arm and head gaps on custom figures is a natural part of the customisation process.
                              Aside from these items, I like to leave the gaps on the figures as they are.


                              Faulty as they can sometimes be, I like to such leave gaps untouched. That way, the figures are in closer condition to how they were when they left the manufacturer; but I completely understand the preference of others and I wouldn't argue against other peoples' aesthetic preferences should they choose to fill theirs as they see fit.

                              Thanks for reading and providing feedback. Such is always welcome.

                              -Windebieste.

                              Comment

                              • Jase25
                                MarshallMadeCollectibles
                                • Jan 8, 2009
                                • 174

                                Love the customs you did, especially Mel Blanc. The white looks impressive. Had a figure arrive in my shop this week. Got a deal on him. Complete with dome. But missing the spine and his inner teeth. Took him apart for a good cleaning and heard the head rattling. I'm thinking it's a spring or a piece of plastic, so I shake it around and shine a light down poor Al's throat and what do I see? I see a shiny chrome bar. I grab my pair of long forceps and pull out a the top inner jaw prefect and shiny like a new penny. I shake the head some more and still hear a rattle, then through the neck hole I see the lower teeth drop down. Took me an hour to finesse them out through the mouth but thrilled to have the original inner teeth and in such perfect condition. I've rehabbed quite a few of these and personally own 5, but this is an absolute first for me. I've found bugs, a candy corn, half a roach (not the bug kind), pretty sure mouse droppings, a paper clip, and a Tootsie Roll inside of different Aliens I've worked on but this is the first time I found something I was actually thrilled to find.
                                Thanks ~ Jase

                                http://stores.ebay.com/Marshall-Made...ctibles?_rdc=1

                                Comment

                                Working...
                                😀
                                🥰
                                🤢
                                😎
                                😡
                                👍
                                👎