Help support the Mego Museum

Announcement

Collapse
No announcement yet.

1979 Kenner ALIEN Complete Restoration - ADULTS ONLY

Collapse
X
 
  • Time
  • Show
Clear All
new posts
  • windebieste
    Museum Patron
    • Dec 31, 2015
    • 115

    #91
    Ya. I consider it to be significant, too. It's one of those odd variants most people aren't aware of or they just think it's a Kenner, especially loose items.

    Yes, the logo on the 1984 Tsukuda box is identical to the 1979 MPC kit:


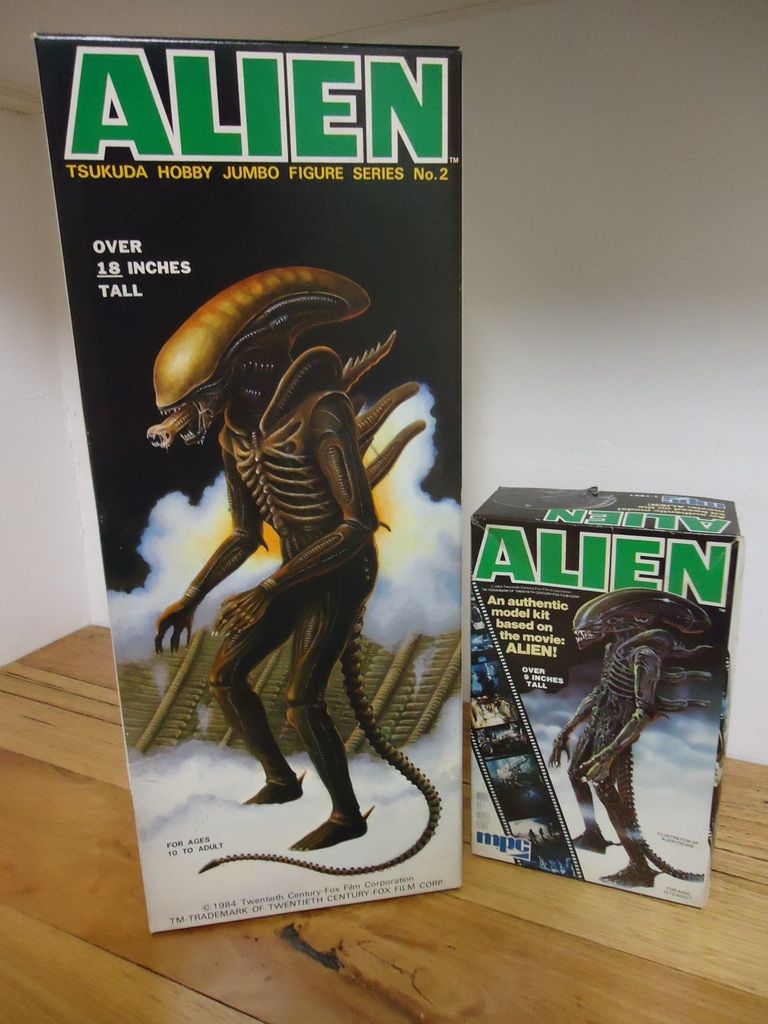
    1984 Tsukuda figure (Left) and the 1979 MPC kit (Right). The title on each is exactly alike. I'm not exactly sure how many
    times the MPC kit has been reissued. I know of the dual language French/English 1979 edition and the Japanese edition (Below).
    It was also reprinted in 1984 and again in the 1990's. The 1990's edition has different box art. The original water color box art
    was restored for the 2013 reissue which, of course, is still available at a decent price.


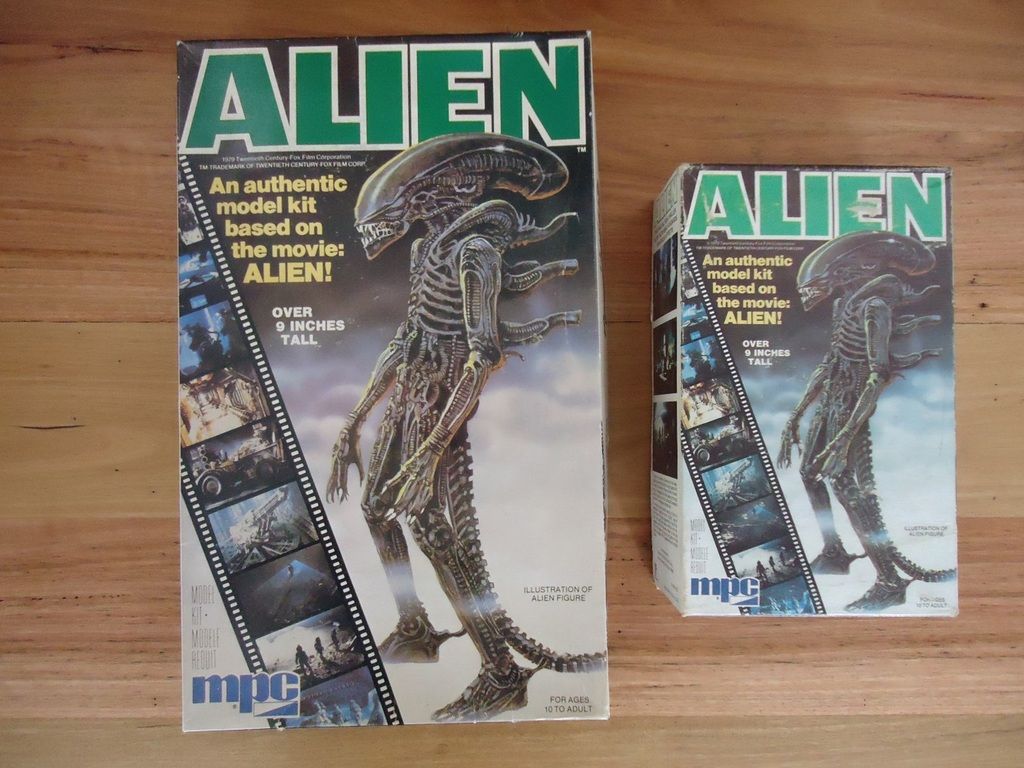
    The 1979 Japanese (Left) and the 1979 US (Right) releases of the MPC 'ALIEN' kit. Yes. The Japanese version of the
    box is twice the size. No, that does not mean the kit inside is a scaled up version of its sibling kit. There are actually
    2 kits inside the box that are exactly identical to the US pressing. That's right, 2 copies of the same kit in the one
    box.


    As for the tail of the 1984 Tsukuda figure, it will bend; but the rod inside is very rigid. You can't exactly call it a wire core for this reason as the rod is resistant to bending. A good wire core will bend with ease and will have the ability to straighten out and return to its original shape without a problem. That can't be said for this figure's tail. You can bend it, alright; but straightening it, should you want to do so, will be extremely difficult.

    For the photo of the Tsukuda figure next to its box above, I kind of cheated. I also own a loose 1991 Halcyon kit item and aside from some small differences, it is more or less a repressing of the earlier Tsukuda item. More so, the tails are identical in every way as they are cast from the same mold; but one significant detail is present. Halcyon used a proper flexible wire core for their iteration that works as intended. for the photo, I kept the Tsukuda straight rod core tail in its box and attached the Halcyon tail instead. Being easy to bend into shape, I could set it up exactly the same as it appears on the box. In appearance, it's exactly how the Tsukuda tail should function but fails to do so.

    As for using a technique for actually attaching the tail, it will work the same way for both the Tsukuda and Halcyon figures. They are both made of vinyl and have the same method of attachment at the hip. To insert the tail stump into the socket you will need to heat it, so yes, you are on the right track. I gave up using hair dryers some time back. I found they heat unevenly, could damage the material and deform the figure. For this attachment, I'd boil some water and dip the tail stump into the pot. You don't need to immerse it for long - 10 seconds should be enough to soften the stump so it can be inserted. It will soften very quickly and be ready to manipulate into place. Just dip the very stump into the water, don't need to do more than that. Shove it in the refrigerator to accelerate the hardening. It's really no different to how I fix Kenner tails, in this regard. Hot water works.

    The other reason I prefer this method is for ease of assembly. Using a hair dryer means you have to put down the tool, pick up the figure and also make sure its oriented correctly in order to insert the tail, wasting valuable time in the process giving the tail stump time to cool. Using boiling water method means you just set the pot on the stove and hold the tail in one hand and the figure in a properly oriented position ready to accept the tail in the other hand. Dip the tail into the pot and insert without juggling tools and body parts around. Quick. Easy. Works.

    The other day I received a 2004 SEGA Alien figure in the mail. I'd bought it with the tail detached. It wasn't broken, it just had come free. I used the boiling water technique to successfully restore that one as well.

    One thing I haven't tried but may be worth considering, is to maybe use a pair of needle nose pliers and remove the rod through the tail stump. You've probably already got a hole there through which the rod was originally inserted. You could theoretically insert a smaller gauge wire core yourself. Then you could keep the rod aside and straight; and reinsert it later should you want to restore the original condition. I'm not sure if this is possible to do but I'm willing to bet it can be done.

    So yes. The very strange 1984 Tsukuda figure is anomalous but it's also such a weird and wonderful relic.

    -Windebieste.

    Comment

    • cjefferys
      Duke of Gloat
      • Apr 23, 2006
      • 10180

      #92
      Thanks for the tips!

      I have the 1979 Canadian bilingual version of the MPC kit. When I was a kid I asked my parents for a Kenner Alien for Christmas, and got the model instead as a consolation prize...

      Comment

      • windebieste
        Museum Patron
        • Dec 31, 2015
        • 115

        #93
        Thanks. Not a problem.

        The MPC kit is good. As a model kit, it's quite often overlooked as a figure but you can assemble it so that the arms can be posed in a desired position. At the time, both MPC and Kenner shared the same parent company, CPG Corp, which itself was a contemporary subsidiary of General Mills. Knowing that both Kenner and MPC had the same parent company, it's surprising then that both companies had access to such intimate design features regarding the Alien for their respective products yet didn't share a common logo between them. Then the MPC logo turns up on the box for the Kenner derived Tsukuda figure 5 years later. Such an odd history.

        I also forgot to mention something. If you do choose to extract the rod from the Tsukuda tail and replace it something that is a lot more pliable, then a wire coat hanger is likely to be an excellent replacement candidate and well within your means of acquisition.

        Anyway getting back to good ol' GG Alien. He's almost complete now. There's still some work to be done on his presentation but at this point in his customisation, he is looking very much how I wanted him. Mind you, certain social circles notwithstanding, that is. So to celebrate 10 pages of mostly me prattling on about how to repair/restore/customise old 1979 Kenner alien action figures I present to you the very near complete 'GG Alien - The FrankenKenner Monster'.


        From his left and right sides, GG Alien is about as safe and publicly presentable as he gets.


        The chest needs something added to it. A shabby T-shirt with a slogan scrawled upon it would be ideal. It will give great diversity
        to the customisation and the ribbed surface of the chest is just not amenable to accepts 'tattoos'. So yes, a scrappy old T-shirt is going
        to be added. As for slogans, I've got a few favourites: 'I HATE PINK FLOYD!', 'DESTROY!', 'PRETTY VACANT' and 'LYNCH THE LANDLORD'
        are just a few very viable choices. Mind you, I have to be able to get the T-shirt on him. That's a logistical challenge to overcome
        right there. lol. Mind you, I have been thinking of how to achieve this and I think I have a solution.


        A three quarter view of GG Alien's face from the right side. I drilled a pair of holes into his head to accommodate a pair of safety
        pins and added the chain as a catenary between them. Originally, I was a little concerned the cheap chain would look too much
        like bling on the figure. I didn't want him to look like he was blessed with any form of wealth. Instead, it helped to contrast nicely
        with the rest of the customisation. After all, the $2 chain is probably his most valuable possession. He probably stole it, anyway.


        A three quarter view from the left side of the head. I've added some reproduction teeth to the figure to aid in its completeness.
        There's no tongue. The figure doesn't need to be any more complete than this; after all, it's not getting a carapace, either. While
        the chin looks good and tidy, the heat scars on the nose and side of the head are still present and actually blend nicely into the
        paintwork and general theme of the customisation. I'm almost regretful I removed all the damage on the chin. It would have toned in
        very well considering how ol' GG Alien is into self mutilation. (That's the rational I'm providing for the tongue's absence.)


        GG Alien wants to take your 16 year old daughter out tonight. Just say 'Yes.' She'll be perfectly safe.

        bwa ha ha!
        BWAAAHAHAAAHAA!
        BWAHAHAHAHHAHAAAHAAHHAAAAA!!!1!!!!!


        Despite my initial trepidation at approaching this customisation, this figure was a lot of fun to modify. It's the first time I've done this kind of work to one of these figures so it included some amount of experimentation and exploration on my part. It's still not complete just yet and along with the T-shirt I want to add some more piercings. At least one to his tail and another to one of the quad dorsal appendages. I still want to add 'blood' and 'poo' stains to him as well. This fellow is not intended to be attractive. A small padlock on a chain around his neck would be a nice addition, too. Nonetheless, he's turned out to be quite the objet d'art, even in this state.

        Eventually, I'll get around to finishing this fellow off but for now he's in a great place, a synthesis of late 1970's and early 1980's bad attitude with a contemporary toy, the first one based on an R-rated movie. I have always wanted to do this to an old Kenner but was reluctant to mess one up to this end, even one in average condition. It's only because I've had an abundance of less than stellar parts from previous rebuilds that this activity has become possible. I'm more than happy with the result, otherwise I'd still be left with a box full of mangy and damaged pieces. Significantly, each one of the pieces on this figure represents another figure in my collection that has been improved by swapping out corresponding damaged parts with better ones. A super Win/Win situation, as far as I am concerned!

        I hope you enjoyed this 'controversial customisaton of a controversial toy'. I have 3 more Kenner Alien figures on my list of repairs and restorations waiting for my attention. Plus there's another one arriving in the post very soon so I will return to documenting repairs to these fantastic old toys.

        GG Alien, you sure were a fun Project to work on and; I hope everyone who peruses this thread (Over 6000 views now since mid Jan, 2016.) has found this experience to be a positive one.

        Thank you everyone for reading.

        -Windebieste.
        Last edited by windebieste; Jun 5, '16, 9:46 PM.

        Comment

        • windebieste
          Museum Patron
          • Dec 31, 2015
          • 115

          #94


          So here he is, The FrankenKenner Monster - GG Alien donning his new attire. I wanted to give him a T-shirt but the logistics was a little too demanding so he gets a mangy singlet instead. The exercise of getting this garment onto the figure was a little tricky and required equal measures of thought and experimentation - how to get it over that oversized crescent head was the immediate issue. Fortunately, as I have demonstrated throughout this thread, the figure can be dismantled and that's what made the figure wearing the T-shirt possible.

          The garment itself is made of a single piece of fabric with 6 holes cut into it and roughly shaped to fit the body. I found a perfect 10 year old T-shirt in my rag pile (wardrobe) and cut a sleeve from it to make this item. The making of this garment was a completely experimental process. Trying to work out the pattern the garment should take, I figured out I needed to cut it out as a small poncho first and shape it to fit. I wrapped the fabric around a limbless assembled torso of the figure and marked with a black felt pen (the same black pen used to write on the chest) where the necessary cuts were to be made. I cut 5 holes in the back for where the figure's various projections were to fit through, cut some spaces for the arms and also marked and cut the hole for the neck as well.

          With the figure fully disassembled, I fitted the back of the 'poncho' over the projections to have it sit directly upon the rear of the figure. Then, with all the limbs (both arms and both legs) assembled in place upon the front torso half, I poked the mounting stump of the head through the shirt neck hole and attached the head to the front torso half. This worked fine even though at this stage the whole exercise was turning into a juggling act where all the pieces were now in place but the loose fabric was getting caught where the torso halves were supposed to close together cleanly.

          Eventually, I got the poncho fitting across the back and the shoulders sitting the way they should without any fabric getting caught in any joins. It was then an easy task to push the fabric aside on the back of the figure and drive the 4 screws home and secure the figure as a whole once again. At this point, the the shirt was secure across the back and the neck was sitting appropriately across the shoulders. All that was needed now was to fit both halves of the shirt together by joining the sides below the arms. A pair of safety pins applied to each side of the shirt completed its fitting. All in all, it worked out very well and I'm satisfied with this result.

          This was accomplished on a first attempt and as such I didn't take any photographs. It was intended to be a test version to be adjusted and then removed from which I would later generate a proper pattern - and an associated visual documentation of the process. I'm not a fashion designer or dressmaker so the exercise was completely experimental in nature and honestly, I wasn't even certain I could get a half decent result out of it. Nonetheless, the rough cut attempt worked out OK and at some time at a later date I'll remove the shirt, use it as a template and make a proper pattern for it. That's low down on my list of priorities right now as even in this state, this grubby garment still looks ideal and appropriate considering the theme that this customisation embraces.

          So here, have some more photos of GG Alien in his near complete state:


          I settled on 'I HATE PINK FLOYD' simply because it's a classic Punk slogan courtesy of The Sex Pistols. Looks good too, the
          black scrawling on the white fabric contrasts well with the white 'tattoos' on the figure's black integument.


          Holes were cut in the fabric to accommodate the 5 crests and stuff that stick out of the back of the critter.


          A pair of safety pins down each side help to keep the garment in place.


          I've also added a couple more piercings to the figure. Just some old metal rings from key tags I had lying in a draw. One for
          his tail and another for one of the double curved appendages (whatever those things are...) on its back. Just a few little
          touches like this to go now.


          While I'm not fully finished with our good ol' friend GG Alien here just yet, it's time for me to put him aside and get to work on something else. It's been quite the journey for this fellow. Selecting parts. ...then swapping them back out again and deciding I preferred using other parts instead. Cleaning, painting and then customising the figure was a lot of fun. Customising an old Alien figure in this way is not something I've done before and much of the process was experimental. Nonetheless, I learnt a few things during the whole exercise. In the end, it was totally worth it considering all the parts that went into this figure were, well, garbage. It's actually difficult to appreciate that now: This figure is made up of mutilated and damaged parts that weren't fit for a rebuild or restoration. So it's been a great win to take all these damaged pieces and put them together once again, customising the rebuild with a clear theme in mind that could take advantage of sub par parts that would otherwise just sit in the bottom of a box in my room.

          Anyway, it's time for me to move on from working on GG for now. You see, this box arrived in the mail the other day and I still haven't opened it. Bet you can't guess what's inside:


          Sorry for the long post. Maybe I should have broken it into two. Either way, thanks for reading.

          -Windebieste.

          Comment

          • windebieste
            Museum Patron
            • Dec 31, 2015
            • 115

            #95

            Now, let's open up this box and see what's inside? Bet you can't guess wots in it! If I asked my Mum what was inside, she'd have no clue, either. Then again, she hasn't read this thread and wouldn't know any better. On the other hand, she does know I have had an ongoing obsession with these old toys for 36 years now. So, maybe she could guess...


            Yes. If you guessed it's a 1979 Kenner Products Alien action figure, then you're correct. If you thought it was something else,
            say, a motorbike, or an amphibious vehicle, or maybe a box of discount underwear or something else entirely then go back to the
            first page of this thread and start reading from the beginning. You've got a lot of ground to cover


            Anyway, here we are for my 28th restoration candidate. I've restored more than 28 of them to date, that's just the number this item has been allocated in my log book. I was repairing these things well before I started maintaining any record so this item is actually more like Number thirty-something-something. Officially, though, he's No.28 in my records.

            Let's get straight into the assessment for this item. It's going to be quick as this particular figure isn't too bad in terms of condition and I don't need to split the assessment into multiple posts, either. This figure is in an average state and that's perfect for my purposes. It's an ideal candidate for a full restoration.


            The right arm has been broken off at some point and been glued back on. Yep. It's held fast in place with adhesive. My
            guess is this was done a long time ago. The glue is cracked and ready to give way.


            There's some white stress marks on the upper foot (Circled.). It's not too bad but it has caused the foot to deform slightly.
            The seam that joins the leg together has minor widening towards the sole of the foot.


            From the front, the figure has some obvious warping on the tail.


            This is a good, average figure that just needs a little general attention to bring it up to a standard worth displaying. The only piece missing from the figure is the carapace. The shoulder crest, teeth and tongue parts are all present. The quad appendages upon the back are all present, undamaged and firm. They are each sitting correctly aligned which means there's no internal breakage affecting them. The jaw mechanism on the head is a little stiff, but I'm betting it will free up with a little gentle manipulation. The paintwork on the head is almost perfect and there's only a small mark above the right orbit. The halves of the head meet perfectly making a clean join in the paint without a break. All in all, the head is in excellent shape despite the dome being missing. I can fill that vacant space easily with a facsimile carapace to make it feature complete once again.

            Both arms are present on the figure. At one point during its life, the right arm as been broken off and returned to the figure using glue. The glue looks very aged; maybe at least a decade old and it is perishing. It's a safe bet with some gentle manipulation it will come free from the body. Some cleaning will need to be done to remove any residual adhesive but I'll be able to restore full mobility to this arm once again. Not a problem. The left arm is still attached but it swings freely, the original rubber anchor is (most likely to be) still present but as is commonly found with these antique toys it has weakened over the decades. As a result, the left arm is now more pendulous in nature than it should be. Once again, easily fixed. The spurs are still present on both arms and the hands are in good condition, too. So aside from some re-stringing and cleaning are in great condition.

            Both legs appear to be attached to the figure without too much at fault. They are both a little loose but well within acceptable limits which means the figure won't fall on its face due to weakness at the hips but I can still improve this condition substantially. The left foot looks like it has some minor buckling around the ankle. I would say the figure has been dropped at some point and impacted on this foot, the force transferring through the ankle at this point stressing the plastic the figure is made of. I can probably repair the mild buckling by heat treating it in hot water; swap it out with another leg I've got; or just leave it as it is because, really, it's not too much of an issue, actually. It's also possible the fall may also be responsible for the broken arm. We'll never know for sure, but gravity is these aging figures greatest enemy. Be very careful when handling one of these and don't drop it! Damage is guaranteed!

            The tail is loose and as commonly seen on these figures, it is slightly buckled and out of shape. Once again, an easy fix using hot water. Other than that it is in very good shape. The very tip is still present and not broken off as can sometimes happen. Excellent.

            Aside from these generally common issues, the figure is a little dirty and dust has settled into all of the small depressions and amongst the details of the figure. It's going to need a good wash.

            Oh, and it smells a little, too. Not too bad, mind you, just a mild stale odor can be detected.

            None of these necessary repairs are particularly demanding and I have encountered each one of them before. Unlike the previous GG Alien customisation that I recently documented (Which was as much of an experiment as much as anything else.), every one of the issues present on this figure is well within my experience to repair. I'm in completely familiar territory here with this item; I absolutely 100% know what I am doing here. By the time I'm finished with this fellow, it will be significantly improved in all the areas listed above. The best part of which, aside from some cleaning and removal of aged glue, the figure will have absolute minimum amount of interference done to it.

            The next task is to dismantle the figure and give it a good wash. Once I've done that, I'll be back at some point to commence documenting the full restoration of this fellow. I'm currently committed with multiple Projects at the moment so that activity won't be until next week. I'll be back then to get this fellow back into a respectable state once again and he'll be made bootifahl once again!

            Stick around, you'll see!

            -Windebieste.

            Comment

            • windebieste
              Museum Patron
              • Dec 31, 2015
              • 115

              #96
              Ah, I've had a little more time on my hands than I realised, so I've taken the opportunity to disassemble the figure and have washed it already.


              This is the fate of all grubby Aliens that come into my house. Into the bath (my kitchen sink, actually) you go, you dirty, dirty Alien scoundrel, you!


              During the disassembly process, I noticed there was a rattling sound coming from within the head. With all the figure's parts put aside and prior to washing it, I picked up the loose head and shook it gently to investigate it further. Yes, indeed, there was something loose inside. A little more rattling and a small coiled spring fell out of the figure's mouth. You know when this happens it's one of those "Uh-oh... This can't be a good thing." moments. Especially when I recognised the spring for the significance it represents.

              I'm going to take this opportunity to investigate a feature of the figure that is a mystery to most people. While this isn't exactly a positive outcome to have pieces falling out like this, it does provide us with another discussion point. So let's take a glimpse inside the hidden workings of the Kenner Alien action figure's head. Let's get some idea of how that trigger mechanism works. We have this spring in hand, now, so we may as well take advantage of the opportunity this figure has presented us with to do so.


              This small spring is part of the internal mechanism that operates the jaws and makes the tongue migrate forward in the mouth.
              It's job is important to this system as it aids in the returning of jaws and tongue to their default closed state when the trigger
              is released.


              This is one of two springs present inside the head. They are mounted alongside the internal lever system that operates the lower jaw and tongue. Having 2 springs mounted either side aids in a straight and balanced operation of the feature allowing the tongue to migrate without yawing to one side or the other. Having one spring missing can (but not always) result in the tongue slightly listing to one side. It's not too dramatic, but the tongue can noticeably not be as centered as it should and the minor deviation can easily be attributed to the age of the figure. Either way, the trigger operated jaw mechanism still works as intended with just one spring present instead of having a pair. I guess its like having a kidney removed. You can still function fine on just one kidney. Only one is really needed. Not that these things have kidneys.


              Taking a peek inside another head that has been damaged, we can see a pair of springs attached to the internal mechanism
              through the opening. Normally, you can't have this kind of access to the head as this particular sample has been broken at
              the neck. Regardless of which, both springs here are clearly visibly attached to the internal mechanism. In the figure currently
              in hand, one of these springs has come free and fallen out of the head.


              As the lower jaw and tongue still function normally and to a satisfactory degree along with the head itself being fully sealed and not accessible at all without damaging it even further, I'm just going to put this spring aside in my collection of miscellaneous debris and detritus that I've collected from inside these figures. It's absence has minimal impact on the operation of the head and the lack of any opportunity to return the piece to where it belongs precludes any attempt or desire to do so. I'm just not going to worry about it. The only way to return the spring to its original location is to snap it at neck so the neck and head become separate pieces. I'm not going to do that.

              Why would the spring be loose inside the head in the first place? I'm thinking it's the result of the figure being dropped as damage to the right arm and right foot would strongly support this possiblity. I believe the figure has possibly been dropped more than once and I'll discuss this theory at a later date when I look more closely at the arms. Particularly in the manner in which they have been repaired. As for the spring itself, the jarring impact could have loosened it, causing the jaws to jam when I tested them earlier. Further manipulation fully worked the piece free and so it rattled around inside the head. It's just one of those things that happens and certainly when you purchase one of these old figures can be considered one of those undocumented flaws the vendor might not even be aware of.

              By the way. This isn't the first time I've seen a spring fall out of the mouth but thankfully, it's only the 2nd time it has happened.

              As a side note, despite the 'Spring loaded arms... To crush its victims!' claim emblazoned on the side of the figure's box, the jaws and tongue are the only truly spring loaded features on the figure. The arms rely on the tension provided by the rubber anchors for their 'spring loaded' ability but to this end, no springs are actually involved. Only in the head can the 'spring loaded' claim truly be considered legitimate.

              Next post, I'll get stuck into addressing the feet of this figure. The arms are going to need a lengthy post. Well, actually, now that I think of it - multiple posts will be required - and I want to go into some length regarding repairing the arms. They are a common problem and there's a lot of ways to address them. I'd like to investigate the options more fully so, yeah. Multiple posts for repairing arms soon.

              Once again, thank you for reading. It makes all my indulgences so much more justifiable.

              -Windebieste.

              Comment

              • windebieste
                Museum Patron
                • Dec 31, 2015
                • 115

                #97
                Ack... My intention was to get this post out to the world a day or so ago. Unfortunately, it didn't go according to plan and this post is a little later than planned. Instead of messing around with decades old toys and posting weird pictures of them online, Real Life stuff got in the way and spoiled all my fun. Well, those responsibilities are mostly behind me (for now) and it's time to get back to giving this figure at hand some attention and fix the gaping wound in his foot. This is how it all went. Quite satisfactory, actually:


                At some point in time, this poor soul was dropped and landed jarringly upon its left foot. The impact has caused the seam to open
                across the sole of the foot and the gap tapers to a close above the ankle. It's not just unsightly, but the figure also has a tendency
                to rock threateningly back and forth as it can't stand evenly upon this foot. Thankfully the right foot is undamaged.


                The outside of the foot has also suffered. The seam has popped a little above the ankle and the plastic shows some buckling.
                There is some whitening of the plastic at the front indicating some stress to the figure. I'm going to do my best to fix this.


                The only way to actually repair this problem and reverse it to any degree is to heat treat it. Holding it in a pot of boiling water
                for about 30 seconds is enough to soften the leg at the ankle and gently ease the leg back into shape to close the gaps, reduce
                the popped seam and restore a flat surface to the sole. The severity of the damage can be appreciated when you realise you can
                actually see through one side of the foot to the other.


                The leg is cooled under cold water once the ankle has been manipulated back into shape. Yes. I use gloves for the whole process.


                Here's the leg with the foot manipulated back into its position. It may not be perfect but the gap has been substantially closed
                and the sole of the foot is a single flat surface once again now instead of multiple planes to rock on.


                The outer side of the foot is also improved. While not completely sealed, the ruptured seam has been eased back into place and
                the damage is noticeably reduced. The White stress marks are still present but as a whole, the repair went well and smoothly to
                finish as an acceptable result.


                So, that's the foot done. A generally favourable result that will help the figure stand more confidently when it is re-assembled. At this point I'm happy with the progress on this item. So far... so good. Next is the arms. I already know they will be more challenging but at least the figure is now going to be more stable when standing and not be threatened with imminent face-plant due to any vibrations.

                Next: The broken arm. This is going to take a few posts to complete as I want to address this item at some length. Back soon. That is, as soon as my schedule will permit. The unruly Beast, the all consuming endless Real Life stuff that is always rearing its ugly head, has to be tamed and beaten back into submission first. lol.

                -Windebieste.

                Comment

                • windebieste
                  Museum Patron
                  • Dec 31, 2015
                  • 115

                  #98
                  Oh my God, some of these figures are in such a bad state! Notwithstanding the poor souls missing parts, the worst of them are always the ones that are not only damaged but have had unsuccessful repair attempts made on them. The results of such activities have not been all that rewarding. The use of glue on this sample is a prime example for demonstrating how such a practice can be a problem. This figures right arm rubber anchor has split. This is the uncommon variety of damage that these pieces can suffer from. Usually, the rubber anchor snaps at the mid point but this particular sample has split at its outer most edge upon the ring. I'm reasonably certain that this has occurred as a result of a fall, probably the same fall that damaged the foot.

                  In an attempt to maintain completeness of the figure, at the sacrifice of its articulation, a previous owner has repaired the damage by gluing the arm directly back onto the figure. While the use of glue will prevent any mobility the joint previously enjoyed at least the figure possesses all of its limbs. Despite the fixed-in-place re-attached arm, this is no doubt preferable to the figure being on display as an amputee. The problem is it is not necessarily a guaranteed method of repair. At some point since this initial repair, this figure has seen other damage done to this arm again, presumably a 2nd fall. The glue has given way and the arm has become loose once again and a 2nd application of glue has been made to the arm to return the limb to its place on the figure once again. Assuredly, there are 2 different applications of glue on the ball joint of the arm.

                  A lot of time has passed since this 2nd application of glue was made to repair the figure. So long it has been since the repair, when I tested the arm, the perished glue cracked easily to reveal its limitations. It quickly gave way, surrendering the arm to my careful exploration of its ad hoc attachment. Much of the aging glue fell away in small fragments with very little manipulation required. The glue had simply aged, reached the end of it's life and the arm came away effortlessly from the figure. This left me with the detritus coated arm in hand with 2 different glue residues coating the ball joint. To make matters worse, each glue layer was of a different type which was guaranteed making their removal a genuine challenge. To make things even worse, the arm had developed a gaping wound along its seam where both halves of the arm are joined together. The gap commences at the midpoint of the upper arm and tapers open, widening along the remaining length all the way to the ball joint, strongly suggesting that the figure had been dropped (at least once) and this damage is consistent with such a fall.


                  What a mess... Ugly glue artefacting. 2 layers of different types of glue liberally coats the ball joint.
                  This will not be easy to remove.


                  The ball joint from another angle further showin the extent of the glue. Also visible is the gaping separation of
                  the seam across the diameter of the ball joint. If possible, this will need to be closed to improve the figure's
                  overall presentation.


                  I attempted various means of removing the glue residues. Resting the arm in vinegar was successful
                  in removing the most recent layer of adhesive but it had no effect on the remaining coating. I also
                  tried some acetone free nail polish and further attempted to soften the glue in boiling water.


                  After limited success with some basic chemical methods and heat treatment to remove the unyielding coating,
                  I finally resorted to more aggressive measures. I'm not a fan of using abrasives such as sand paper or steel
                  wool but in the case of this arm, I did so as a final solution. Fine sand paper did the trick and removed most
                  of the glue. Unfortunately, it also left the ugly scratches upon the ball joint that you see here. Ack... I hate
                  having to do this.


                  Removing the scratches isn't difficult, though. Here is the ball joint with almost all of the glue removed
                  and all the scratches polished out. Just some elbow grease, some plastic polish and a rag is all that was
                  needed. Also of note is the sealed seam where boiling water served to assist in closing the gap on the arm.
                  It's not perfect - but it's not bad, either. For the sake of returning the arm to the figure and restoring its
                  articulation, this is a good result on an otherwise very average figure.


                  There are no rule books and no official or manufacturer's recommendations to repair these old toys. One method is as valid as the next - it just comes down to personal preferences. There's no 'Official' way to achieve the desired results and your expectations of what it means to restore one of these old figures will be different to the next person. There's always room for experimentation to be performed and sharing the findings is valuable; and the hope that someone else comes along with a better solution or even just a suggestion is always welcome. It's always something I look forward to - seeing how other people solve these problems; and broken arms on these old figures is common. Chances are quite high that if you find one of these old 1979 Kenner Aliens, it's missing an arm (or two!). Fortunately, there's many ways to approach this problem.

                  The arm for this figure in its current state isn't perfect but it is certainly appreciably better than when it first came into my hands with the arm fixed immovably in place with glue. It is now clean and can be reattached to the figure. Achieving its mobility will definitely be a primary goal and an appreciable improvement over when I first received it. In the next post, I'll explore multiple means of returning these severed limbs to one of these aging figures.

                  The best part of this exercise is I won't have to do any work.

                  -Windebieste.

                  Comment

                  • windebieste
                    Museum Patron
                    • Dec 31, 2015
                    • 115

                    #99
                    At this point, we're 10 pages deep into a thread that is mostly my own endless rantings about how I fix these old toys. I'm not the only person who has attempted such repairs and as far as I am concerned other peoples' efforts are just as valid. It's legitimate if the desired results are achieved. So, looking into one of the most common problems occurring with these figures, the broken arms, I think it's fair to investigate how other people have attempted this repair.

                    This is very important because there's no 'right' way to fix these limbs back on to the figure once the rubber anchor has snapped and improvisation is essential. Hasbro closed down its subsidiary Kenner Products company and it ceased to exist in 2000, merging all the Kenner Product lines into the parent company. Kenner throughout its history never produced any spare parts to supply any after market support for the figure. This means repairing the arms (and other parts) is solely up to the creative endeavors and ingenuity of enthusiasts and fans alike.

                    Returning the arms is a matter of preference as much as it is skill. On the other hand having a selection of choices is desirable. Knowing what alternatives exist is going to help a lot. So, here we go with a list of alternate arm repairs and links to them so you can figure out the best/appropriate method if you want to perform this repair yourself.

                    I'm not making any value judgments on any of these techniques, just assembling this brief compilation of solutions.


                    Let's start with a YouTube video by Oldest Kid In The World:


                    User897 offers his method in this Rebel Scum forum post


                    Dallas shows us how he solves this problem on his Vintage Kenner Star Wars Toys blog.


                    Additionally, Kenner's earlier 1978 12" 'Star Wars' range of figures, particularly Darth Vader and Chewbacca can also have similar problems with their arms. Kenner's 'Six Million Dollar Man' Bigfoot figure can also share this issue. I'm placing these here because the principals of repair are very similar.

                    Chewbacca arm repair on the Rebel Scum forums by MicroJow13.


                    You can find further discussion about repairing arms on this MegoMuseum thread. No doubt I have missed a few posts and discussions that have appeared elsewhere and I would love to see anything else get added to this thread that I may have overlooked.

                    In each of these techniques, re-attaching the arms requires that the arm be anchored and some form of elastic be used to attach that anchor to the figure (or in the case of both arms being broken, to the other arm). While this is the principal concept common across all these repair techniques, the materials and methods do vary. Success will also vary due to other factors as well, the skill of the repairer being the most significant. As you can see, the problem has been addressed by others and the use of glue was completely avoided. While the success of these techniques will vary, it's preferable for the arms to retain their mobility rather than have them permanently fixed in place and that has been the goal for each of these repairs. In the end, if the desired result is achieved, then the end justifies the means. I applaud each and everyone of these repairers for their creativity and preparedness to experiment and overcome this common and increasing problem with these aging vintage figures.

                    I'm still not finished with working on the arms for this particular restoration figure just yet. I'll be addressing getting them attached soon.

                    Once again, thank you for reading!

                    -Windebieste.

                    Comment

                    • SKotK
                      Career Member
                      • Mar 11, 2014
                      • 574

                      I just wanted to say thanks for this thread. I have been following the whole thing with interest, because even though I don't own a Kenner Alien (and don't have plans to, although I do admire the thing), I've found the thread to be very useful in general for approaching all sorts of toy repairs. Now I have some new information I can use to do a better repair to my large size Darth Vader.

                      Carry on with the good stuff!

                      --SKot
                      Look what happens when you aren't allowed to play with "dolls"...

                      WANTED: partly-unsealed or bubble-damaged carded Romulan + unbroken plant trap from Mission to Gamma VI

                      Comment

                      • windebieste
                        Museum Patron
                        • Dec 31, 2015
                        • 115

                        Thank you! I'm pleased, very pleased you are finding it useful. Of course, there are a number of techniques used here that can be applied to other toys as well. After all, some techniques applied to other toys can be just as applicable to the Alien figure as well. It's a matter of experimentation in many cases.

                        The 1978 15" Vader figure is cool. I did find another video where Oldest Kid in the World shows how to use a bungee cord to repair the arms on a good ol' Darth figure. I was going to include it in my last post but unfortunately the forum only permits one video per post. All the same, here it is:


                        The Vader figure uses a very similar system to secure and tension its arms in place. If you own an Alien with both arms broken off, then this repair method is just as valid. The big differences between both figures is the Vader figure is permanently sealed and access to its interior is not possible without damaging the figure. On the other hand, a great multitude of repairs can be done on the Alien because it can be disassembled by removing the 4 screws on its back, perform and repairs and then reassemble the figure. This arrangement makes the Alien an ideal subject for most repairs or replacement of damaged parts.

                        Either way, I hope it all works out for your Darth Vader. I have one of those.


                        Dunno what these 2 have just agreed upon, but it's got to be Bad News for the rest of us.

                        -Windebieste.

                        Comment

                        • windebieste
                          Museum Patron
                          • Dec 31, 2015
                          • 115

                          While we are on the topic of links to how other people have chosen to solve this problem of keeping arms attached to the figure, let's take a look inside a few of them and see how some of these techniques were applied.


                          A pair of broken arms along with their severed anchors.


                          First up, here's the problem. This is a common issue that many of these figures now have. The arms are held in place by rubber anchors that are easily severed. It's been over 35 years since these figures were manufactured and the rubber anchor for each arm is frequently snapped, leaving the arm separate from the figure. As a result, some of the anchor collapses into the arm and can be considered to be irretrievable. Sure, you can fish around inside the hole to collect it and if you're lucky, maybe even use it for a repair. This is generally unsuccessful and not worth pursuing. Importantly, due to its larger diameter, the severed anchor cannot be removed from within the arm and it becomes a permanent resident, loose inside. Any attempt to separate the pieces that comprise the arm will damage it. It's just best that you leave the severed arm anchor in there.

                          The other half of the arm anchor will still be attached to the mid post inside the torso. Unlike its other half, its removal is easy. Take the figure apart by removing the 4 screws in the back of the torso and gently pry the halves apart with your hands only. Use no tools, screwdrivers, knives as you will scare the figure's seams. Once the figure is disassembled, and the torso halves are apart, the severed anchor(s) will just fall off of their internal point of attachment. You will want to remove them as a general rule because the best methods of repairing the arms involve attaching them to this post and the now useless anchors are taking up much needed real estate inside the figure.


                          The most common method is attaching the arms together involves the use of bungee cord. Also pictured here are various other
                          attempts at repairing broken anchors that I have fished out from within the interior of these old figures' torsos. Some techniques
                          work better than others, no doubt. Opening up so many of these figures has taught me a lot about other repairers previous attempts,
                          including the ones that work as much as the ones that don't.


                          For this repair, some strong thread has been used. Notice that this necessitated the drilling of additional holes into the arms for
                          this method to work. The threaded repair was completed by attaching the new anchors to the figure's mid post.


                          Just in case you were wondering, Gentle Giant's 24" tribute figure also had to solve this problem of arm attachment. Here we see
                          the use of black bungee cord used to connect the arms to the torso. Hell, if this solution is good enough for a company like Gentle
                          Giant, then it's good enough for you, too! All 4 of their range of figures (Glow in the dark, Tribute, Gold and Silver) use this method.


                          A small collection of discarded broken anchors retrieved from inside the torsos of various figures. Each one represents a broken arm
                          that is now returned back to its proper place. Yeah. I've done this a lot.


                          I hope this has given you some insight and more ideas into how to fix the arms on these figures. I have my own preferred method and it's documented earlier on this thread, page 2, if I remember right. Hah! That'll be the day! Anyway, I still haven't finished with fixing broken arms just yet. Just one more post and then it's just about time to wrap this figure up. I have another figure on the go at the moment and I do want to talk about it as well... Gah. Some people think these things are rare. Well, they're not.

                          - - -

                          Also of great interest to me - and of great excitement I can hardly hide - is the very recent announcement of Super 7's 18" faux 1986 'ALIENS' 'prototype' action figure to be released exclusively at this years San Diego Comic Con, 2016. Significantly, this thing never existed at the time the movie was released but that hasn't stopped Super 7 from speculating with this release and it does look neat. It's definitely derived from the original Kenner figure - so it interests me intensely! Some discernible changes to the head, arms, hands and feet have been made to match these features as they appear in Cameron's movie; but the tail, torso and thighs belie its origin as they appear to remain untouched from the 1979 figure. I'm guessing Super 7 have used a similar 3D digital scanning technique to generate their new figure. The smooth glossy finish would indicate such. Who knows? Maybe Super 7 have taken the same raw digital data that Gentle Giant used to create their oversized figures. Either way, I'm soooo looking forward to getting my hands on one of these. Love the 'prototype' work-in-progress box design, too, and the use of the 'ALIENS' refitted logo along with the repurposing of the 'Warning! ALIENS are here!' slogan. Too much awesome!


                          Ack! That price!!!1!! At least it's cheaper than Gentle Giant's figures. Too much lolz there.


                          Knowing Super 7, this SDCC exclusive will probably be a precursor to a more widely distributed mass market edition, much like they did with their pocket sized 'ALIEN' ReAction figures. Sooo looking forward to this being released later this month. Now... just how am I going to get one in Australia without being price gouged on Ebay? GAH!

                          -Windebieste.

                          Comment

                          • windebieste
                            Museum Patron
                            • Dec 31, 2015
                            • 115

                            Anyway, now that we have explored various options in previous posts on how to fix the arms on these (and other) old ovresized Kenner action figures it's time to turn our attention to the figure in hand once again. Specifically, getting it's own arms reattached to the torso and complete the work that is needed on the figure.

                            For this repair, I am opting for the method that I've found works the best. It's relatively easy to do and works well when completed. Also of importance, should there be any problems with it, it is 100% repeatable without damaging or altering the figure. Basically, it's as good a method as I've been able to come up with. I've tried just about everything you could think of including the methods trailblazed by previous repairers but I believe this one is the best.

                            This repair method does require some basic materials and tools but the results are generally excellent and worth the effort.


                            Just the most basic tools - 2x pliers, scissors and a leather hole puncher. The screwdriver is used to disassemble and re-assemble
                            the figure. Yep. That's all you will need. This selection of tools will complete the task from start to finish.


                            A wire coat hanger and a coil of 1mm thick neoprene rubber strip. Basic materials that are reasonably easy to come by. If you are
                            not familiar with how to obtain neoprene rubber then it can be purchased from a swimming pool or marine supplies store. It should
                            cost around $2-$3 per metre. You won't need that much. You can even try Ebay - but I found it more expensive online than instore.


                            Here, the right arm already has the new improvised anchor inserted while below it the anchor is yet to be assembled for the left arm.


                            Both arms now have their anchors inserted and ready to be re-attached to the figure.


                            This method of repair is more fully documented on page 2 of this thread so I'm not going to replicate it all here. The actual process is a simple task of cutting the neoprene rubber into small strips and punching a pair of holes (one large and one small) into either end of the strips. Cut a short length of 15mm wire from the coat hanger, bend it at the middle and thread it easily into the smaller hole of the rubber anchor. Then attach the arms to the front torso half with the larger hole and re-assemble the figure. Done and simple.

                            You may find the anchors are not tight enough to your liking and may still be a little loose. If this is the case, then simply repeat the process. Disassemble the figure, cut the rubber free of the wire using a craft knife. Discard the rubber. The wire will retreat into the the arm and you will now have to retrieve it. Don't worry. It's not hard. Just shake the arm and it will fall out through the hole. Sometimes it falls out straight away - sometimes it takes longer. When you have recovered the wire piece, just repeat the process but reduce the distance between the 2 punched holes on the rubber.

                            This process is infinitely repeatable without damaging the figure or adding any additional detritus to the interior of the arm. It's also surprisingly strong. Here's a little experiment I conducted regarding this technique that demonstrates how strong this method is:


                            A 2kilogram weight with an improvised anchor attached to it with some string.


                            The test of strength easily passed as the neoprene anchor is easily capable of lifting an object weighing 2kg. A great
                            result without breaking under the strain. The stretching is normal and when inside the figure will do so anyway. It's
                            the anchor's stretching within the figure that applies tension to the arm and will hold them in any pose you set them
                            at. I would not have the confidence of applying this test to rubber bands. Their elasticity is way too high.


                            We're getting to end of the work I wanted to perform on this figure. The arms have been re-attached successfully and all the other work is complete. I straightened the tail as per methods documented elsewhere multiple times throughout this thread already - so I won't do that again here. The figure's been cleaned, its buckled foot has been successfully straightened and the arm has had an abundance of glue residue removed from it's permanently fixed in place previous repair. The arm's full articulation has been returned to it once again. All that remains now is the final summary and some comparison photos.

                            I'll be back for those soon. These posts do take some time and effort to prepare so your time and attention is greatly appreciated! Thanks for reading.

                            -Windebieste.

                            Comment

                            • windebieste
                              Museum Patron
                              • Dec 31, 2015
                              • 115

                              Using this particular figure, I really wanted to explore getting the arms fixed. This is a very common problem these old figures display and unlike other potentially missing parts - say the carapace or the dorsal crest - it really hurts the figures presentation if they are missing when it's being displayed. While it's preferable to have all of its parts present, it's at its most ugliest when limbs are absent. To this end I spent a little time exploring some alternative methods so at least one of these techniques will be appropriate for your needs/ability.

                              While this figure did have both of it's arms present, there's no harm in addressing them. Certainly, an arm that's been glued into place is better than missing entirely but it's substantially more desirable to have that arm have its full range of mobility returned to it. The removal of glue and the addition of some fresh, albeit improvised, arm anchors has done the trick and the figure now holds any pose I set it too. Strictly speaking, the other arm needed no fixing at all as it was still attached. However, it did hang limply at the figures side. The original anchor, while present and still working to a limited degree, had become fatigued. It had been performing its task of holding the arm in place under tension for over 30 years. It's way too much to expect a small piece of cheap rubber to continue doing so for such an extended period of time. Very, very few samples of these figures do not suffer from such fatigue. Extremely few.

                              For the arm that still had its original anchor present, I basically left it in place and added a new improvised anchor alongside it. Assembling the figure then meant the original rubber anchor was left unattached, sitting inside the figure with the new anchor performing the task of attachment and tensioning. Effectively, the old anchor is still present and undamaged inside the torso of the figure but it is now retired and no longer in danger of snapping.


                              The more or less completed figure. It just needs a carapace. It's been thoroughly cleaned he can now hold a pose.
                              It looks good. Well, as good as it can get.


                              Our three quarter view and portrait comparisons further demonstrate the improvements to the arms ability to now hold
                              a pose. Also note the tail no longer has a pronounced curvilinear warp to it. Presentation wise, this figure has been
                              improved dramatically with just a little attention to detail.


                              This was a great figure to work on. It's been cleaned, the foot has been straightened out so it stands confidently, the arms now hold a pose and it's had its tail alignment corrected. Unfortunately, I cannot return the spring to the interior jaw mechanism as it's just not possible to access the interior of the head. Fortunately, it hasn't appeared to affect the operation of the system. Pressing the lever at back of the head opens the jaws and the tongue halves emerge, separating as they exit the mouth. Releasing the lever migrates all the parts back into their original position. I'm lucky it works as intended. It's uncommon that either of the 2 springs fall out like this and fortunately it's even more rare for both of them to do so. You're in trouble with the jaw operation if that happens.

                              All in all, I'm very satisfied with how this figure has turned out. I've done the best I can to bring it up to a display worthy state.

                              I have another figure on my workbench at the moment but I'm thinking it doesn't have anything I particularly want to document. Just the usual problems need to be addressed. It was dirty and covered in dust. One of its arms are broken off and the other is just loosely hanging in a pendulous state. The quad dorsal appendages are all snapped from their mounting plate and rotate freely around. It's missing its dorsal crest and carapace. All very common problems that I've encountered many times in the past and have documented elsewhere throughout this thread. In which case, I'm not going to document it's repair and restoration. It'll be fine without that attention.

                              In which case, this is the first time in 6 months I really don't have anything new to post.

                              It's been some fun documenting the repair and restoration of these old toys. That's not to say I'm finished and leaving. No. I'll be around. There's a number of other repairs I haven't documented here. How do you fix a severed head? Yep. That can be done. I've not directly documented this procedure on these pages but there is a link amongst all this stuff somewhere. What about arms that have collapsed into the figure because the 4 pins inside the shoulder are broken? Yep, that can be fixed, too. I'll get around to documenting these and other remaining issues when I get to work on such figures.

                              Anyway, please keep an eye on this thread. It's not being abandoned - it's just nearing completeness in its content but I do intend to continue posting here in the future.

                              All the same, thank you for reading. It's been a Joy!

                              -Windebieste.

                              Comment

                              • windebieste
                                Museum Patron
                                • Dec 31, 2015
                                • 115

                                My, how time flies... It's been a while since my last post here. I've been committed to working on a major Project of late (Well, actually for over 12 months now) so I have not had the time to contribute further to the largest online collection of repairs to this old toy (probably any toy for that matter, I haven't checked!) for about a month. Anyway, This will take a few posts to complete.


                                I have this mangled leg. This is serious damage to the limb and while I still have both of the shattered fragments these pieces of debris
                                will be discarded for the sake of this repair. It's obvious from the glue residue that an attempt at repair has previously been made.


                                Here's the ruined leg and the hip joint that it is supposed to be attached to. Clearly, this is going to need some creative treatment to be effective.


                                Here I've already commenced work on the leg and it's been sanded back. All the glue residue is now gone and the stumpy remains of the spindle
                                have been removed. It's now a flat surface and will sit flush against the figure. It just needs to stay there.


                                Unfortunately, mangled hip joints like this are relatively common. If the figure is left lying on its side and a heavy weight is placed upon it, this damage will occur and it's clear this leg has seen better days. This is an extreme example of this kind of damage as the spindle and flange arrangement is usually only split or cracked and still and yet the leg is attached to the figure. I simple splint is all you need to fix it and I may have covered that method on these pages already. This particular leg is severely damaged and to compound its problem it's also been previously repaired, leaving difficult to manage glue residue on many of the surfaces of both the leg and it's debris. I've already cleaned the surface that will sit flush onto the torso so we are already way under way.

                                As is clearly demonstrated, there's no way glue is adequate to hold the limb in place so I will be embracing a more practical and permanent method of restoring this leg. In effect, I will be completely rebuilding the spindle joint - and what's more, I will do it using materials anyone can get their hands on.

                                The goal here is simple but it still needs to fulfill these criteria:

                                - Repair the leg, which will involve completely rebuilding the spindle joint.
                                - Fasten it to the figure.
                                - Ensure that the limb has full articulation and can rotate 360 degrees as it should.
                                - Make the repair clean.
                                - Make the repair undetectable.
                                - It has to be permanent and long lasting.

                                This is going to be fun!

                                -Windebieste.

                                Comment

                                Working...
                                😀
                                🥰
                                🤢
                                😎
                                😡
                                👍
                                👎