Help support the Mego Museum

Announcement

Collapse
No announcement yet.

1979 Kenner ALIEN Complete Restoration - ADULTS ONLY

Collapse
X
 
  • Time
  • Show
Clear All
new posts
  • windebieste
    Museum Patron
    • Dec 31, 2015
    • 115

    #61
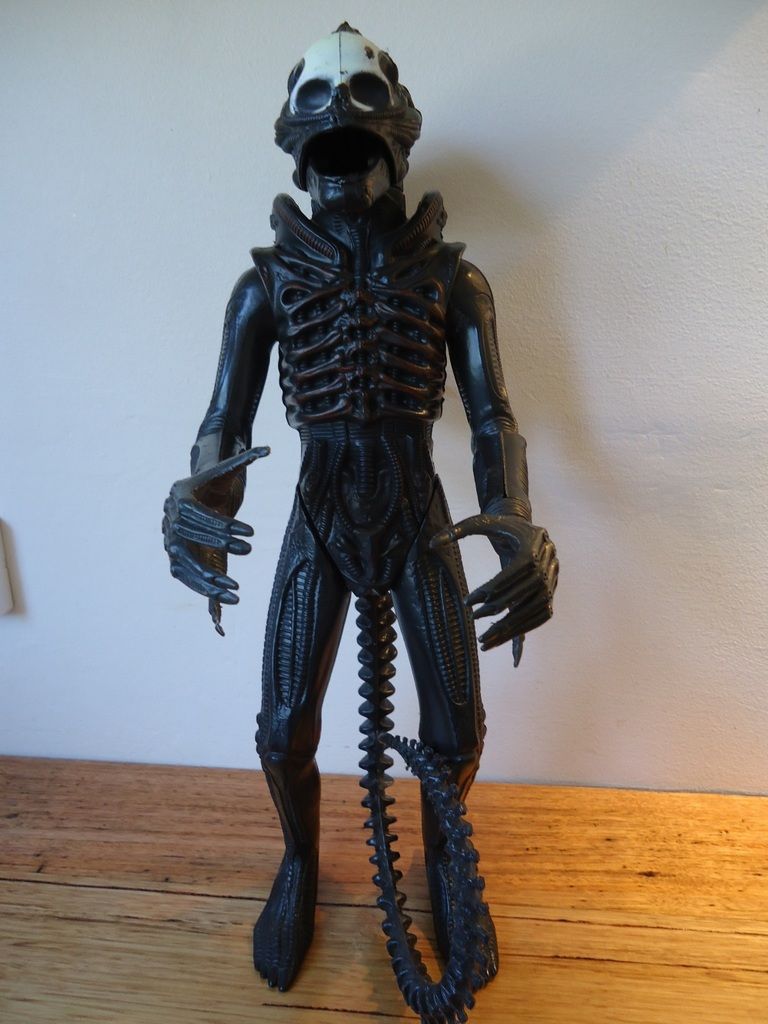
    It's time for me to wrap up this figure, put him aside and move on to the next one...

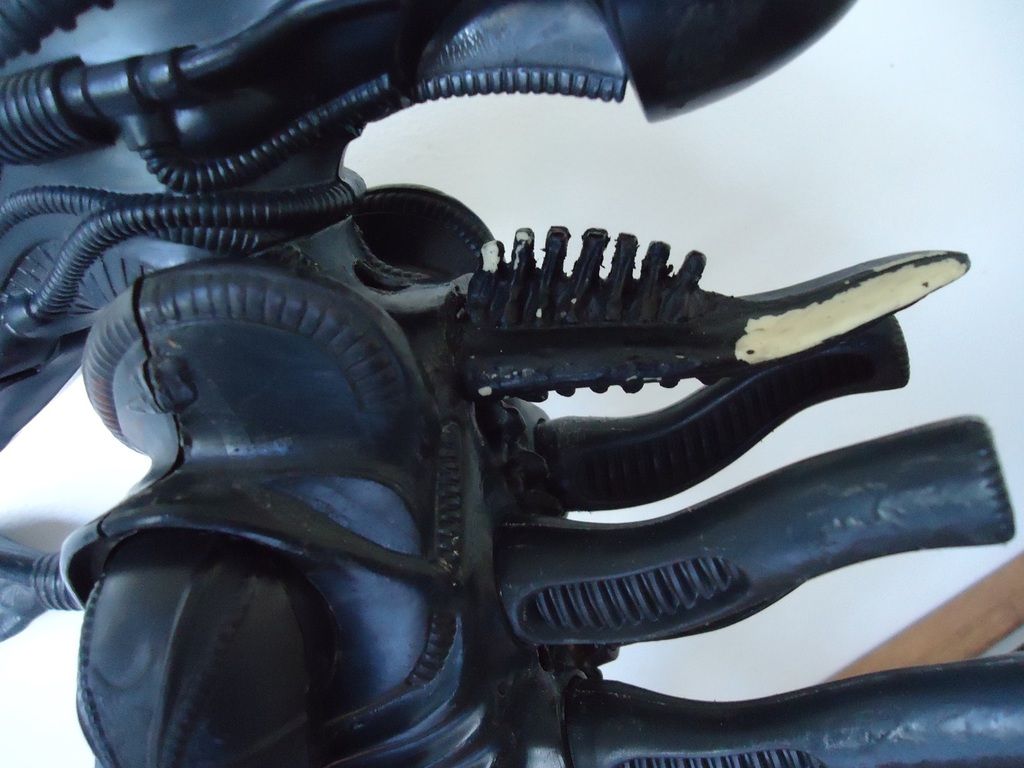
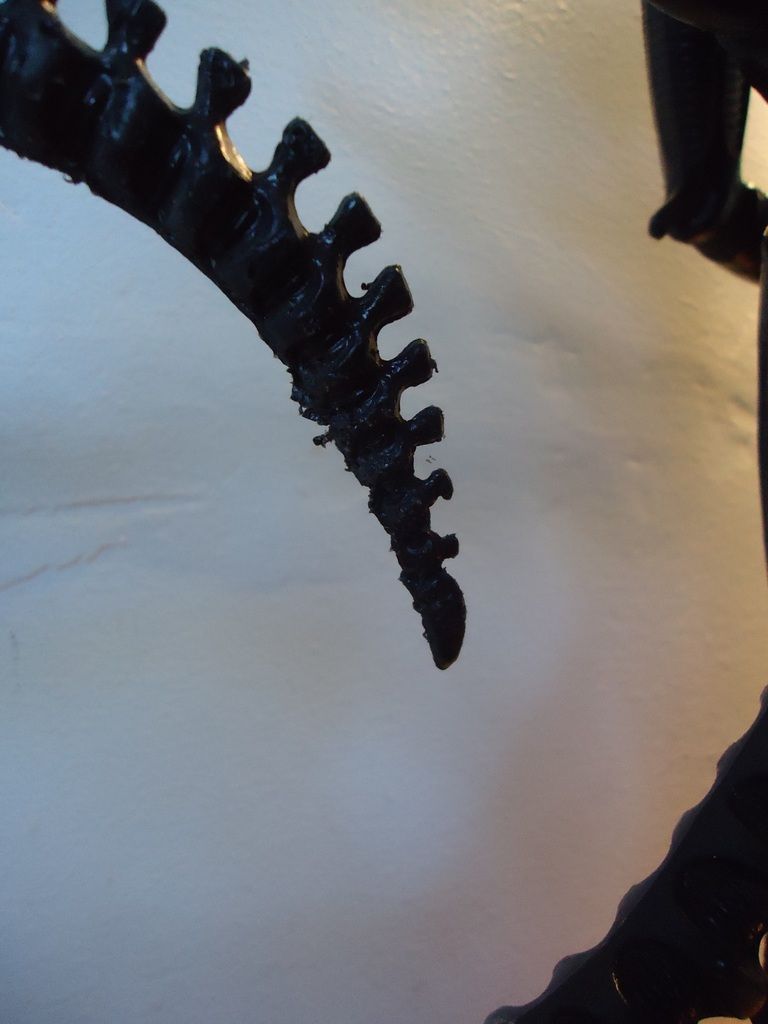
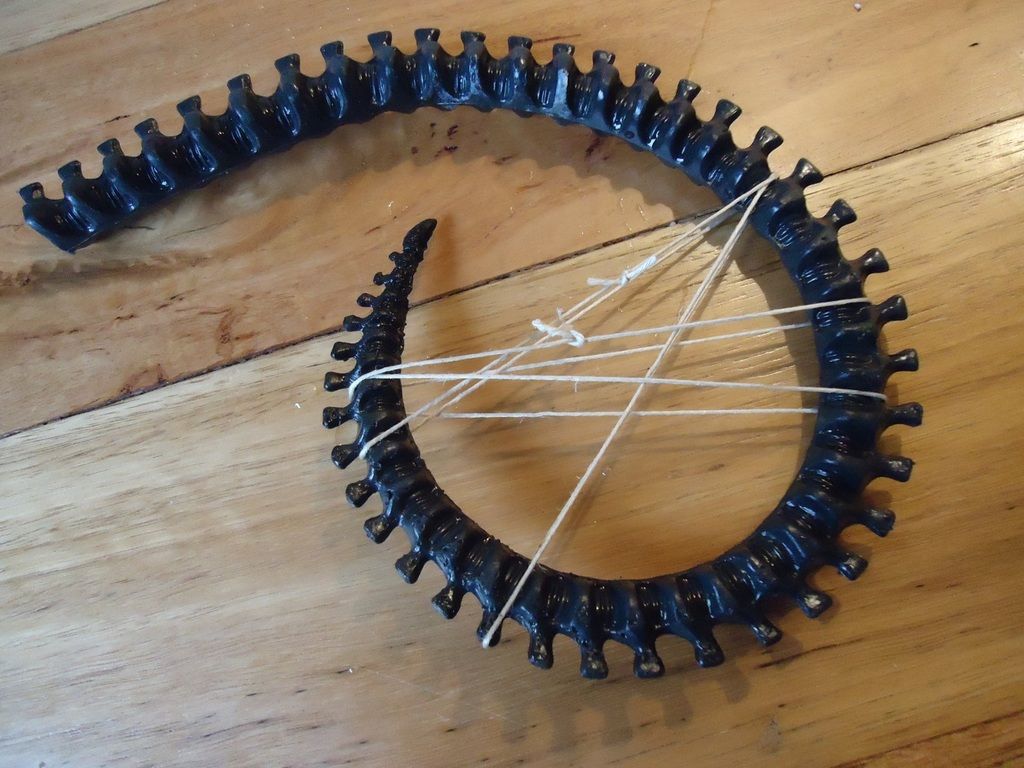
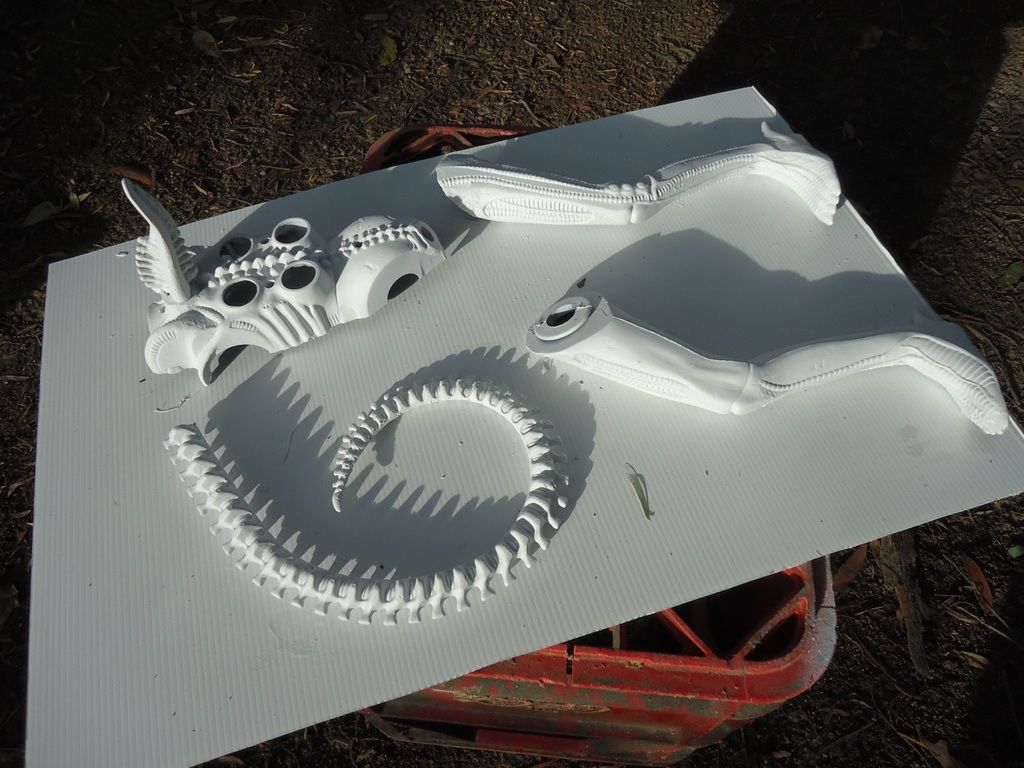
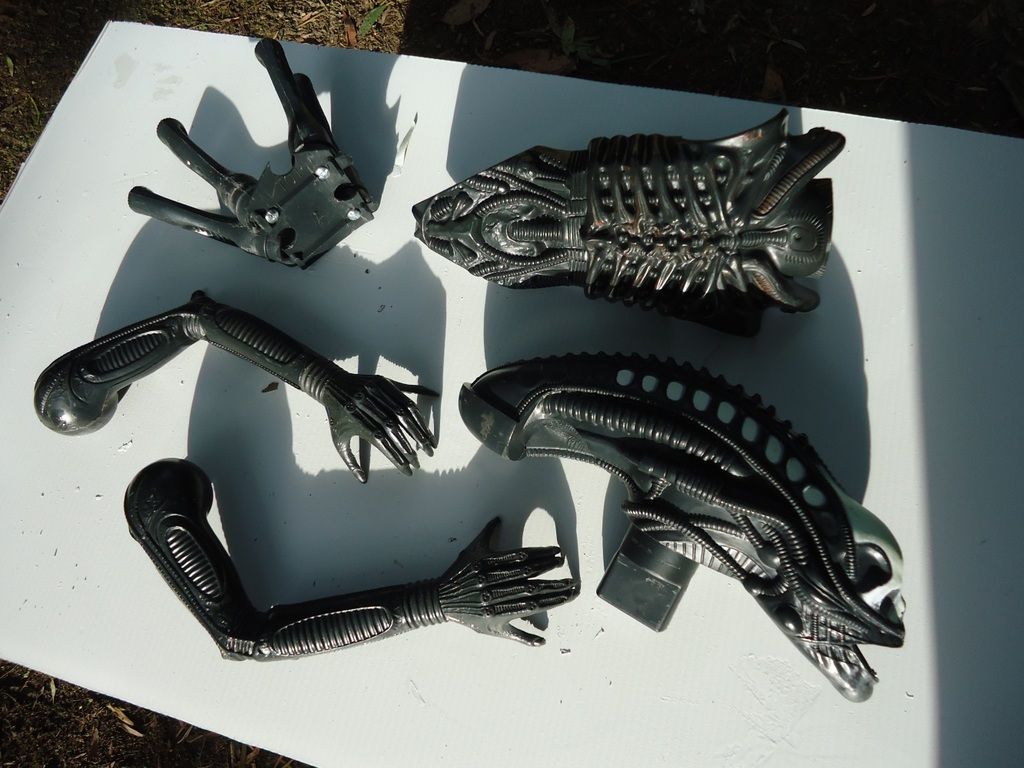
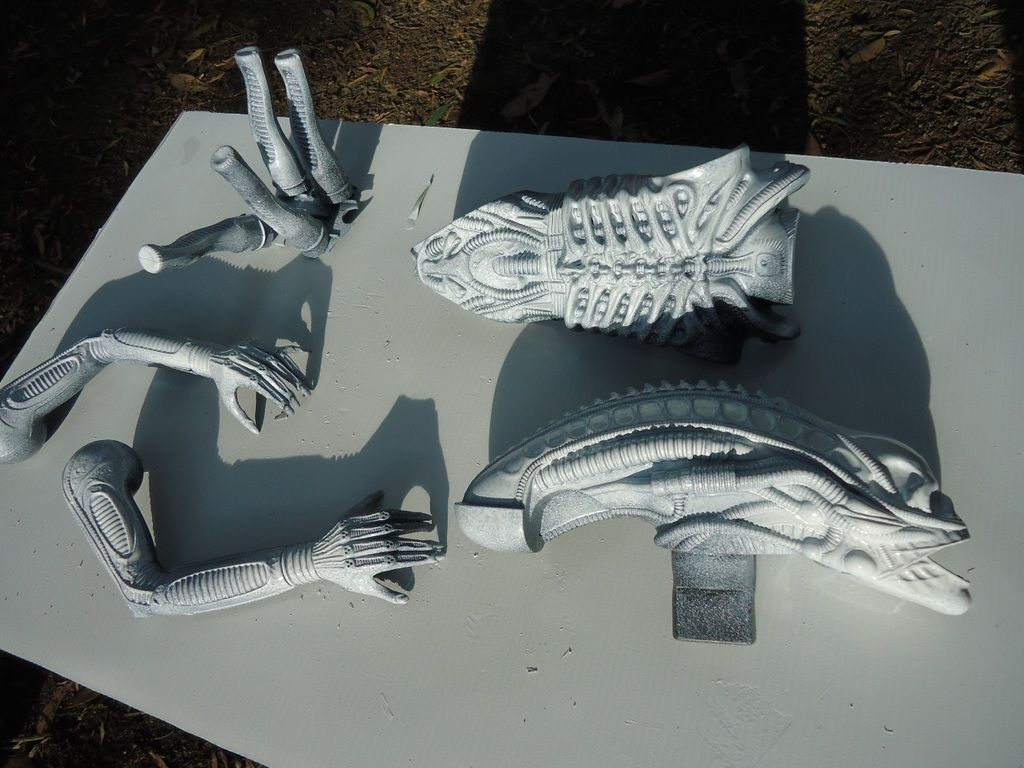
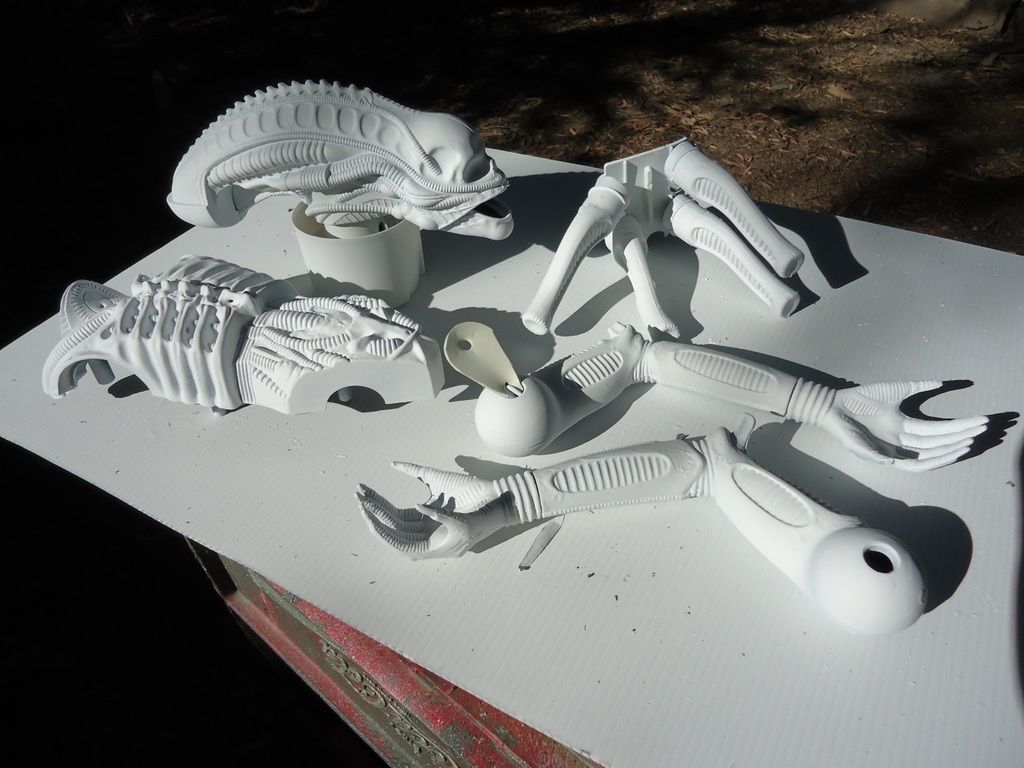
    When I first received this item many, many Moons ago, he had no arms. It was a double amputee, if you wish. Later, I purchased a pair of arms online and then set to work restoring this figure. What I was unaware of at the time was the elbow on the right arm was lightly damaged. Nothing too distracting, just a spur missing from the elbow. All the same, the parts were welcome. Once the arms were attached, work on the figure stalled for about 6 months. I needed more parts to get the figure up to a decent display worthy state. I knew facsimile parts would be the way to go - the overall quality of the figure just didn't warrant spending too much money on genuine parts. I just wanted to get the figure looking good rather than be incomplete and, well, 'naked'.


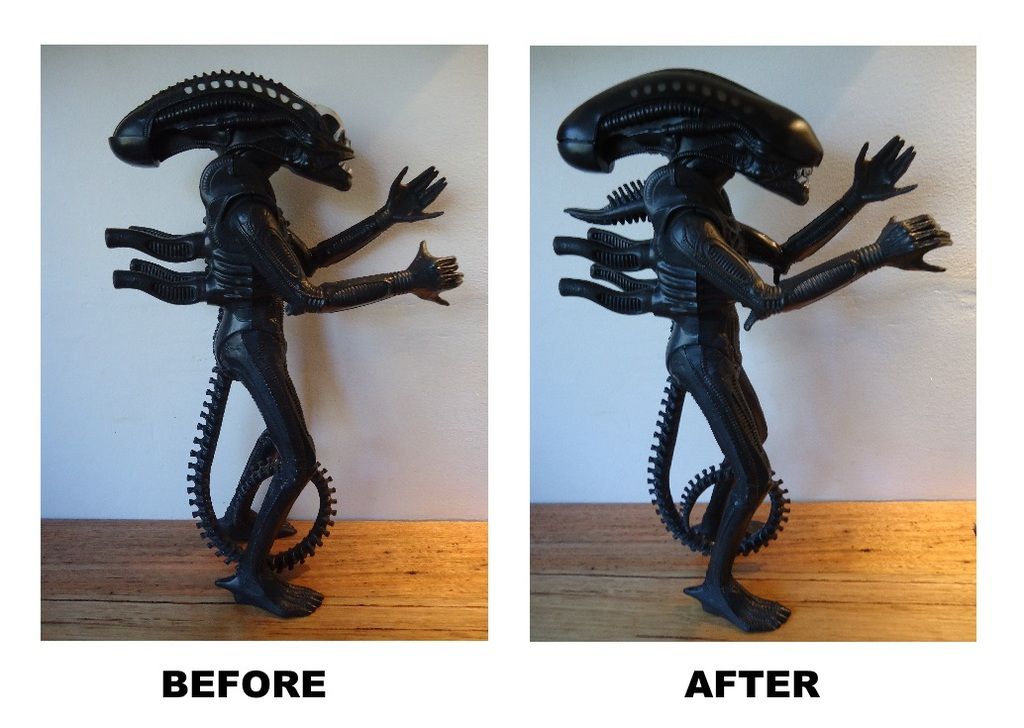
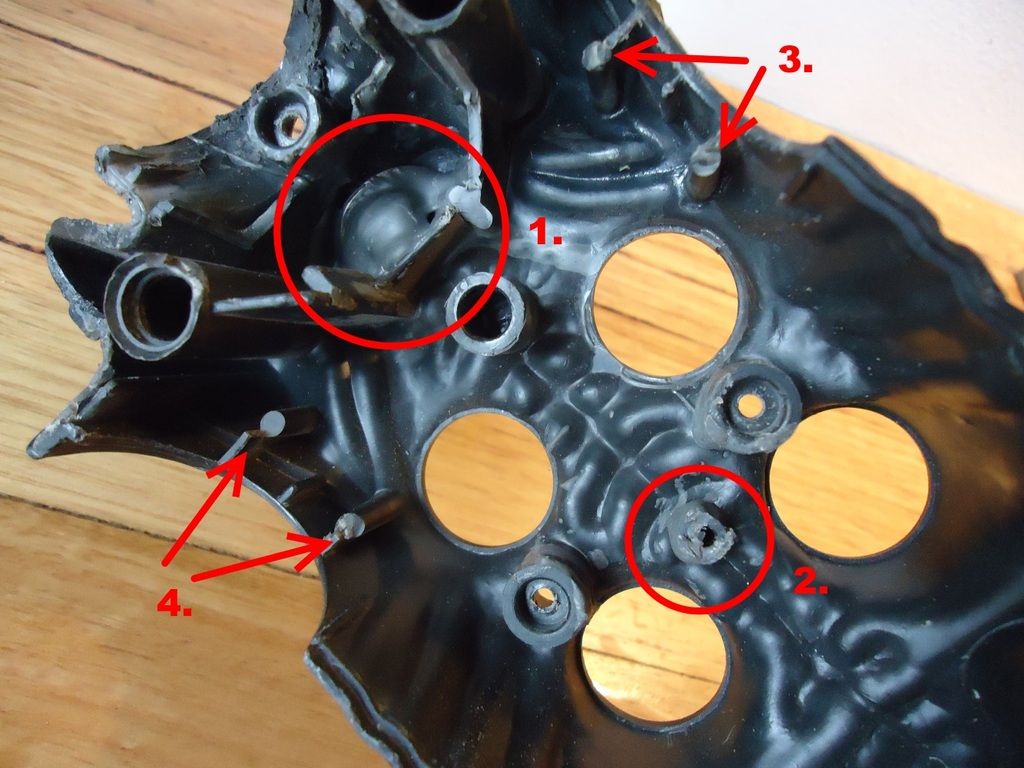
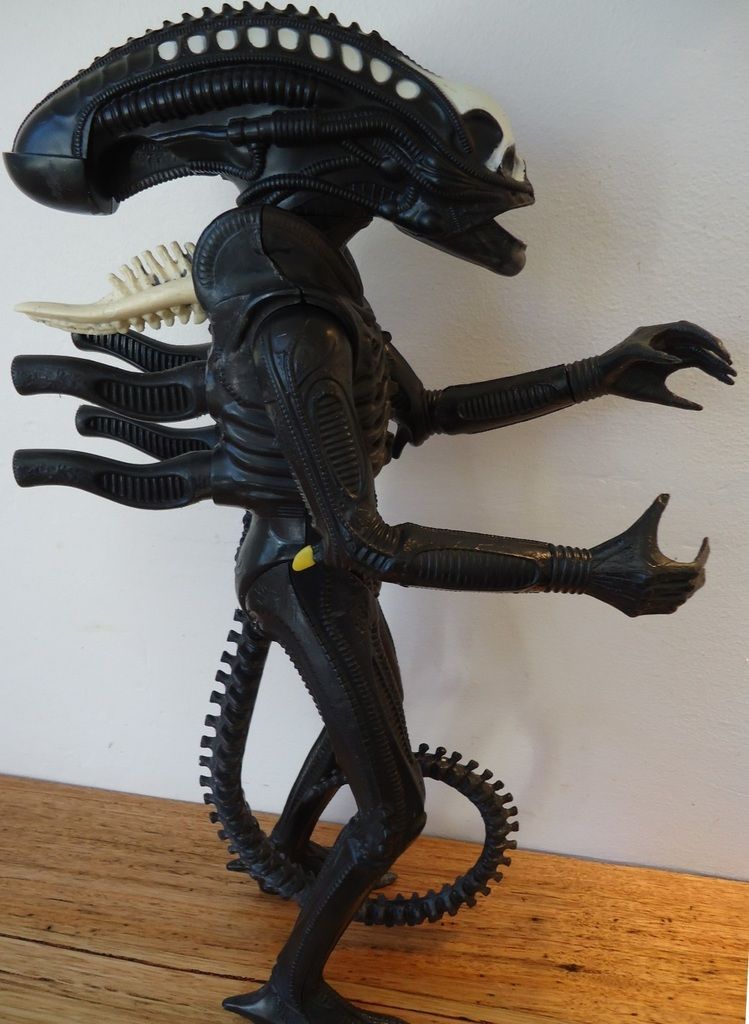
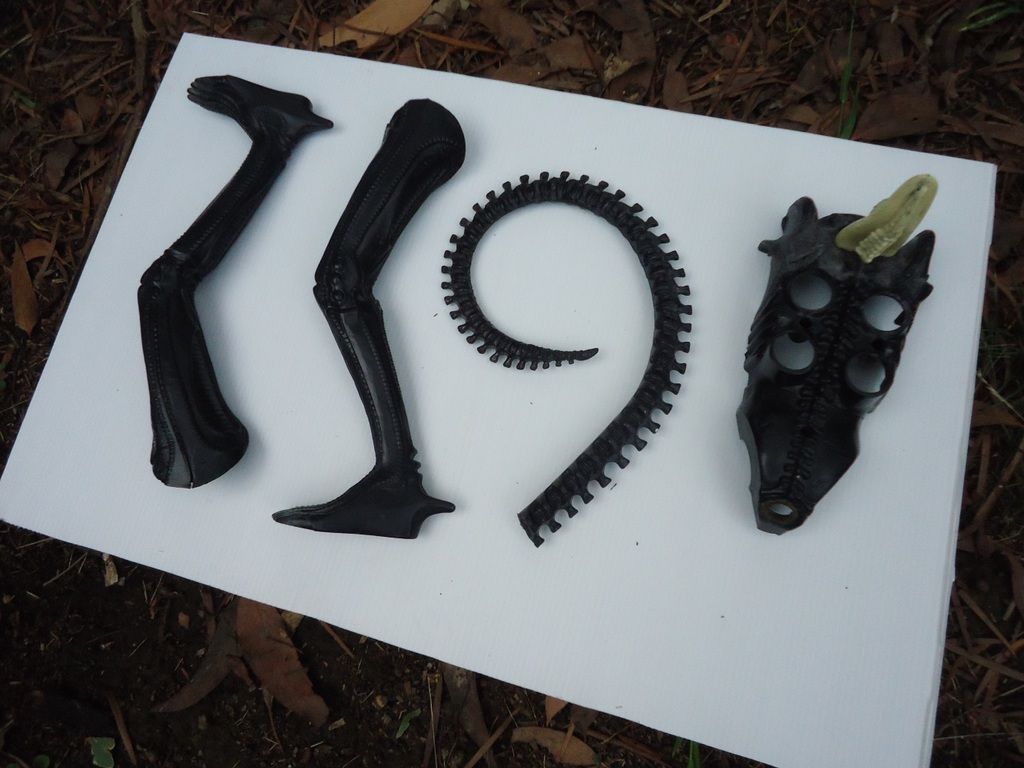
    (Left) Douglas Adams prior to receiving his makeover. The absence of various parts is obvious when compared to the completed
    figure (Right) repopulating it's vacant spaces with facsimiles. Also note the missing spur on the elbow of the right arm. To fix this
    damage, the entire arm was replaced.


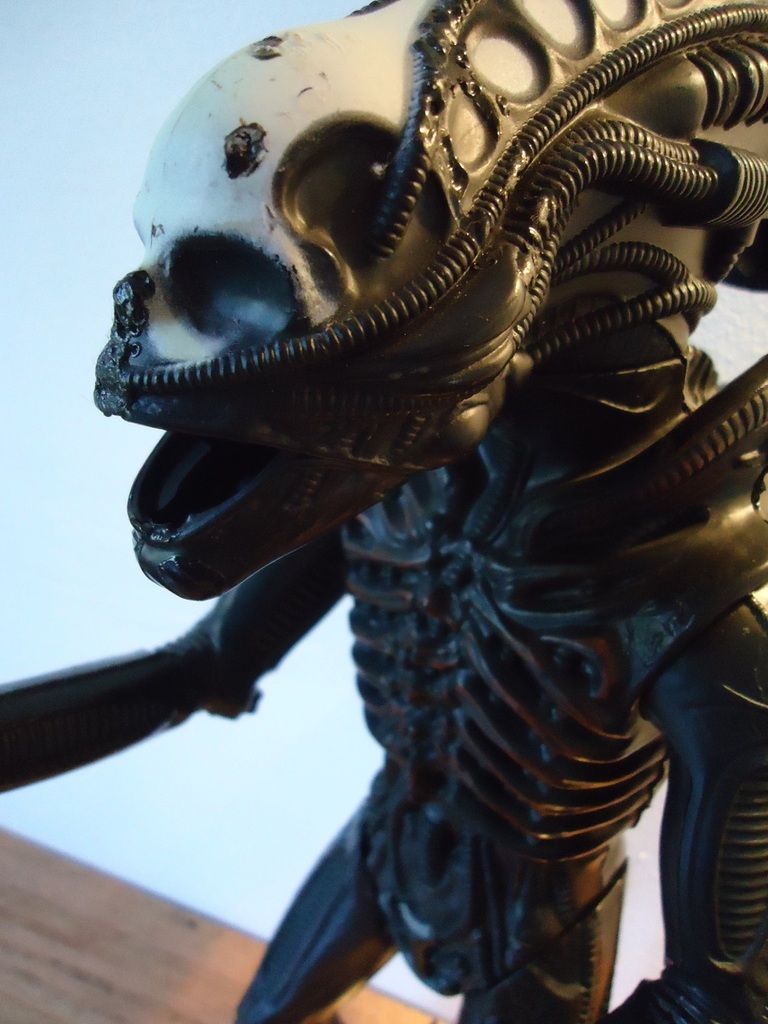
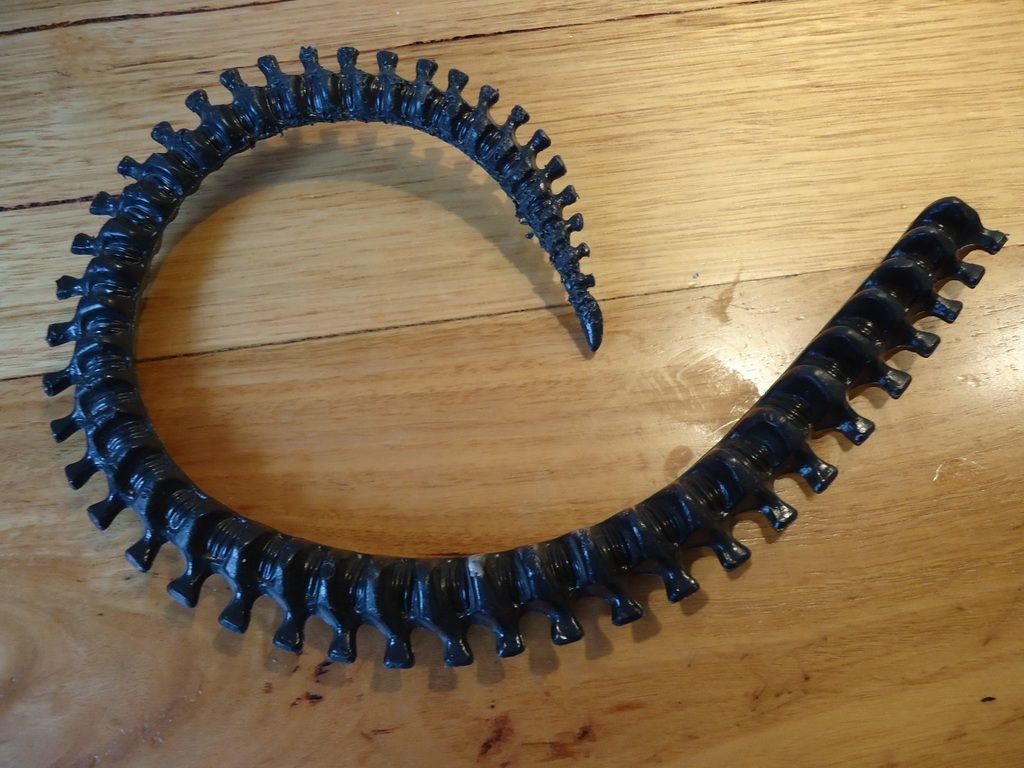
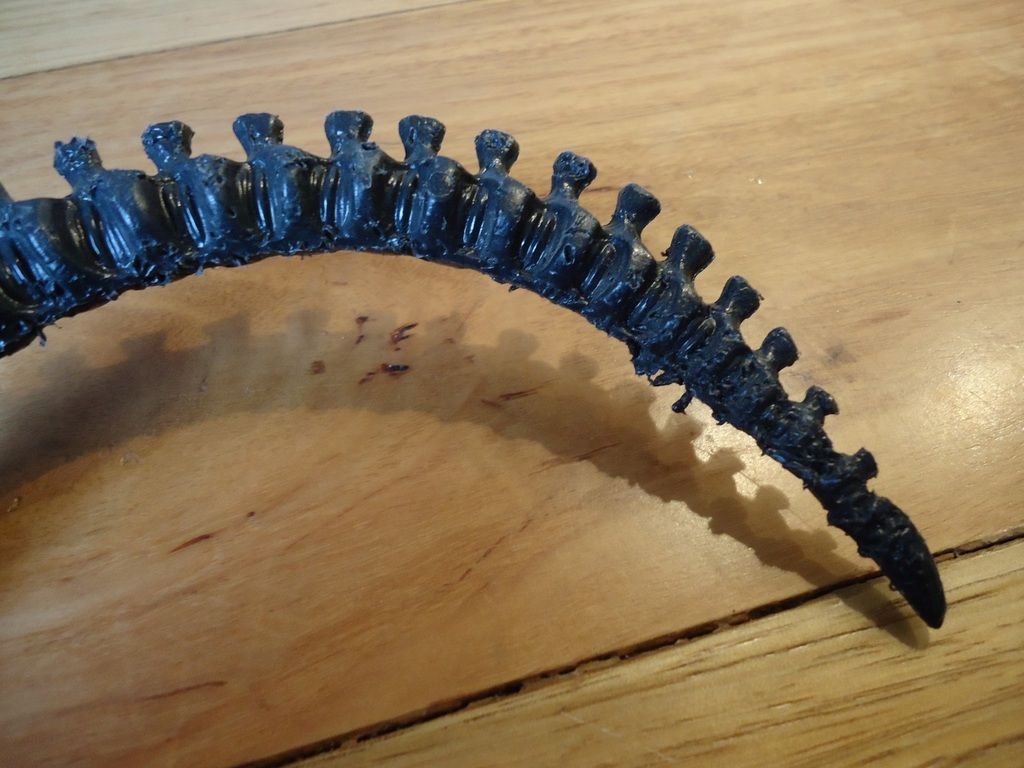
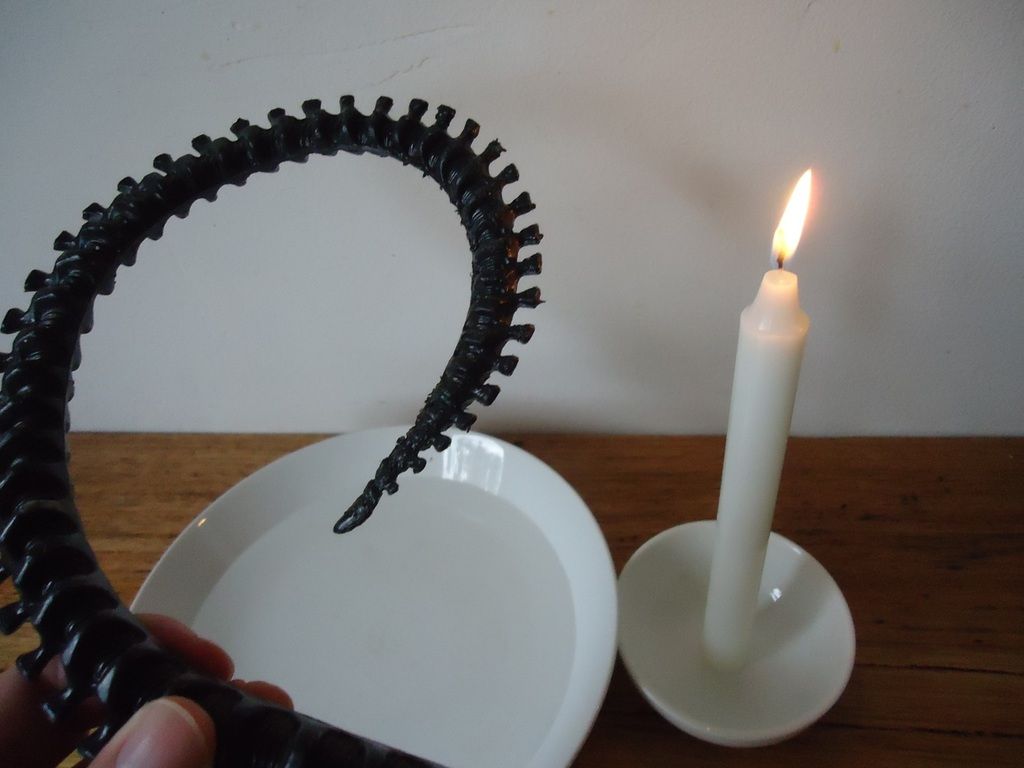
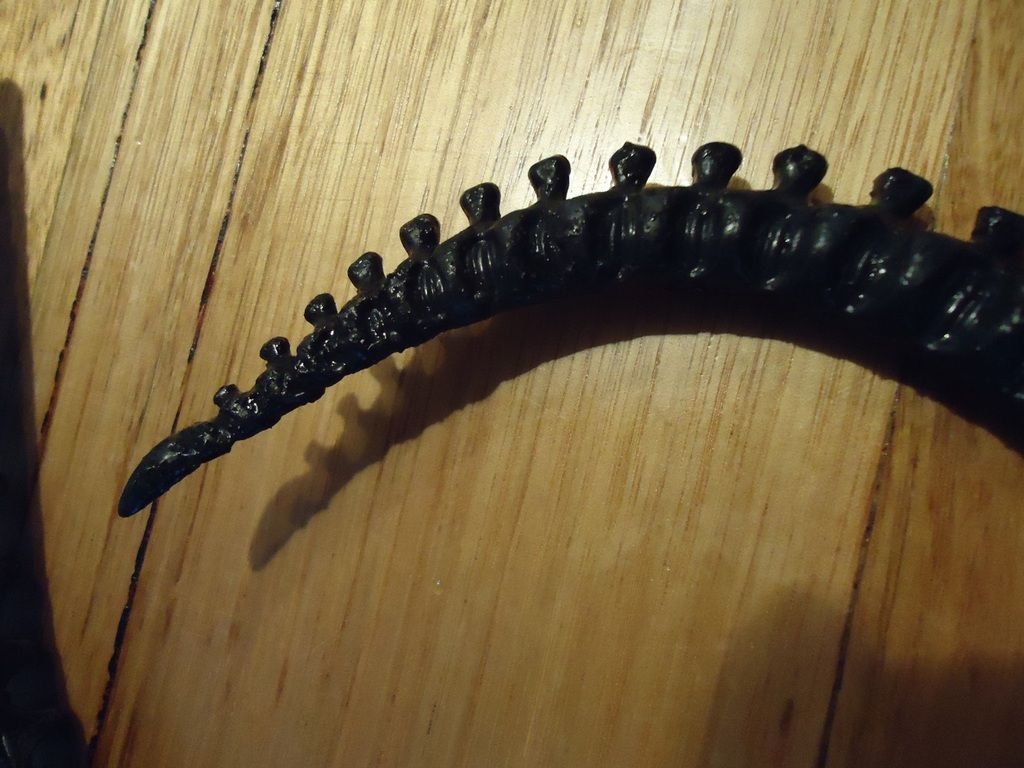
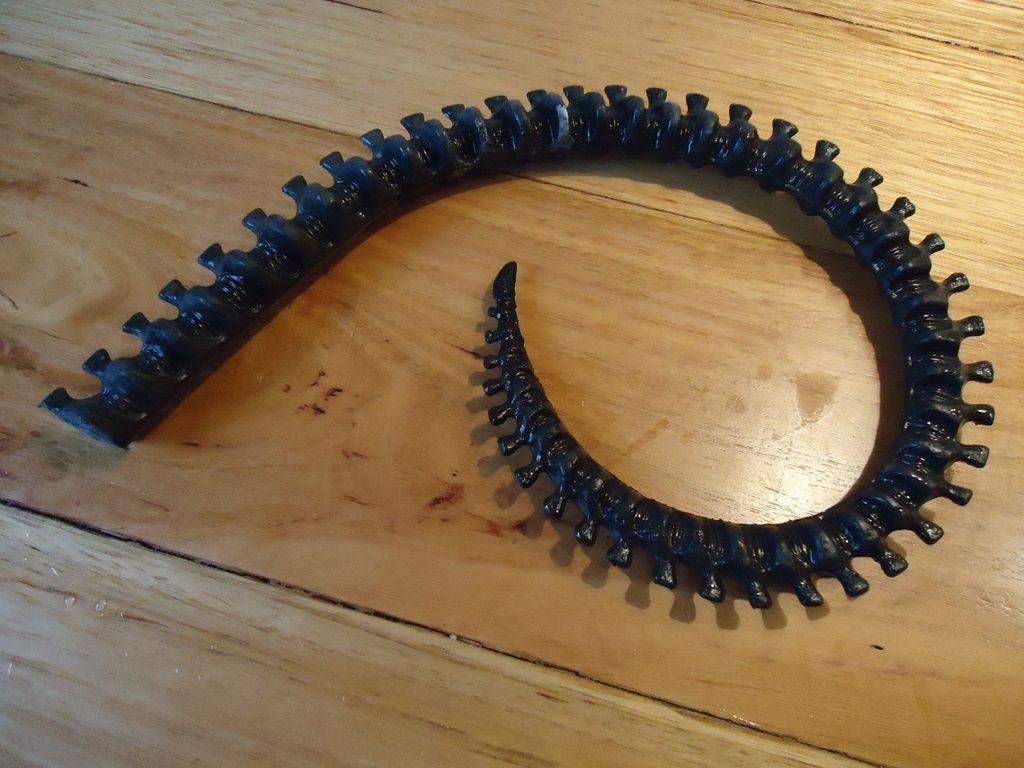
    Now that I have those parts the figure is as complete as can be expected. A number of critical vacant spaces have been filled on it and I'm happy with the result. Reproduction teeth (x2), split tongue (x2), carapace and crest have all gone a long way to improve its presentation.


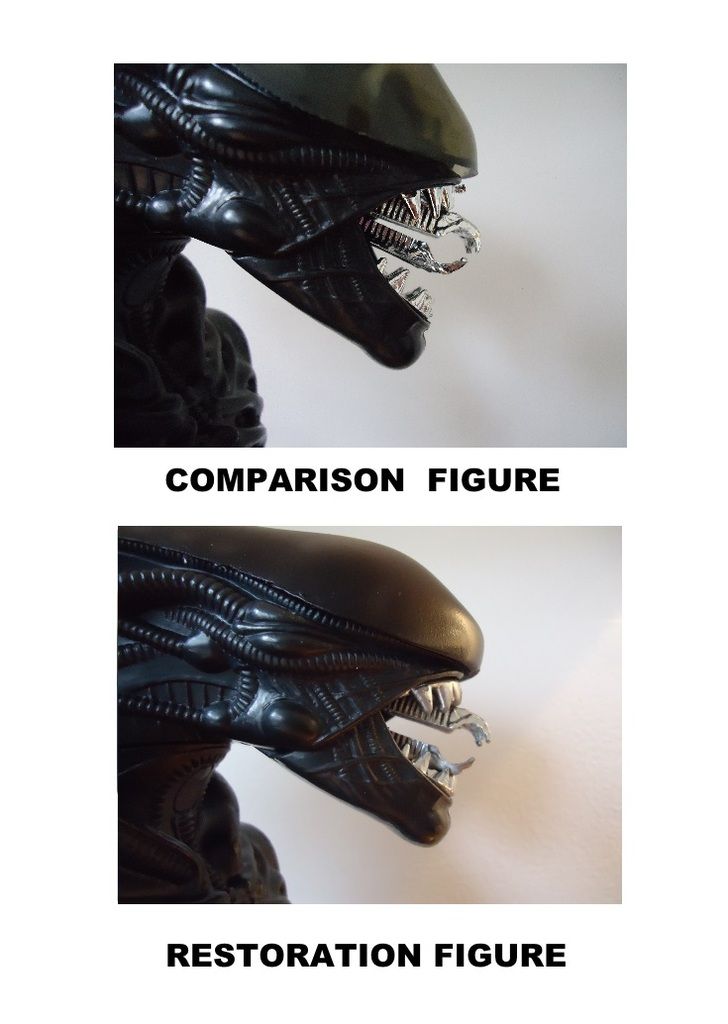
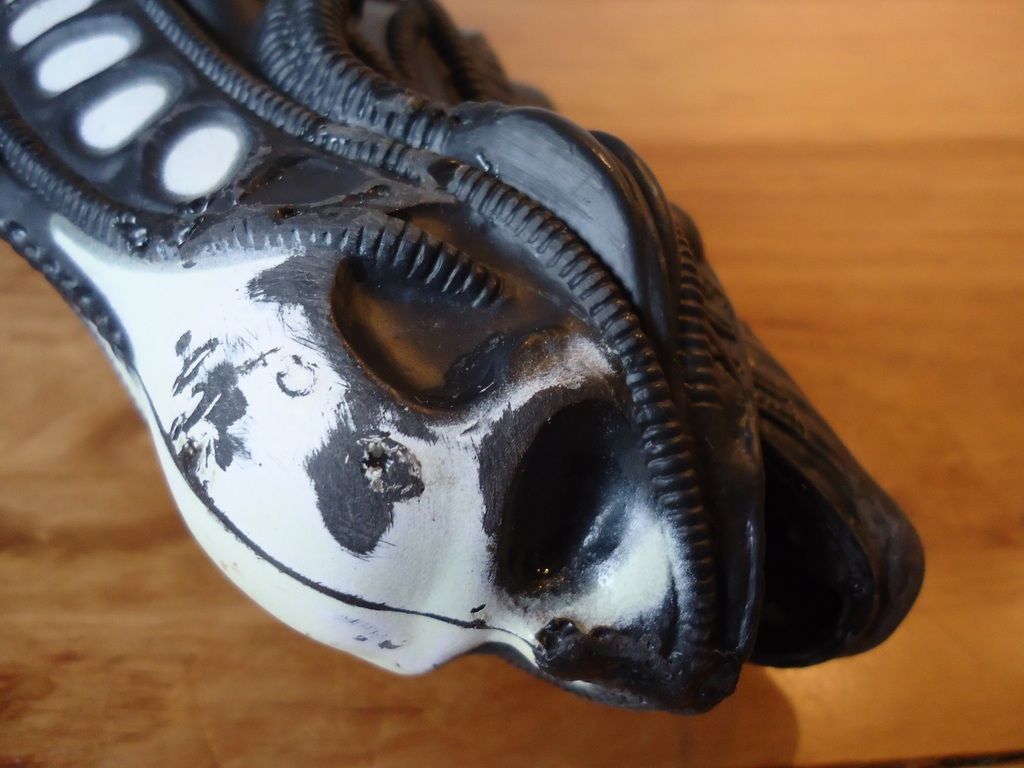
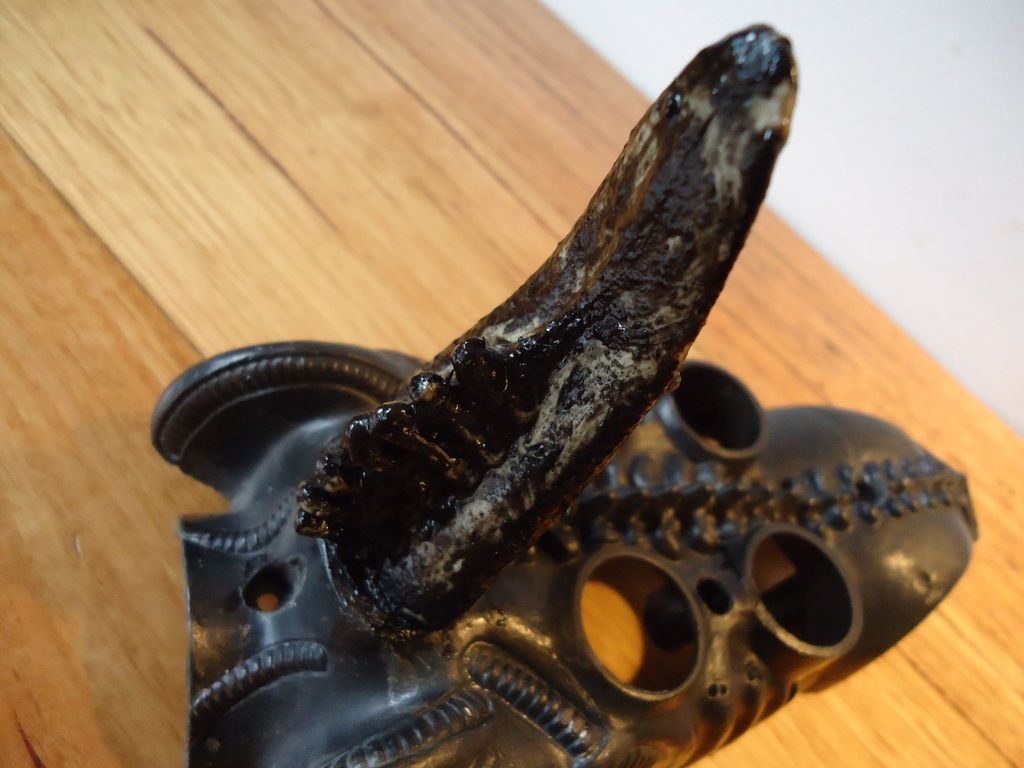
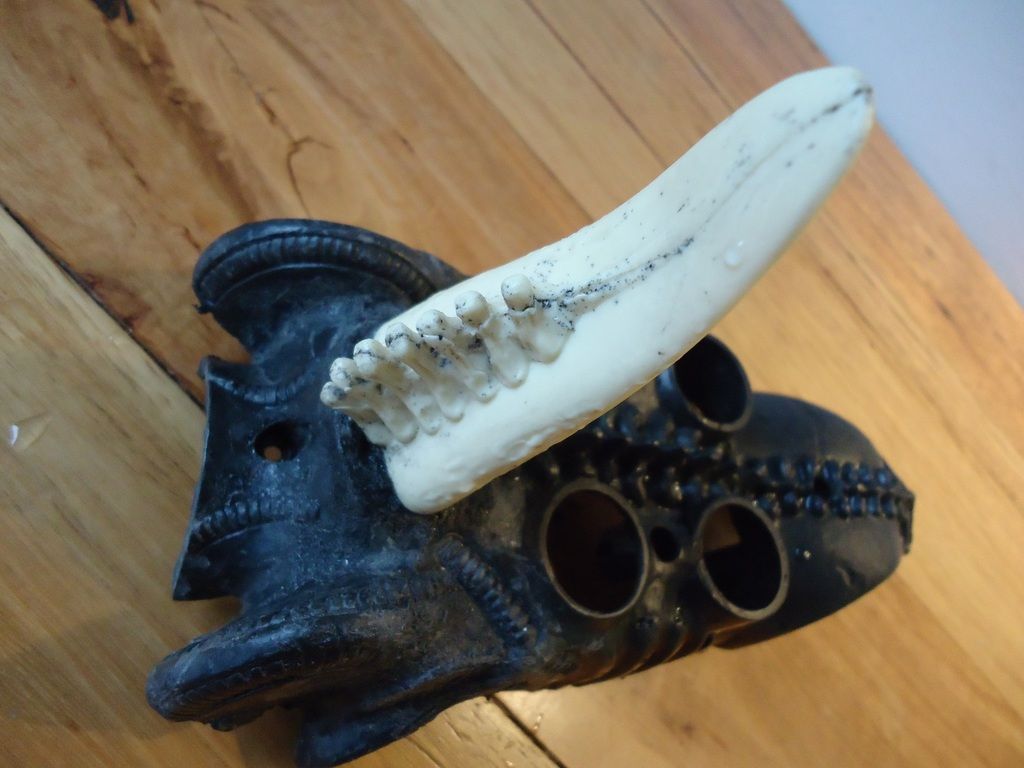
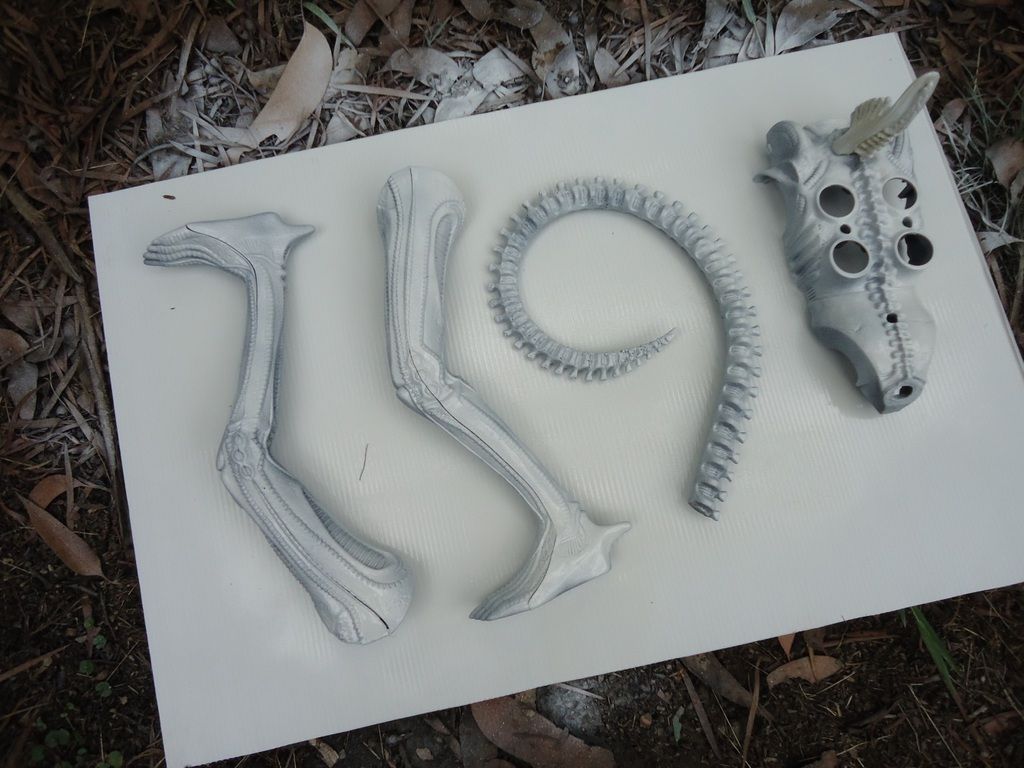
    The upper image is of a 100% fully original figure. Note the differences on the restoration figure at the bottom. The carapace is obviously
    darker and a subtle bulbous change in shape is present at the front of the piece. Also note the very slight difference in presentation of the
    teeth and split tongue pieces. The restoration figure's teeth are slightly dull and have less sheen to the chrome teeth in the upper image.


    As part of the figure's refurbishment, I acquired another pair of genuine arms and the damaged elbow on the right arm is now no longer an issue. That replacement was a straight swapping out of the parts and not a difficult process. Indeed, it's a routine exercise of dismantling the figure - something I have done many, many times. I still have the right arm with the damaged spur and it will be used in my next Project. This next item I will be working on will be the previously postponed customised figure I was originally going to engage in. It will be next.


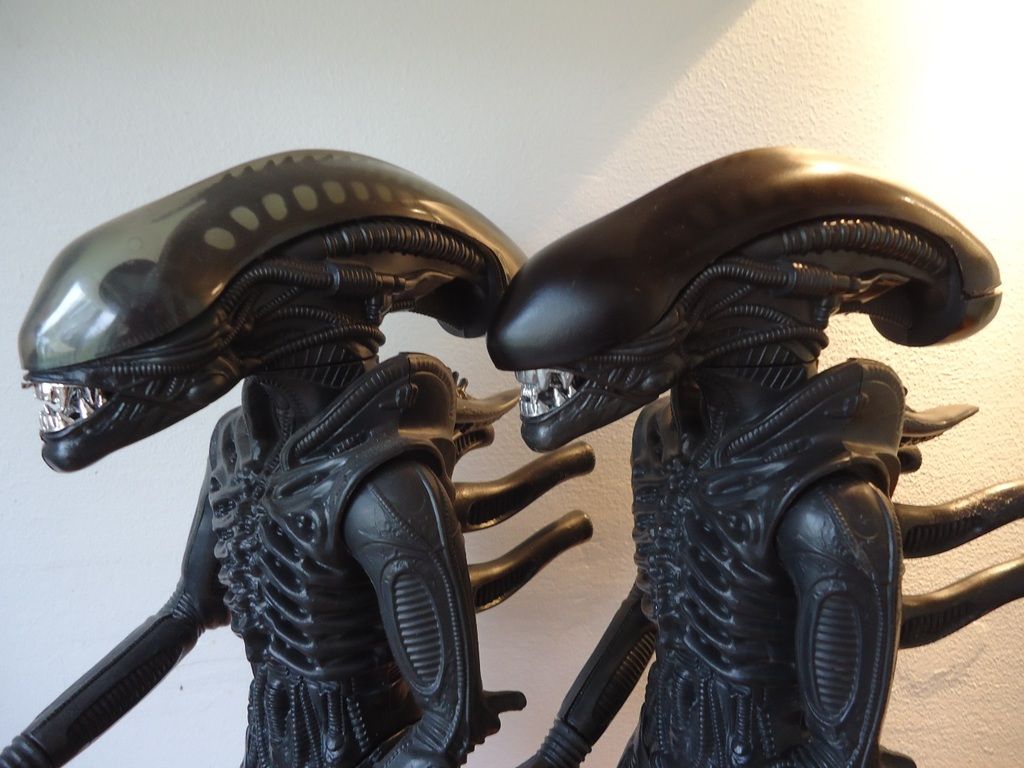
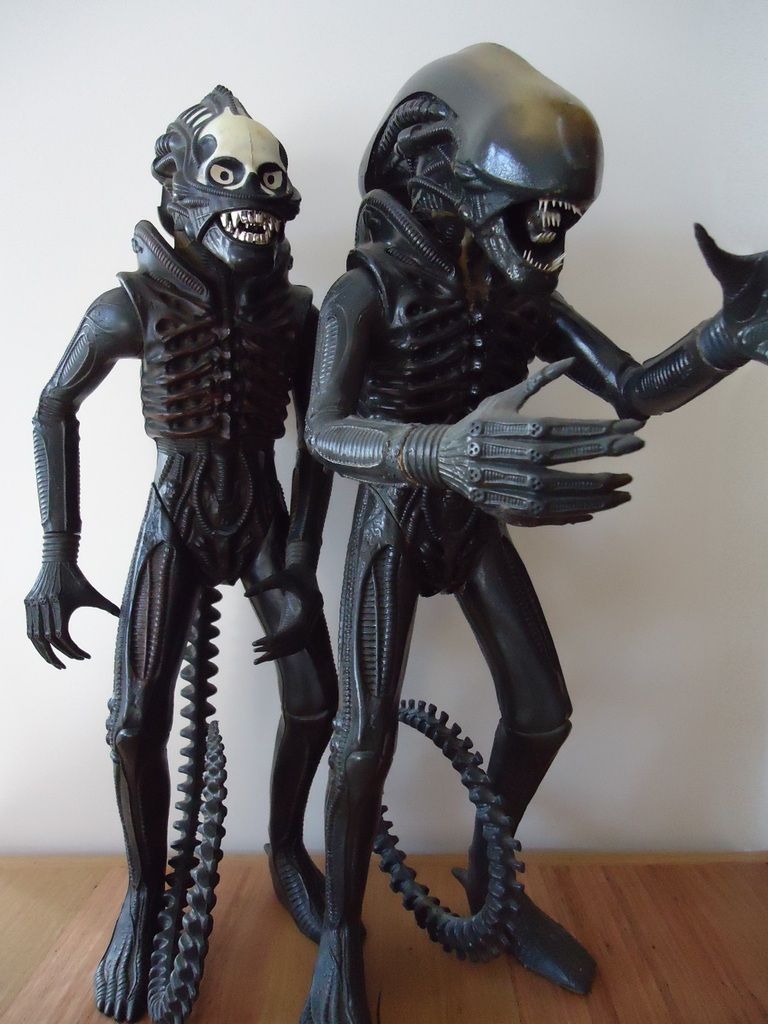
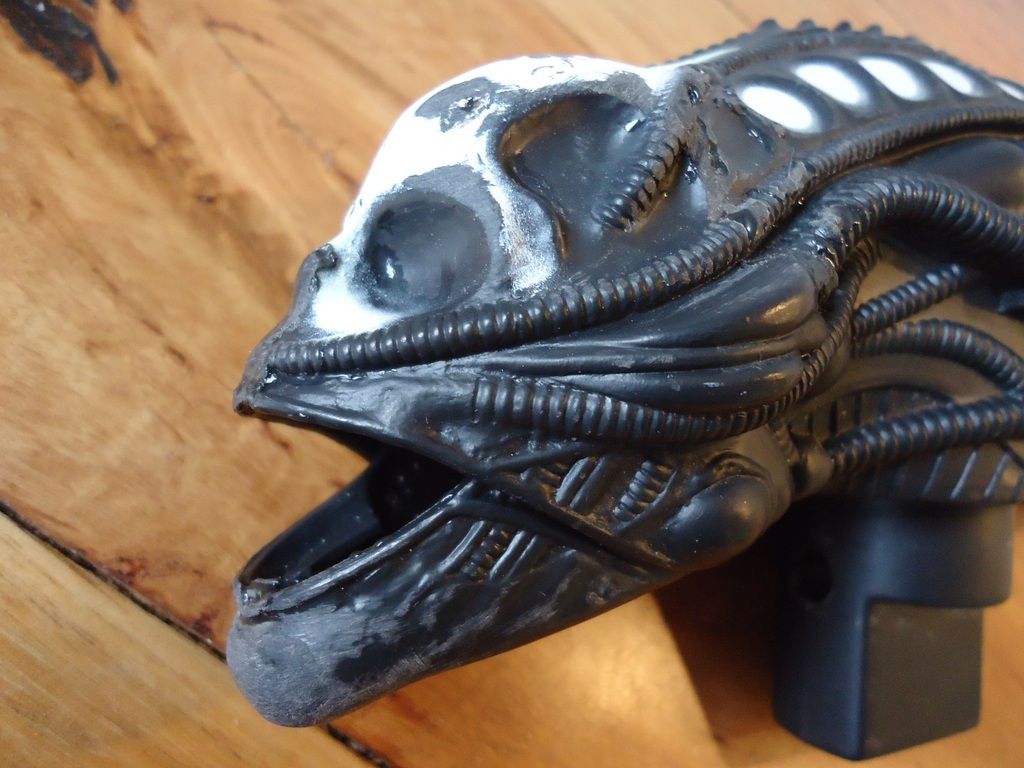
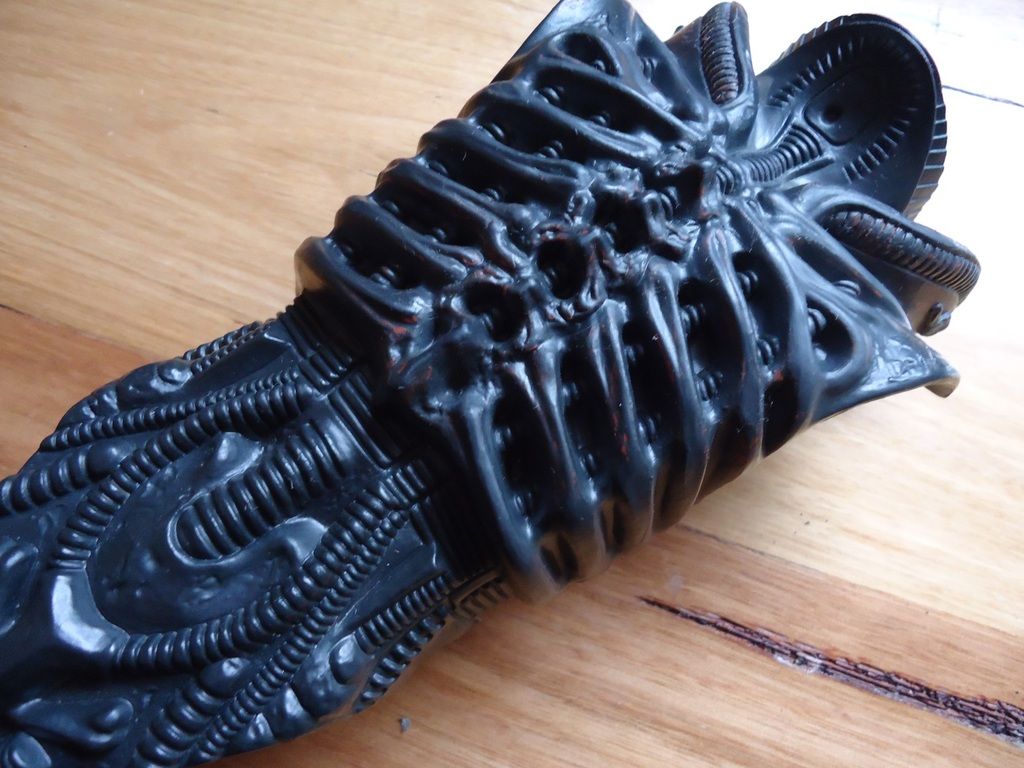
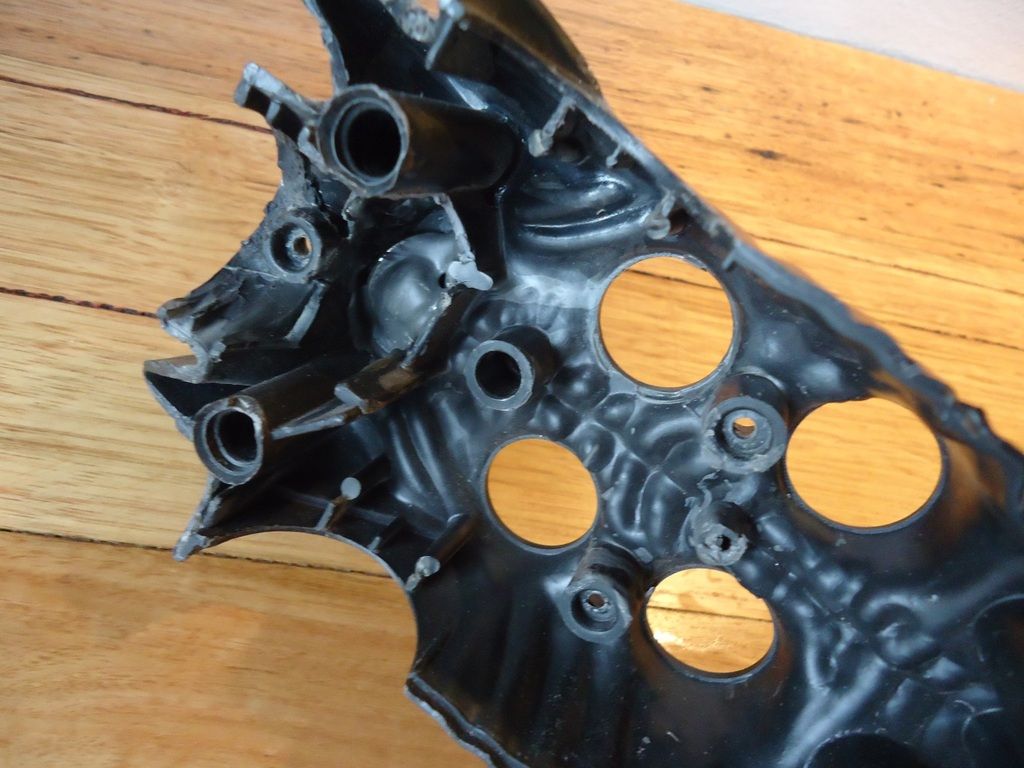
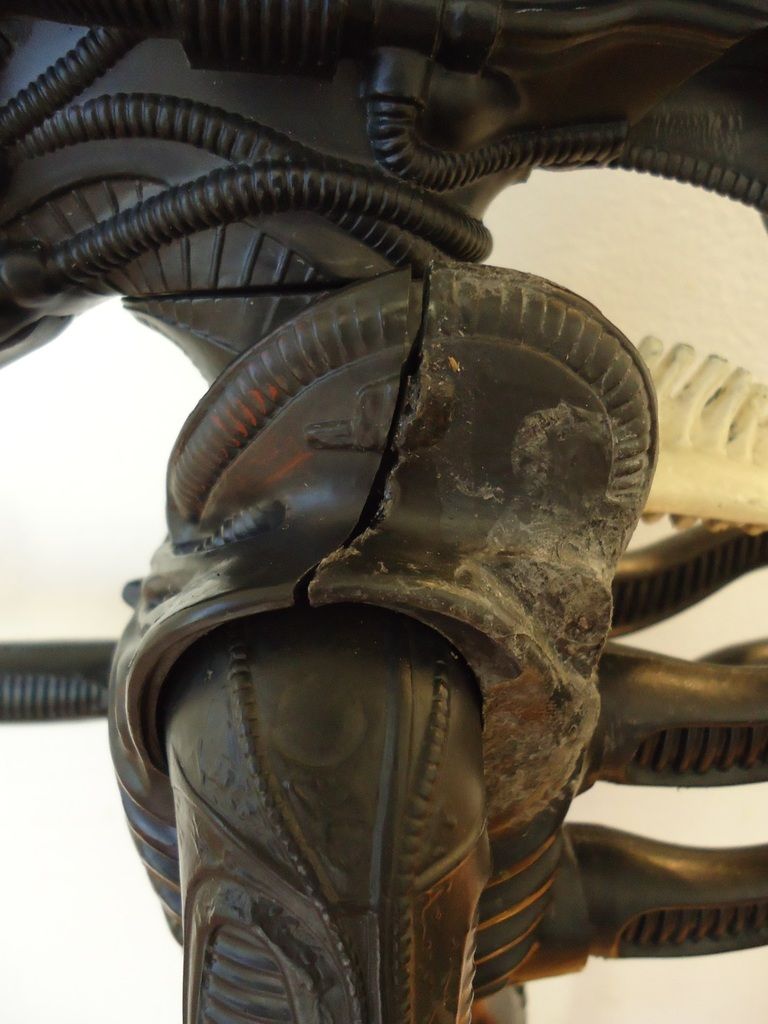
    Both figures side by side. The carapace is clearly different and the one on the restoration figure (Right) is almost opaque when compared to
    the original piece. You can also detect differences in the quality of the mouth parts here as well. Importantly, it's impossible to determine
    whether the crest is original or not on the restoration figure. Always ask vendors if any reproduction parts have been used on the figure.
    Just because a figure is 'feature complete' doesn't mean you are getting what you are paying for.


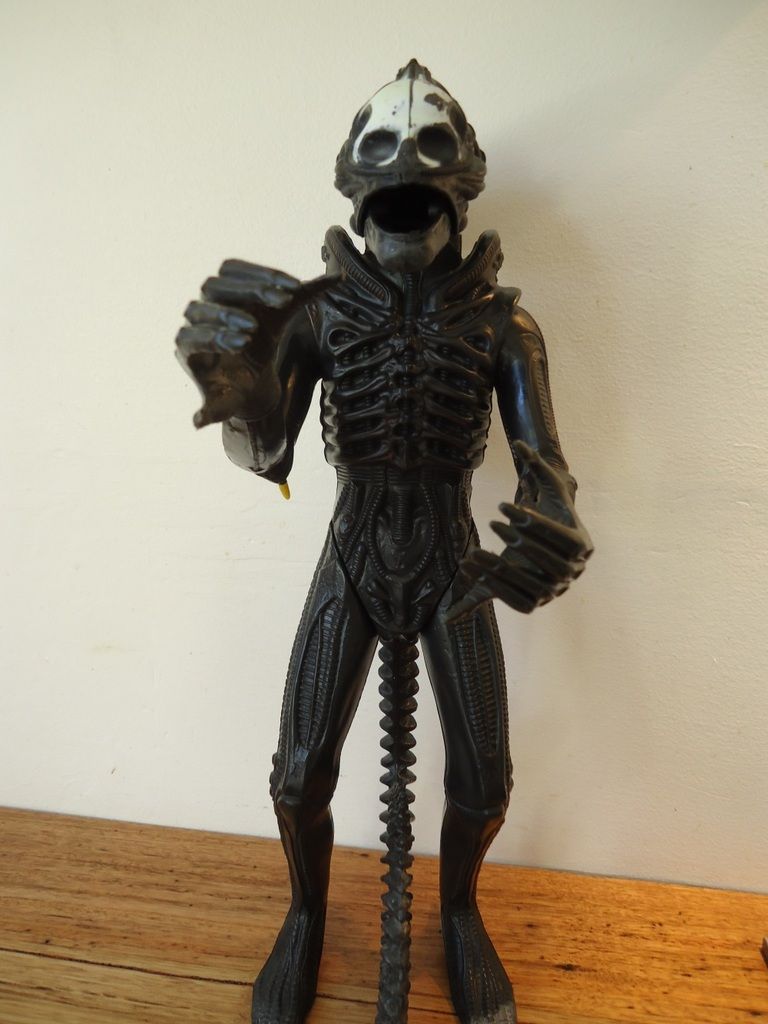
    As for Douglas Adams, he's as good as he's going to get. He will no longer be considered 'mostly 'armless'. All of his fresh parts have substantially contributed to taking an otherwise sub-par (average at the very best) condition figure and transform it into something that is considerably more presentable. I know some people will shun the use of repro parts. They advocate the use of either original or nothing as far as they are concerned; and I completely understand where they are coming from. Unfortunately, original parts are limited in number and are only available from Karcasses of wrecked figures that were made in 1979. You don't come across them very often and when you do, they are expensive.


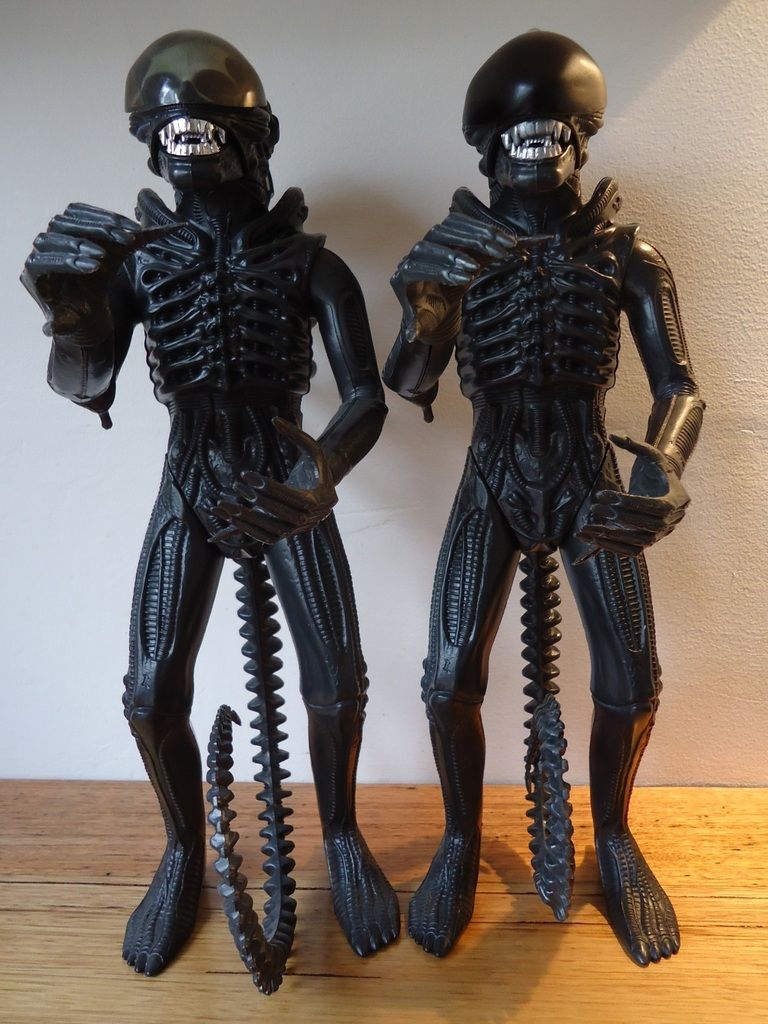
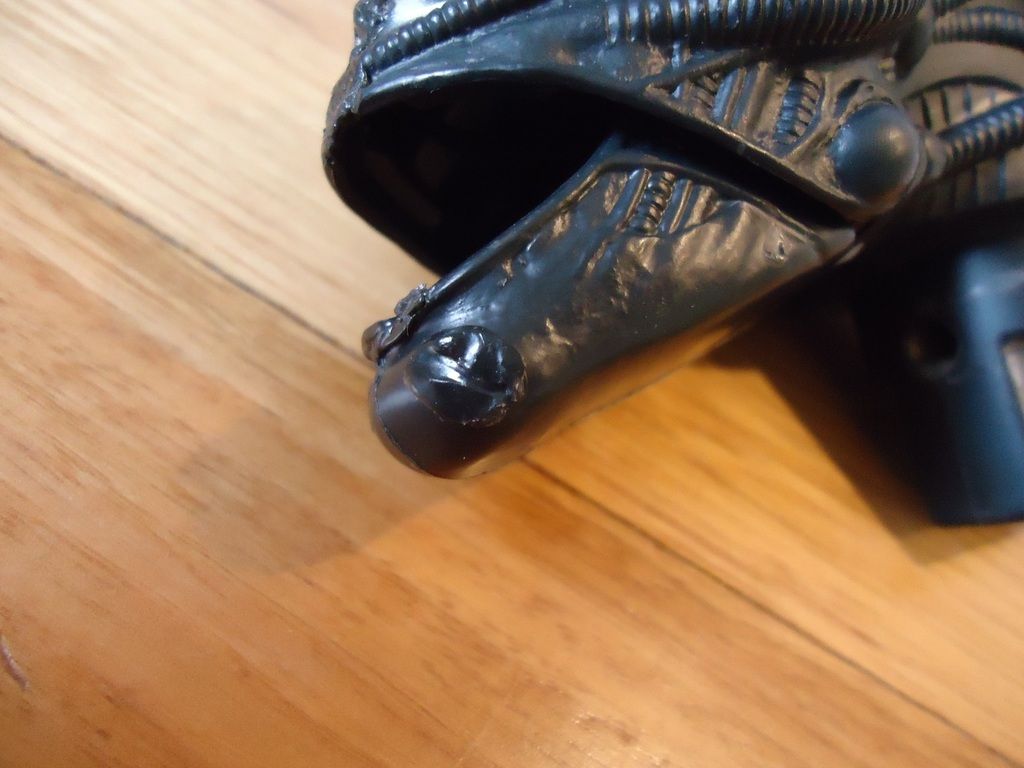
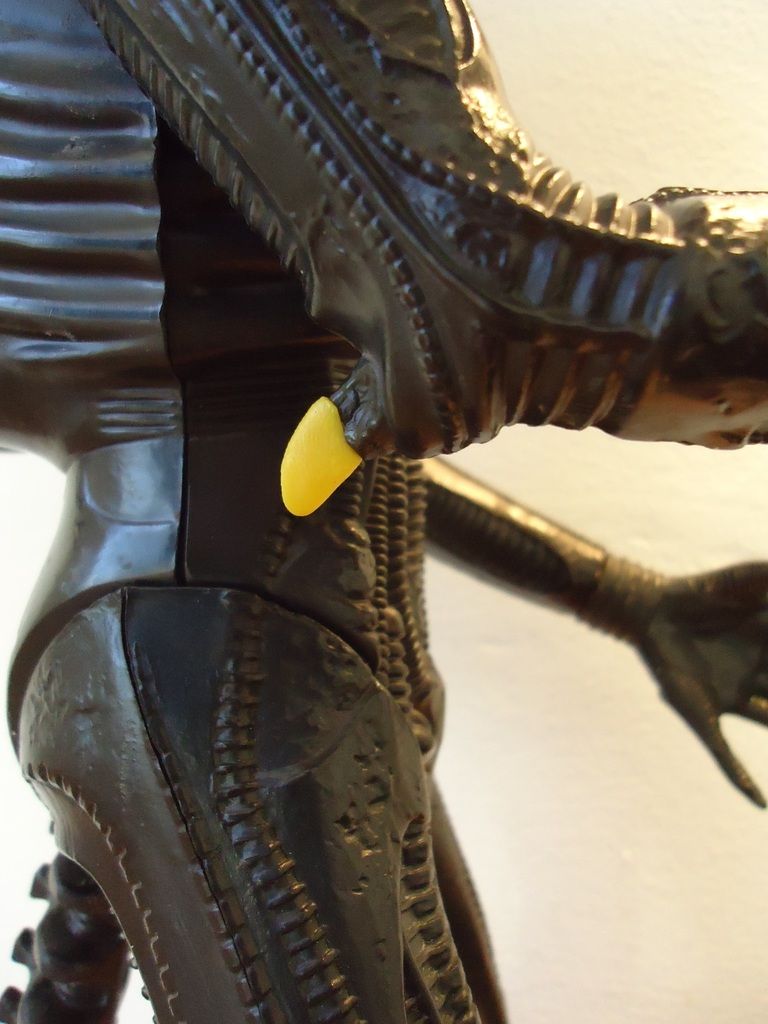
    Here's both figures from the front. Once again, the teeth and carapace are detectable as different. Note that the right arm on the
    restoration figure now has its elbow spur in place. This arm was replaced with an original piece.


    On the other hand, there are quite literally, dozens of these old figures - if not hundreds or even thousands of them - in similar states to this one around the World that will otherwise never be fully restored without the use of such parts. The only way to have their condition improved is to employ reproduction parts. I prefer not to use them; but if it means the difference between a figure that looks like a derelict cripple only good for cannibalising; and a figure that looks complete, then I will use them. As far as I am concerned,they are a resource to be used. Unfortunately, like any valuable resource, such replica parts can be used, misused or abused. It's really up to individuals to make their own judgment call on this issue as there are no Rules. Be mindful of this when purchasing one of these 30+ year old vintage figures.

    Next, I will tackle one of these old figures in a very different manner. I'll be doing something that goes against what I would normally consider appropriate. That is, modifying one and generating a custom item out of it. I'm still waiting for some materials to arrive in order to tackle this process so getting started may take some delay.

    -Windebieste.

    Comment

    • windebieste
      Museum Patron
      • Dec 31, 2015
      • 115

      #62
      I figured that I can do some prep work while I am waiting for this last package of materials to arrive. Before I get stuck into this figure and mess around with it, I'd like to clarify how I intend to approach it; in particular, what it means to 'customise' a figure. Customising a figure may share some traits with the restoration of one but there are some substantial differences that set each practice aside from each other. There are some very different principles at play here. While potential changes can be made to figures for both of these goals, the philosophy behind each is very much in diametrical opposition.

      For the sake of a restoration, the definition I abide by includes the legitimate intention to return the figure to as much a complete state as possible to how it was when it was new. In this regard, that would include making as minimal changes to the figure as possible to achieve this goal. While it's true that I will introduce materials from such eclectic sources as old coat hangers, strips of neoprene rubber and bits of cut up DVD cases to the figure to achieve these goals (and I'm more than prepared to acknowledge that this practice itself may be argued to be a customisation), the end result is to improve the quality of the figure as much as possible and to return it to an improved and worthy presentable state that it was originally in without actually modifying any of its parts to do so.

      A customisation on the other hand, is driven by very different motivations. Many customisations are brought about by owners wanting to have their figure match specific ideals that are lacking or may for it to be more fitting and be in line with what they prefer it to be. Such methods will always involve conscious changes to the figure that will remove it further from its original state, altering its condition and, well, customising the figure to suit the owner's ideals or purposes.


      Customised figures can have any amount of changes made to them and I've seen some odd ones. (Left) this figure has
      had eyes painted into the orbits while (Right) all the dentition on this figure has been replaced with toothpicks.


      Customisations are unlimited and there's as many customisations possible as you may have ideas. I've seen quite a few custom Kenner Aliens over the years and the attention afforded them varies significantly. The most common alterations I've seen people make to these figures is largely understandable. They want the figure to be more movie accurate or simply 'improve' upon its ambiance. In this regard, I have seen multiple instances where wax, silicone (or other fluid material that sets while still in a dripping state) has been added to the mouth of the figure to emulate the copious drool the Alien is seen to vent from its maw in the movie. Another common customisation I have witnessed is for the figure to be painted jet black from head to toe. Completely covering the entire surface, including the glow in the dark stencil work on the head. I've seen at least 3 fully black painted Aliens on Ebay in the last 6 months. This alteration to the figure's normally gun metal grey integument is a very common customisation.


      Some customisations are just simple cosmetic alterations. This figure has had a pedicure and now all 8 of its toenails have been painted glossy
      white. Yep. Some customisations can be pretty mysterious indeed.


      There's absolutely nothing wrong with customising a toy in this way. If you're happy with a black Alien or one that looks like it's profusely salivating or one that's had a pedicure or some other conscious change for whatever purpose, then it's your decision to do so. Keep in mind, customisations of this nature can significantly devalue your figure. Such customisations do remove the item further from its original state and any potential purchasers may possibly be discouraged if this is the case. I've never seen a custom figure sell for more than one that is in excellent condition. Even one that has various parts missing from it is likely to fetch a better price than one that has deliberate changes made to it that pushes it further away from its original condition.

      Up until now, I've documented a multitude of methods you can employ to repair one of these vintage toys. Where ever possible, no changes have been made directly to the figure or it's parts. Only the introduction of fresh systems to hold pieces, like the arms, in place are used but actual physical alterations made to the figure's original parts have been avoided whenever possible. I've conscientiously respected these 30 plus year old figures where I can in this regard in order to bring them up to a worthy presentable state.

      For the sake of this next Project, I'll be undertaking an entirely different tact and further removing the candidate figure from its original condition. This will be a true customisation in every sense of the word.

      Before I commence the work, and while I'm waiting for this last package to arrive, I am going to provide the obligatory assessment and condition report on the candidate figure. I will explain why it's a worthy candidate for this kind of treatment despite how much it conflicts with my normal set of ideals how these glorious old action figures should be treated.

      Of course, this exercise will be documented in my next post.

      -Windebieste.

      Comment

      • windebieste
        Museum Patron
        • Dec 31, 2015
        • 115

        #63

        I'll be back to flesh out this post when I can. In the meantime, I've added a few banners to help separate each Project as I noticed that they tended to run into each other without any sense of start or finish.

        EDiT: Here's the assessment for this figure. Took me a while to write and prepare this.

        = = = = =

        One of the great features of Ye Olde 1979 Kenner Alien is its assembly method. Kenner Products in their wisdom (probably more to do with a practical solution than anything else), chose to fit the figure together using screws rather than glue. This is a great blessing for someone like myself. I've dismantled and repaired more than 2 dozen of these vintage toys now. Part of that repair process frequently involved the swapping out of degraded parts for better quality ones. As a result, I have ended up with a substantial collection of malformed and broken pieces in my little box of spare parts. In fact, I have enough of these pieces now to assemble another figure.

        So this is indeed what I have done. The candidate for this customisation is constructed from all the poor quality, broken, disfigured and abused parts that have been replaced during other rehabilitations. The big initial gain is every degraded piece on this figure represents another one elsewhere that is now in an improved condition; but this is also an opportunity to take what is essentially a collection of wasted parts and turn it into something unique.

        So here it is. The recipient of many a traded limb and it sure is shabby. It's ugly. It's made up of all the busted up and rejected parts from other figures that have benefited from upgrades - but it's still a 1979 Kenner Alien action figure. This will still be true even after I've finished with the customisaton but what would I call this rogue assemblage of misfortune and irreparably damaged parts? Why, it's obvious, really, isn't it.

        I present to you, the 'FrankenKenner Monster'.


        At a glance, he doesn't look too bad but the sad the truth is, every single part on this figure is either mildly degraded, disfigured or simply damaged
        beyond repair. The amazing thing here, even in this heavily degenerated condition and dilapidated state, it could probably fetch around US$100 on Ebay.


        From the front. Easily noticeable is the missing dentition and scarred painwork. You can also see the deformed lower thumb on the right hand.
        Note the tail, which is warped and curvilinear in its presentation.


        This assessment is going to be lengthy. From the top of his heat scarred head to the very tip of his mangled tail, there isn't much on this figure that's in decent shape. As a result, there's a lot to cover here so let's get cracking!:


        THE HEAD.

        Firstly, the usual parts that you expect to be gone are indeed missing. Both the upper and lower sets of teeth, the pair of split tongue pieces and the carapace are absent. No problem there. Those spaces will eventually be filled in by the recent shipment of replica parts. There's no point in using good quality fittings on this particular figure... You'll see. Unfortunately, the head itself has come to some mishap and experienced some heat damage. There are points throughout the face and the left side of the head that have been in contact with a heat source which has left un-removable scars upon its surface. These are observable upon its nose, chin and elsewhere on the left side of the head. The glow in the dark stencilled paintwork has had similar damage as well along with other scuffs and scratches to mar its delicate surface. Despite the fact the head is a real mess in these regards, the jaw activation trigger still functions properly. I'm hoping by the time I'm finished with this fellow that that functionality will still be operational. We shall see.

        Importantly, the clips inside the mouth for the tongue pieces to be attached are present and undamaged. That's one of the few good things about this figure.


        The heat scars on the face are obvious here. The nose, chin and ribbed hose details behind the the left temple have been melted resulting in obvious
        and unsightly damage. Also clearly visible in this image is the red painted ribs along with the right arm elbow spur being missing.


        THE DORSAL CREST AND REAR TORSO HALF.

        The crest itself is a reproduction piece. Some of the paint has been scratched off of it revealing the white material it is made of. The crest is permanently fixed in place onto the rear torso half. This attachment was achieved by removing all the internal plastic features inside the rear torso, repurposing them and melting them down to use the material to cement the dorsal crest in place. No. I didn't do this. This is the condition it was when I acquired it. As a result, the crest is immovable and there would be no gains to forcably attempt to remove the feature from the back as I would just risk damaging either piece in the process.


        The dorsal crest is an obvious repro part. Also notice the wide opening in the shoulder pauldron. There's some scarring in this joint done by a previous owner
        who pried these pieces apart with a screwdriver or similar tool. Please don't do this! Just use your hands. Even stubborn figures will come apart. Immerse the
        figure in a sink full of hot water as that can help.


        THE QUAD DORSAL APPENDAGES.

        These matching pairs of tubular organs that project from the figure's back would normally be attached to an internal mounting plate inside the rear torso half. Unfortunately, all 4 of these pieces have broken off from the plate. I've since returned them in place by using screws. I'm not going to go into details on this item as is I have covered this particular repair technique in the first figure that appears on this lengthy thread. So go back and read about it there.


        FRONT TORSO HALF.

        The front torso half isn't in too bad of a condition. This piece is the least likely to be damaged on any of these old figures. This one has a lightly dry brushed red highlight added to the ribs but it's easily removed and if I needed a front torso piece used elsewhere, this one could be made to be OK. As it is, I have a number of these sitting in a box as spares. I'll use this one here for this customisation.


        THE ARMS.

        The right arm comes from the previous restoration, Douglas Adams; and is being used for this figure. It's got a broken elbow spur and the lower thumb (The original Alien design has a pair of thumbs on each hand as does this figure.) is showing some minor damage. It's nothing substantial and the arm is otherwise OK. It's just a little too far gone to be used on a figure that deserves a better right arm.

        The left arm is one of the items that arrived recently with all the facsimile parts. Aside from it missing the usual rubber anchor connection, it's actually in reasonably good shape and the only real issue it has is the abundance of glue residue stubbornly adherring to the shoulder ball joint. If it wasn't for the residue, I would probably use this arm elsewhere as it's in reasonable condition. It's not great, but it would be OK on any restoration candidate. On the other hand (Geddit? lol), each of my current restoration projects all have arms, anyway, so it's getting used here.


        THE LEGS.

        Outwardly, the legs look good. Except the joints at the hips have been severely damaged and I've had to repair both of them inside their hips so that they fit flush onto the figure without revealing gaps or other damage. They both have splinted flanges inside the figure that keep the legs in place securely to this end. I'm pretty sure I covered this technique elsewhere throughout this thread as well. ...or elsewhere on the 'net. Somewhere, anyway. lol.


        THE TAIL.

        Fortunately, the tail is complete for it's entire length and it also includes the delicate barbed tip on the very extremity which can frequently be absent. It's too bad then that at some time during the last 36 years that some pointy toothed animal - probably a cat, or a chiahuahua or the neighbour's lyconthropic 5 year old child - has used it as a chew toy. The last 4 inches of the tail's length is covered in small, pointy holes and some of the plastic is burring off the figure. I can reduce the damage done by these gnaw marks but not fully repair it. Hopefully, the customisation process will improve its appearance favourably. Fingers crossed here. I'm going to have to try something new for this one. Mind you, this whole figure is a viable candidate for experimentation.


        The tail shows obvious burring and wear. There are small tooth marks all over the last few inches of it's length.


        Anyway, that's the rundown on the current state of this figure. It's a mess. Only the left arm and the front torso piece would be considered to be useable elsewhere if needed and they aren't in perfect condition, either. Nonetheless, at the most fundamental level, the figure is complete with critical body parts present despite their largely poor quality. Any missing pieces will be replaced by facsimiles. I'm also going to be employing a few techniques on this figure that I've not tried before, use some materials I've not used before and perform a few other procedures that I've not tested. So this whole Project may go south at any point. Well, at least it's all taking place on a figure that's so banged up it won't be missed by anyone. So for the purpose of gaining more experience and broadening my skills this banged up old figure is a perfect customisation candidate for experimentation and learning. Victor would be pleased!

        Next post I'm going to start working on the FrankenKenner Monster to transform it into something very unique. Well, not that it isn't already unique. lol.

        -Windebieste.
        Last edited by windebieste; Apr 27, '16, 1:25 AM.

        Comment

        • SpaceCrawler
          Veteran Member
          • Mar 20, 2008
          • 441

          #64
          Windebieste, what do you do with all these Alien figures you restore?

          Sean

          Comment

          • windebieste
            Museum Patron
            • Dec 31, 2015
            • 115

            #65
            That's a good question as these things do take up a lot of room. I haven't sold any of them. They are currently carefully packed with bubble wrap and stored in boxes as I am renovating the house. All the carpet has been pulled up and there is quite literally boxes and furniture all over the place. The house has been like this for 12 months now and I've become a little too acclimated to the disarray for my own good. lol.

            Eventually, (if all goes well) at least 15 of the better restored items will be offered up as part of an upcoming (and as yet unannounced) Kickstarter Project that I have been working on for the past 10 months.

            Hope that answers your question.

            -Windebieste.

            Comment

            • windebieste
              Museum Patron
              • Dec 31, 2015
              • 115

              #66
              There's part of me that really hates doing this customisation. I've been putting it off, delaying, procrastinating the whole thing. I really dislike the idea of making the changes on these figures. On the other hand, the candidate I am using is basically a derelict and sub standard piece. It's an ideal subject for experimentation and taking the opportunity to take risks that might, for all intents and purposes, irreparably damage the figure really isn't a problem. As each one of these parts are already well below average condition, it shouldn't trouble me to do so. ...but it does. I feel irresponsible. This isn't the kind of recommendation I would normally make.

              Importantly though, not only is there a goal in place, but I'm documenting the entire process. I also want it known I'm divided by the unhappy task I've set myself and ecstatic about the knowledge I can gain from this exercise.

              Anyway, enough of the conflicting introspection. On with the show.

              I've started work on the head. As noted above, it displays multiple scarring from heat (or possible chemical) damage. The chin displays obvious melting as does various points around the details of the head. The nose is blistered and damaged and the hose details around the left temple is also damaged. Well, I've attempted to reduce the amount of visible damage to these locations and the success has been varied.


              Here we can see the chin more clearly. It's got obvious heat damage that looks like a nasty ulceration.


              Now the chin (and other parts of the head) have been carefully sanded back. All the high spots of the burn mark have
              been removed and the chin smoothed out somewhat.


              Here's another view of the sanded head. Some indication of how deep the scars go can be visible here. A pair of scratches
              still show luminous paint embedded in them despite the rest of the paint around them having been sanded back to the surface
              plastic of the head. The nose has also been sanded back. As has some of the damage done to the other details around this
              side of the head. Not my favourite job on these figures; but it's done now.


              This work is all preliminary to preparing the figure for coating. I estimate that the figure will take about 6 coats of varying types of spray paint. I'll get to those eventually. I could polish the chin and smooth out the light scratching (which at the very least is an improvement on the nasty heat ulceration) but I'm just going to leave it for now. I'm not too fussed about the scratching. 6 coats of paint will be enough to reduce them. The only failsafe I have here is any of the unsatisfactory surface details on the head will be concealed under one of the dark carapaces I received earlier - in this regard, any fnck-ups on my part can be concealed. lol.

              Oh, Hell... This head was seriously damaged, anyway. I have to keep telling myself that. It really doesn't matter what I do with it.

              -Windebieste.

              Comment

              • windebieste
                Museum Patron
                • Dec 31, 2015
                • 115

                #67
                Moving on now... Let's see what kind of mess we can make out of this situation. Yes. Indeed. I did make a mess out of it.

                You know how some things just don't go as planned? How even the best intentions no matter how good they are, just don't work out..? Well, this entry is going to be one of those.

                The next piece on the figure I want to prepare is the rear torso half. What a mess this piece is - and even worse - by the time I've finished with it, it has deteriorated even more. *sigh* Just one of those mess-ups due to carelessness on my part. Anyway, the piece was seriously degraded to start with. While externally it looked perfectly fine, it had been modified considerably on its internal surfaces. At some point in the life of this piece, a previous owner had attached a replica dorsal crest. The method employed was to remove all the interior posts and supports, melt them down and use the material to cement and anchor the crest in place. This fixed the piece in place, for sure. Permanently. It also meant that the torso has been weakened in some locations making removal of the crest nigh impossible without damaging the torso half piece.

                So, the crest has to stay permanently affixed in place upon the rear torso half. It won't ever be able to be freed without damaging the rear torso half further. It also lacks the innate looseness that the crest should have, which is an unsatisfying finish.


                Here's the internal view of the rear torso half. Note the large molten mass at the center of the circle (1.). This misshapen
                blob is the anchor that holds the reproduction crest in place. It is made up of material salvaged from the post (2.) that would
                normally force the quad appendage plate into position and each of the shoulder pins (3.) and (4.) along with material extracted
                from other locations within the piece.


                Taking into consideration that the piece is in such a degraded state, I'm not amiss to some experimentation to be performed upon the rear torso piece. In this regard, I do want to address the actual dorsal crest that is fixed in place. The crest is made of a white base material and painted with what looks to be some form of acrylic. No primer has been used and the paint scraps off with ease. As this poor coating will undermine any attempt to paint over it, I'm going to have to remove the current coat of paint.

                To this end, I am going to use some paint stripper. The goal here is to remove as much of the extant coating as possible so I can lay a proper undercoating upon the surface of the crest (and, for all intents and purposes, the rest of the entire figure as well.). I'm going to use some powerful paint stripper. I've used this stuff on one of these figures before and I know from experience it will damage the surface of the figure if I am not careful. In this regard, I do have one blessing up my sleeve. If this gets botched, hey, the piece was already substandard - it's not that much of a problem.


                Using a brush, I carefully apply the paint stripper to the crest, making sure that none of the solvent touches the actual original
                figure. Big mistake. I should have known better.


                With the stripper applied to the part, I then scrubbed the crest clear of the loose coating. As part of the process, I rinsed the entire piece under running water. This is where things went wrong. Believe me, things can go wrong so easily when you don't pay attention. and... haha... I wasn't paying attention. While rinsing the piece, the stripper washed over the shoulders of the piece and reacted with the plastic, scarring the external surface. I didn't realise I'd done this until after all the black paint had cleared and I inspected the piece. Sure enough, the damage had been done. At least the crest had been cleared of almost all paint; but the upper shoulders of the piece were now irreversibly damaged.

                Godammit... I'd screwed up. Now the piece was thoroughly ruined. Not only was the interior destroyed, but so was the exterior. To say I'm disappointed is the least of many expletives vented when I realised what I had done.


                The Crest is now cleared of unwanted paint that may have affected future coatings; but the chemical damage to the shoulders is obvious.
                This happened so quick, I had no time to respond.


                There are a number of actions I could have done here to prevent this outcome.

                Firstly, maybe I could have left the paint on the crest and not applied the paint stripper. ...or I could have used a very different solvent (Which I will use later for the front torso piece.) ...or I could have masked off the torso piece and then applied the stripper. That would have worked. Lesson learned. I certainly didn't consider my options here very well and as a result, the rear piece of this figure is now damaged. It's a good thing, then, that I'd already resolved to accept this kind of disaster possibly happening. What I'm not so self forgiving is the casual abandon I approached this activity. This could have just as easily have been a perfectly good piece I'd ruined. If I'd done that then the kind of language being used here would be much more colorful and possibly result in the moderators sending me a very stern warning. lol.

                Either way, I'm going to accept that this damage has taken place. It's only on the shoulders of the figure and once again, the severity of it may be reduced by the multiple coats of paint that will ultimately be applied to this figure. There's also one other consideration that works it's way to be a positive outcome here. This figure was always intended to be an experimental subject. I've learned something very, very important. Plan properly. Prepare properly.

                Besides, this customisation Project is called the 'FrankenKenner Monster' for good reason and I'm hoping that when this series of exercises is complete, this little mishap will just add to the figure's unique personality.

                -Windebieste.

                Comment

                • windebieste
                  Museum Patron
                  • Dec 31, 2015
                  • 115

                  #68
                  After my previous minor disaster, I still have to deal with the front torso half of the figure. The ribs have a coating of red paint. ...or maybe crayon? ...or something. I don't know what it is but I'm concerned that adding further coatings will be prevented in this location so I've decided to remove the current red coatings as much as possible.

                  I'm not about to use the same overly aggressive paint stripper that I carelessly employed earlier. I'm dumb enough to use it already - I'm not so stupid to use it a 2nd time. For this exercise, then, I will be using a different substance. For removal of the front torso paint, I will be using nail polish remover. The remover I will be using can cause damage to the figure if left in place for long duraton but adding it to a rag and then wiping the painted surface, I can easily stop and wash any residue away. This is a relative safe method and will be over well before the nail polish remover has a chance to etch or damage the plastic.


                  Red highlights on the ribs may or may not permit additional coatings.


                  Done and cleaned, the surface of the piece is undamaged and almost all of the paint has been removed. Small pockets of it are difficult to remove but the exposed plastic surface is substantial and a good couple coats of plastic paint primer should be enough to make sure the color coating I will be applying will permanently adhere to the figure.


                  Careful use of a significantly less aggressive nail polish remover did the trick. The finish isn't perfect, but the minor remnants won't be a problem
                  and there's no damage to the torso half.


                  Thankfully, this stage went well. Maybe I should have used this stuff on the rear torso piece. Then again, I guess it's also important to illustrate how easy it is to damage one of these vintage figures if the proper care hasn't been applied. After all, I have used both of these chemicals before and already knew how they behaved on the figure. In this regard, yeah, maybe I was intentionally inviting disaster to demonstrate a point. You decide. After all, it's clear this figure is intended to be made to suffer.

                  More so, if you do want to clean one of these figures, here's a couple of tips:

                  Firstly, disassemble the figure. It's significantly easier to clean and the results are better if the parts are cleaned individually. Trying to clean one of these figures with its arms, legs and tail loosely flailing about is not much fun. The rich detail on the figure can easily be pitted with dirt and dust making a thorough cleaning difficult but when all the limbs just want to fall about the place makes it so much more difficult.

                  Secondly, take advantage of the figure being in a disassembled state to test any solvents you may want to use. With the figure in pieces, you have access to ample room inside either torso half. The concealed surfaces here are ideal to test any chemicals you may have doubts about their compatibility on the figure. You don't want your figure to be etched and damaged by chemicals the way this one has been.


                  Inside the torso is a great place to test chemicals and see if the material will react or remain inert. Just dab a small amount of the
                  chemical on this surface and observe. Reactions usually commence straight away and their strength can vary. Wash all of the
                  chemical away as soon as any reaction may be in evidence. If there has been a reaction, you know not to use the chemical
                  on the exterior of the figure and any damage will be concealed inside where it won't matter.

                  I'm hoping this practical demonstration with chemicals and using them to clean these figures is of benefit to any one reading this. No one wants to see you ruin your vintage figures and it's too easy to make mistakes. On the other hand, no one wants them to look shabby and dirty either. Clean with care. Hot soapy water is all you need in most cases to remove dust and other light coatings. For paint removal, it's probably best to seek advice from someone more knowledgeable (identifying the kind of paint that is present on the figure is the first challenge here). Take advantage of disassembling the figure and using an internal surface of the figure to test chemicals if you need to.

                  Next, I'll be moving on to attempting to address problems with the tail. We will move on from the dubious use of chemicals to clean the figure to the equally challenging technique of embracing heat treatment and using the all purpose wonder that is fire!

                  This will be good. ...if things go according to plan.

                  -Windebieste.

                  Comment

                  • SpaceCrawler
                    Veteran Member
                    • Mar 20, 2008
                    • 441

                    #69
                    I would advise against using nail polish remover on plastic. It's acetone and dissolves plastic. EasyOff type oven cleaners strip paint of rigid plastic with no damage to the plastic. It's what model builders use to strip paint from model kits. They also use brake fluid with success.

                    Sean

                    Comment

                    • windebieste
                      Museum Patron
                      • Dec 31, 2015
                      • 115

                      #70
                      Yes. I agree. The acetone based removers can be a problem. For cleaning this figure, I'm using a brand that my wife uses. She has all kinds of allergy sensitivities and will only use milder cleaning agents throughout the house, anyway. Acetone wouldn't even be permitted in this household.

                      Thanks for the heads up, though. You are correct.

                      -Windebieste

                      Comment

                      • windebieste
                        Museum Patron
                        • Dec 31, 2015
                        • 115

                        #71
                        Moving onto the tail now and it's the last part that needs any real preparation. The tail has suffered from some 'Jones Revenge'. That is, it's been chewed on by a cat. The final last few inches are severely damaged. Small pointed toothmarks are in abundance and the tail also has a lot of loose burs that sit on its surface resulting from this damage. It is also warped a little out of shape. I'm hoping I can reduce the amount of damage to this piece with some serious heat treatment. The 2 treatments that will be utilised here should be able to reduce the severity of the toothmarks along with any associated burring as well as bringing the tail back into shape.

                        Let's take a look at how this process went.


                        Here's the tail, the mounting stub has been removed long ago. It will have to be screwed back onto the figure.
                        You can detect some damage towards the end of the tail tip. While the damage can't be undone, presentation of
                        the piece can still be significantly improved. Note how the shadow being cast reveals how much out of shape this
                        item actually is. The tail should be lying flat on the surface but warping prevents this happening.


                        Here's a close up of the last few inches of the tail. Toothmarks are evident and floating material attached to the
                        tail is visible here. These unsightly burs will have to be removed as they interfere dramatically with the presentation
                        of the tail.


                        Here's the first critical stage of the heat treatment on the tail. Passing the tail quickly over the candle flame will singe
                        and burn off the burs. This has to be done quick enough for the flame to melt away the floating damaged material and fast
                        enough so that the tail itself doesn't distort, melt or catch fire. I really don't want that to happen as such deformations will
                        not be recoverable I keep a bowl of water on immediate standby just in case this exercise goes pear shaped. Passing the
                        tail through the flame multiple times will eventually remove all of the burs. Interestingly enough, the toothmarks themselves
                        are also reduced in severity as the plastic the tail is made of wants to return to it's original configuration it was cast in
                        and will do so if careful heat is applied. Careful use of heat can heal or at least reduce the sharp edges and re-contour
                        plastic parts that are slightly deformed by such punctures or scratches.

                        It's tricky and exacting work, prone to error in an instant. Clearly, I've done this before.


                        Success! Here's the tail tip once again and it's looking very good considering how mutilated it was previously. I had
                        to gently scrub it with a toothbrush to remove some soot as some of the burs did catch alight and burn away. This
                        is why a bowl of water is necessary. The result, however, is excellent considering how damaged this piece was
                        previously. Mind you, it still has some warping and that will be corrected next.


                        The tail is now trussed up with string. I'm using fiber based string and not plastic or other material that may stretch
                        when heated. The tail will be bathed in a pot of boiling water for about 30 seconds which will heat the tail evenly so it
                        is malleable without damaging it . (This process is detailed elsewhere in this thread) and then placed between 2 wooden
                        cutting boards to define and flatten the tail. It will then sit in the refrigerator for about 15 minutes.


                        Here is the tail after all the heat treatment has been performed. The exercise was a success! It's still showing some signs
                        of mutilation but sadly it can never be fully restored to its original condition. Nonetheless, the unsightly burs were removed
                        and many - not all - of the pointed puncture marks were 'healed' (it's the only way I can describe it.) and reduced in severity.
                        The tail is also a lot flatter and now no longer casts any shadows that previously revealed its warped state.


                        Now that the tail is in an improved state the figure is just about ready. The legs don't need any additional attention. I'm just about ready to give this fellow it's first coat of paint but before I do that, I'll assemble it and take some photos of its current state it is now in. I'll post those next.

                        -Windebieste.

                        Comment

                        • windebieste
                          Museum Patron
                          • Dec 31, 2015
                          • 115

                          #72
                          Let's stitch this mangy old critter back up and see what we have so far.

                          This assemblage of largely damaged and poor quality parts is really beginning to live up to its name. FrankenKenner Monster it certainly is. Made up of miscellaneous parts from other figures, these pieces by themselves aren't good enough to use as spare parts to populate missing features on other figures; and yet they are simply too good to throw away. That would be a waste especially when taking into consideration I possess enough of these worn and mutilated pieces to assemble them into a figure in its own right.

                          It's just too bad that the figure shows all the signs of having been made up of these rejected parts but the promise of something unique emerging from all this experimentation is very high. Let's reassemble this decrepit old fella back into a single unit and take a closer look at how this Project is coming along.


                          It's still lacking its carapace and mouth parts but at least a replica crest is present. Sure, it's fused into the back of the
                          figure and not removable but that's OK. These parts are frequently missing from these old figures and at least it's in place.
                          Note the yellow spur on the elbow of the right arm. I've documented that addition below.


                          From the front, the vacant blank spaces of the mouth are far too obvious but at least some of the damage to the head has
                          been minimised. I'm also going to give the chin some more attention and minimise the artifact scratches that are still present
                          there. Almost all of the red paint has been removed from the front of the torso and what little remains shouldn't be a problem.
                          The tail has been tidied up and straightened. It looks as good as can be expected. I decided to swap out the legs for another
                          set that has minor wear and tear upon the toes. This alternate pair will benefit from being coated while the pair I originally had
                          slated for this customisation will look good on another figure as they don't require painting to conceal cosmetic issues.


                          I forgot to document the repair to the right arm so here is the repaired elbow spur. Using polymer clay, I hand moulded the shape
                          of the spur directly onto the elbow's broken stump and removed it again. This meant that when it was ready to be glued back
                          onto the arm, the surface of the new piece will exactingly match the extant broken surface perfectly. The tiny piece was then
                          baked in the oven and allowed to cool (didn't take long). The mating surfaces waere primed and then the piece was glued onto the
                          figure's elbow. It's a perfect fit even it isn't a perfect shape. It's still a substantial improvement over the vacant damaged space
                          that was originally there. I also lightly trimmed the lower thumb to remove the 'hang nail' that was present which tidied up the
                          hand a little in this regard.

                          The left arm has had no work applied to it as it's OK other than a liberal coating of glue residue upon the ball joint that cannot be
                          removed. I will sand and polish it back a little prior to coating all the figure's pieces with primer but there's nothing to be done
                          to it other than that.


                          Some of the other issues that I still need to address are visible in this photo. Some red paint still remains on the collar that I may
                          want to remove. There's a gaping hole along the pauldron seam that should be closed up. I may have to sand back some of the prying
                          damage done here and fill this location with some plastic putty. Also of some consideration is the scarring on the rear shoulder resulting
                          from my misuse of paint stripper. I may have to sand that surface a little, too, to remove some of the roughness. I'll use some steel wool.
                          It shouldn't be a problem - it's just additional work that was completely unnecessary if the job had been performed properly in the first
                          place. My fault, that one.


                          He's an ugly figure at best, possessing all the grace of Boris Karloff's interpretation of Mary Shelley's creation before he's had his first morning cup of coffee. Nonetheless, it's this rough state that makes him such a great candidate for this kind of treatment. I get to practice a few techniques along with a few new ones. I get to mess around with polymer clay for the first time on a minor repair item and practice sanding back severely damaged pieces. He's been a lot of fun so far and the figure's overall ambiance right now resembles one of any unfinished item at the halfway point that needs yet more attention. I really can't leave it in this state. The figure is considerably rough around the edges in so many ways but it's nothing too bad that a good coat of paint can't help resolve and unify to make its appearance complete and finished once again. Other than a handful of small tasks now, the figure is ready to be disassembled once again and moved onto it's next stage.

                          The first activity of this next set of exercises will be to give it a wash in warm soapy water, rinse the pieces and then have them dry. I won't document that process. It's a simple matter of filling the kitchen sink with water, add some mild detergent, immerse all the parts and give them a generous scrub with an old brush to remove any particles, oils or other residues these pieces may have collected since their last bath. It's about as exciting as washing the dishes. You really don't need me to detail how I wash my dishes, right?

                          -Windebieste.
                          Last edited by windebieste; May 2, '16, 7:52 PM.

                          Comment

                          • windebieste
                            Museum Patron
                            • Dec 31, 2015
                            • 115

                            #73
                            On with the show...

                            Everything is now washed and ready to go onto the next stage, which involves heavily modifying the figure by coating it.

                            Indeed, some of the pieces have now had a full coating of primer and are ready for their next coat. The first pieces to be fully undercoated are the back torso half (with crest attached), the tail (with chew marks) and both legs (with discolourations on the toes). They are now all matching, all bone white pieces waiting for the next stage in this customisation process.


                            The pieces ready to be coated. To complete this process has taken a couple of days and some patience on my part.


                            A light first coating is applied to these pieces. They are then set aside for a few hours to dry, rotated, and another light coat of paint applied.
                            Multiple coats of paint are applied during a 2 day period to build up an overall even coating.


                            A couple of days later, and these 4 pieces are now evenly coated. Multiple light coats applied to the figure prevents runs, drips and pooling
                            of paint in the figure's many recessed and richly detailed features.


                            Now that these parts are ready for their next coat (which itself still won't be the finishing I am planning for this figure) I can put them aside and start working on the remaining pieces of the figure. Next up I will be undercoating the head, both arms, the front torso half and the quad appendages that are currently missing from the figure's back.

                            Once they are done, I will repeat the process again 2 more times on all the pieces with other coatings. This customisation will take a while to complete.

                            For now, though, once all of the pieces are brought up to the same level and fully undercoated in primer, I'll assemble the figure for a Work in Progress assessment. An all white Kenner Alien, even just using an undercoat primer, should look quite amazing!

                            -Windebieste.

                            Comment

                            • Neutron X
                              Persistent Member
                              • Dec 22, 2007
                              • 1803

                              #74
                              I like where this is going!

                              Comment

                              • windebieste
                                Museum Patron
                                • Dec 31, 2015
                                • 115

                                #75
                                Well, hopefully I can take it to someplace you will enjoy. The end result is still some good posts away...

                                On with the remaining half of the figure. The head (damage to nose and details on the side), Left arms (glue residue), right arm (broken elbow and mutilated fingers), front torso half (previously painted red) and the quad dorsal appendages (broken away from mounting plate) are now done. Let's take a quick look at the progress on these items went.


                                Here's the parts ready for their first coat. You can see the repair on the quad dorsal appendages (Upper Left) where 3 screws
                                are used to hold the recurving tubular organs in place. One still remains fixed to the plate. Also of note is the spike on the right
                                elbow. My repair attempt wasn't adequate and the spur broke off. I'm thinking the glue was OK but plastics bond best when they
                                match. The original arm piece and the spur fabricated from polymer clay certainly weren't made of the same material. I can attempt
                                to fix it again - which I might do - but I will now have to contend with the fresh paint now covering the surface as well as the glue
                                residue from the previous attempt. Not a promising result, but I do have one potentially viable option up my sleeve. Otherwise...

                                Pfft... glue. I hate it - and it hates me.


                                The first light coating of paint on these pieces is now applied and must be left to dry. Cumulative build up of light coatings is needed. Too much
                                paint sprayed at once risks runs and pooling. All you need is patience.


                                Here's all of the 2nd round of parts fully undercoated. The coat is evenly applied without a problem. Looks cool in white, huh.


                                I'm just going to let all of the painted pieces for the figure sit undisturbed and harden for 24 hours. I probably don't need to allow them that long, but the recent coatings should be given ample time to fully dry and harden. Then, I'm going to perform a test assembly on the figure. One all white Alien coming up.

                                -Windebieste.

                                Comment

                                Working...
                                😀
                                🥰
                                🤢
                                😎
                                😡
                                👍
                                👎