Help support the Mego Museum

Announcement

Collapse
No announcement yet.

1979 Kenner ALIEN Complete Restoration - ADULTS ONLY

Collapse
X
 
  • Time
  • Show
Clear All
new posts
  • windebieste
    Museum Patron
    • Dec 31, 2015
    • 115

    1979 Kenner ALIEN Complete Restoration - ADULTS ONLY

    Hi everyone. My first post here!

    Yeah. my first post here and it's aimed at a specific goal. Exciting, huh. Anyway, the purpose of this thread will be to outline and record the full restoration of a heavily degraded 1979 Kenner Alien action figure from its base neglected state to something truly remarkable. I know there's some interest on these forums for this wonderful 36 year old item and I'm hoping my efforts will be of interest to you.


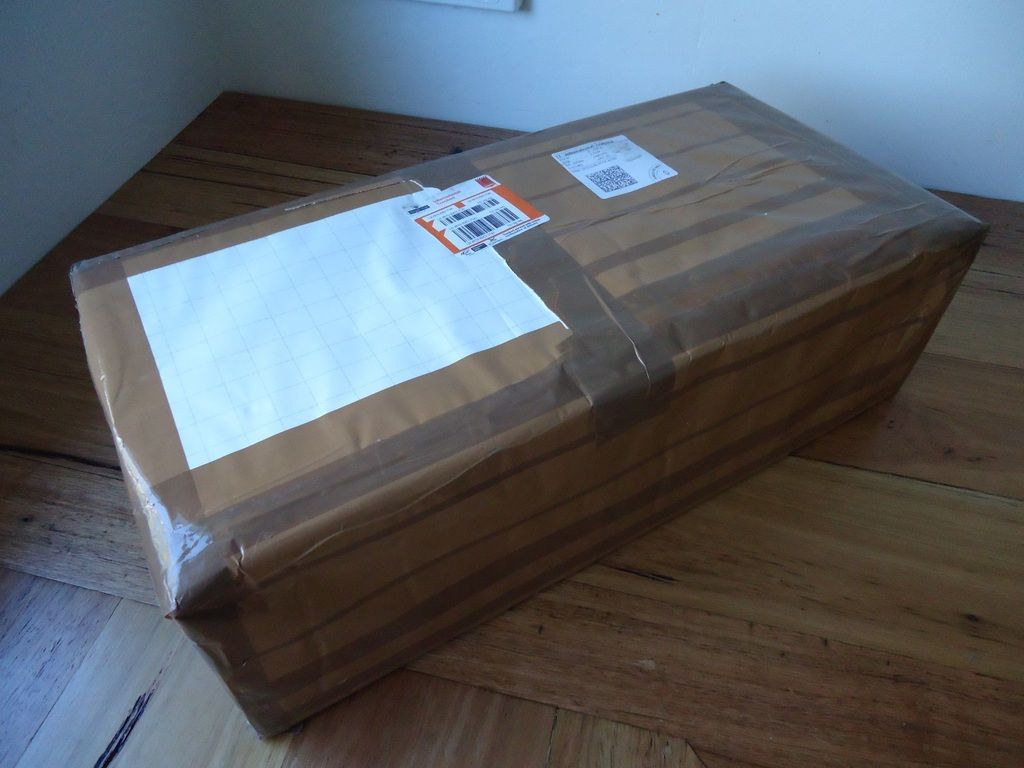
    This package arrived in the mail the other day! Let's take a look and see what's inside.


    This is going to take some time and will span multiple posts so please be patient but the end result will be completely worth it! I've performed these repair and maintenance techniques on 2 dozen of these vintage action figures now so I know they work. Now it's time to start sharing that knowledge with other interested enthusiasts. I don't mind if anyone intervenes with comment or question. As a matter of course, it's welcome. Please do so.

    Nonetheless, this process will take some time to complete and will involve many posts of varying length on my part. I intend to document all the processes with text and photos but if something is unclear, then please ask. I should be able to respond to any question about the figure's restoration process; and hopefully, I'll even provide you with a meaningful answer! lol.


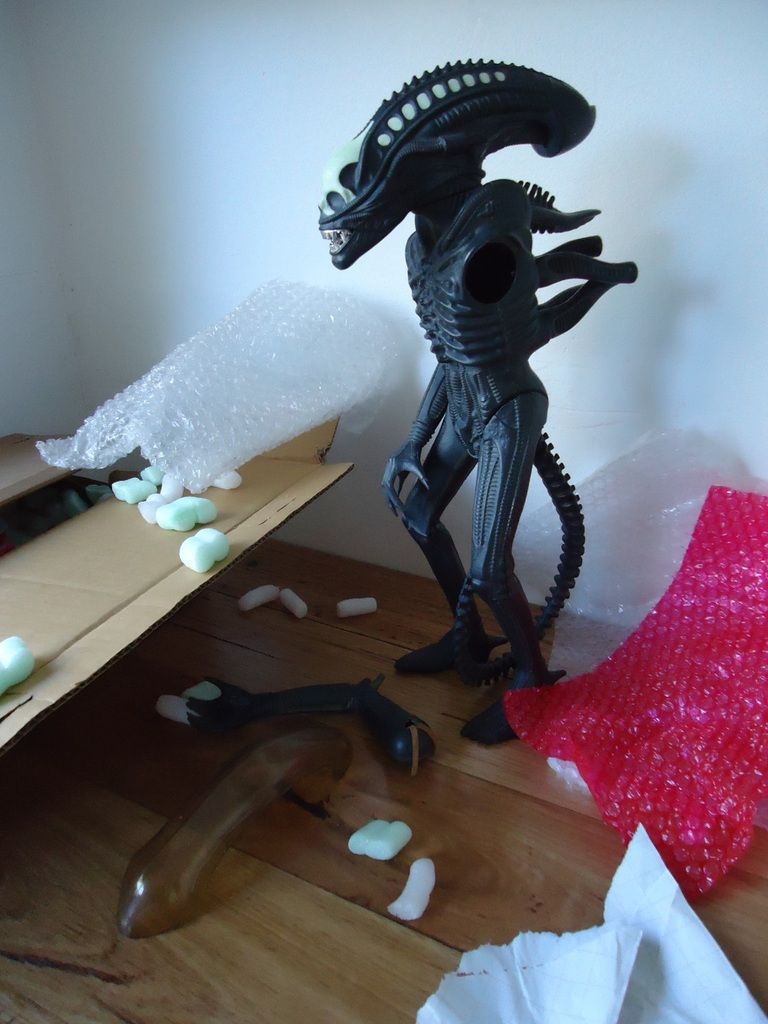
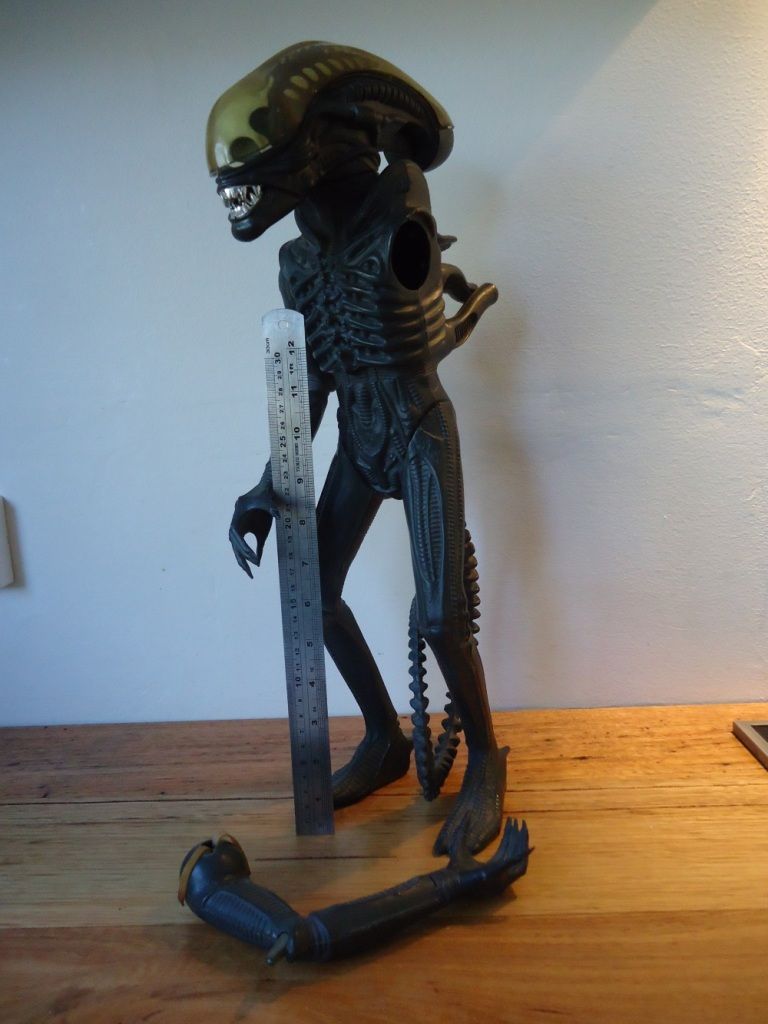
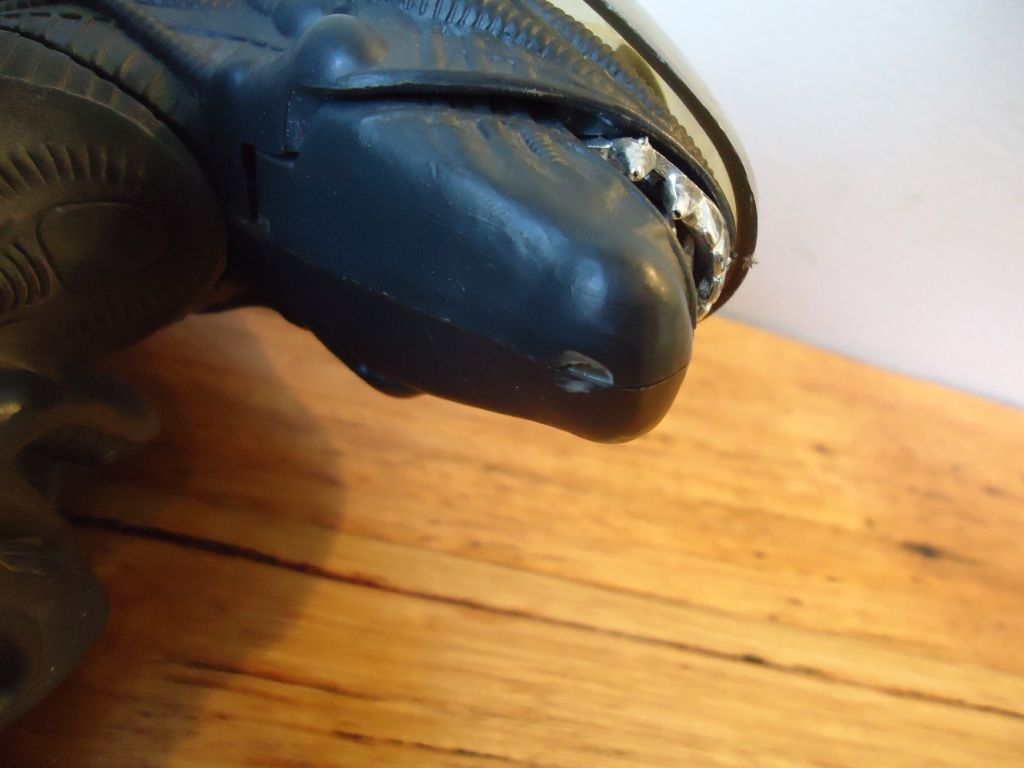
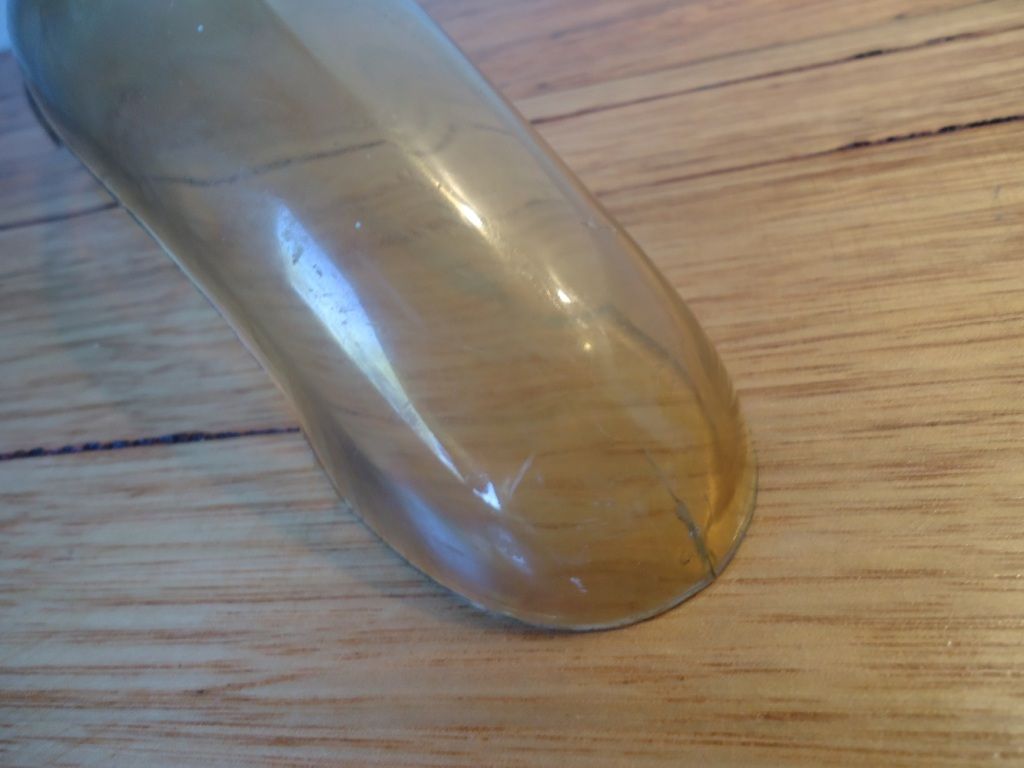
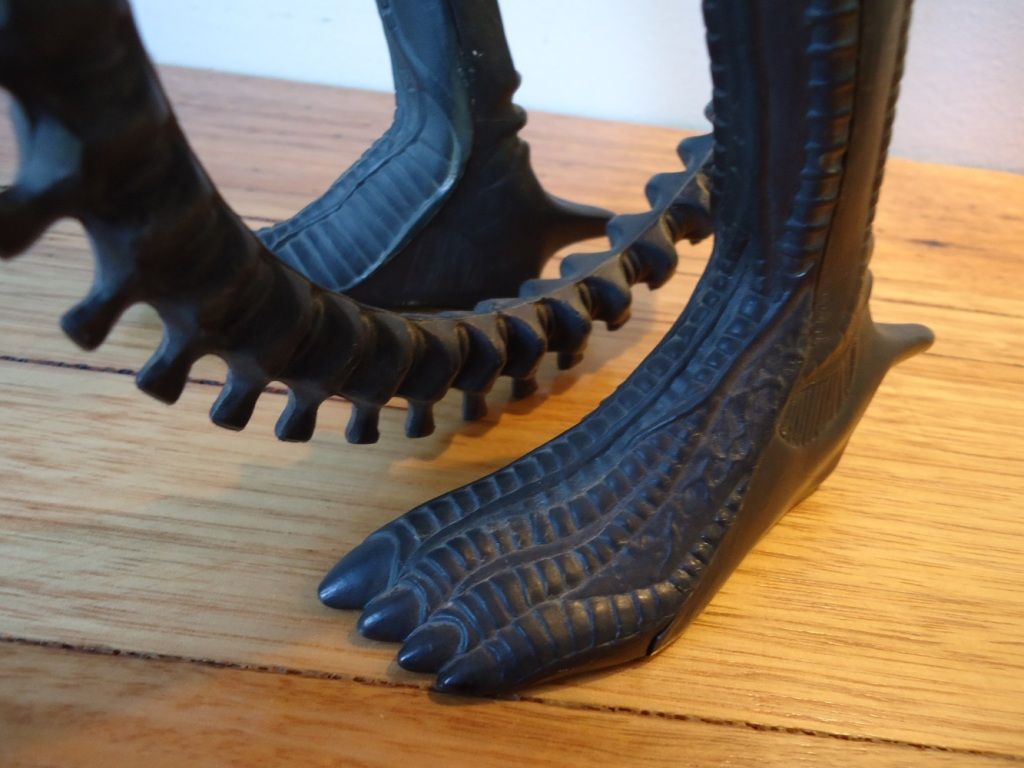
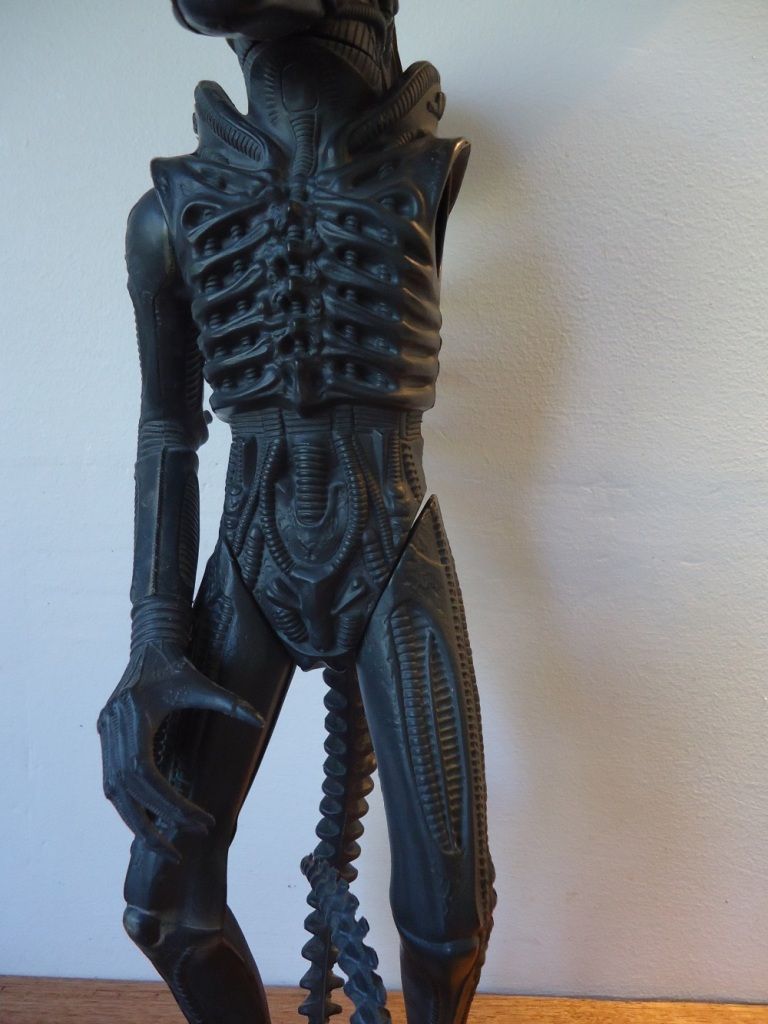
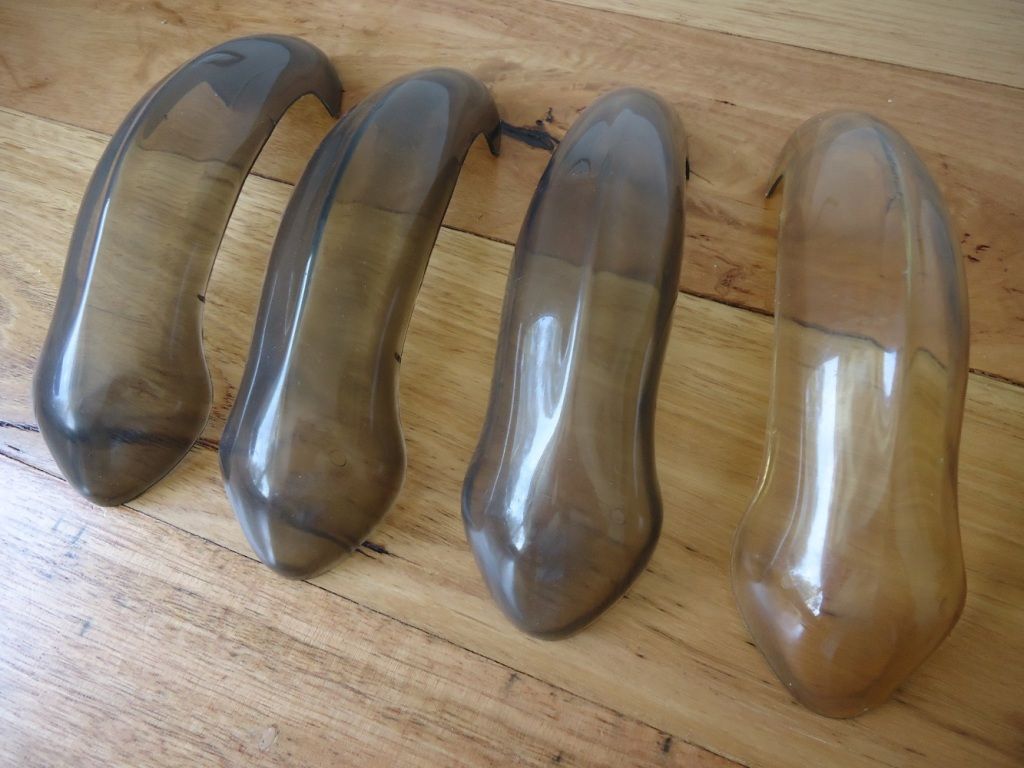
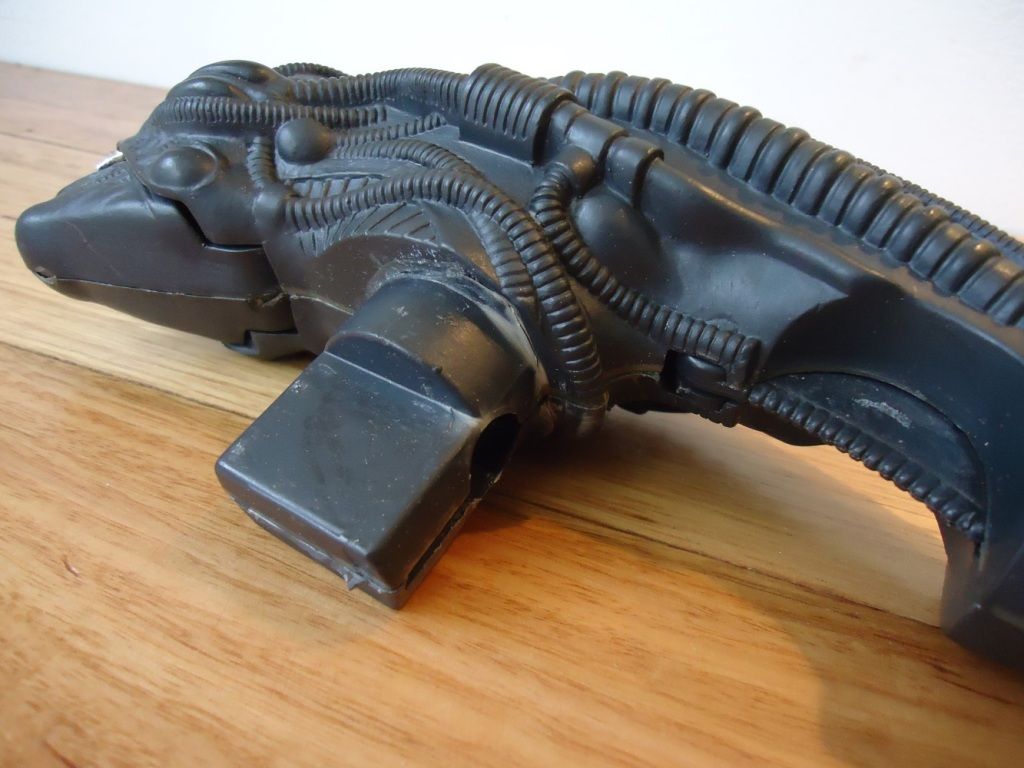
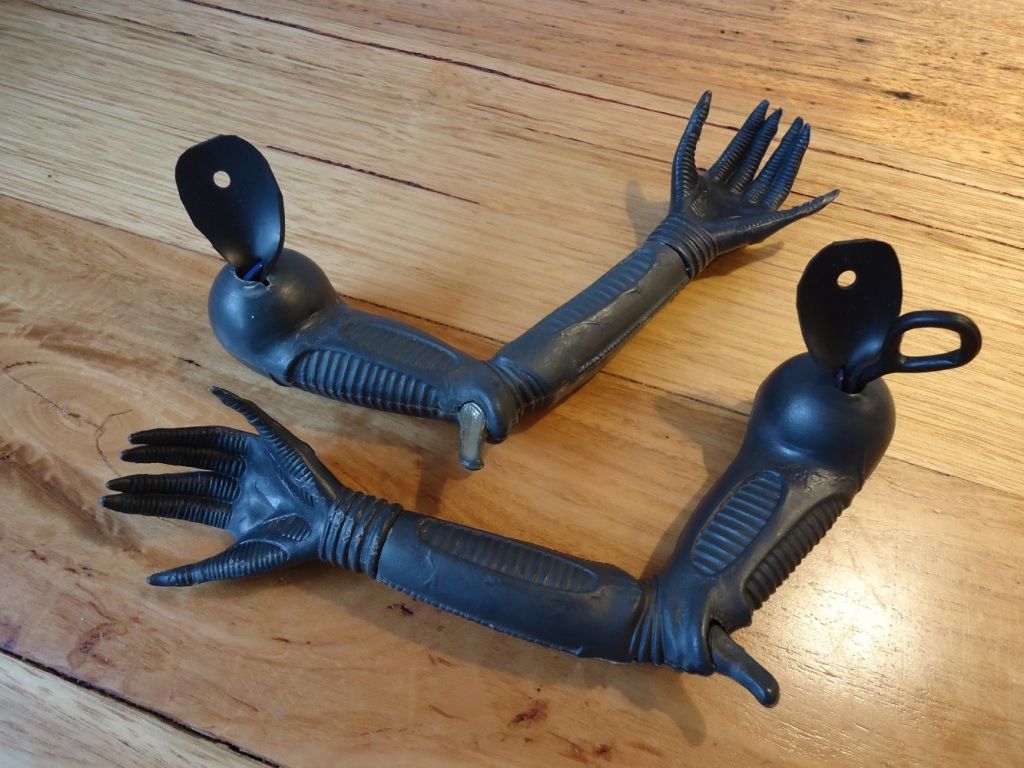
    Yep. You guessed it... it's a 1979 Kenner Alien! This is the figure I'll be working on and this is the condition it arrived in, straight out of the package. It's pretty grody, actually.


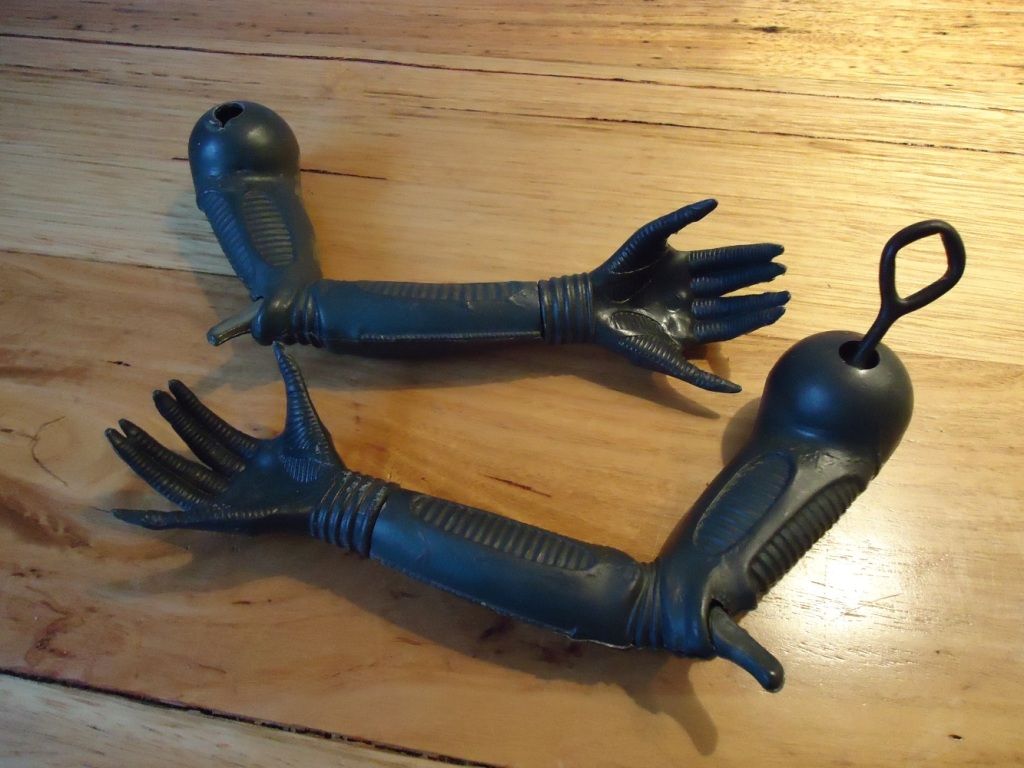
    The particular run down sample I will be focusing on for this exercise is an ideal candidate for a full restoration* and the documentation of the various processes performed on it will be made below. The ultimate goal with this exercise is to take this particular specimen in its less than spectacular state and completely refurbish it. By the time we are finished rehabilitating this candidate, it will no longer be a forlorn dust coated arthritis ridden crippled amputee. Instead, it will become a glorious testament of how a little attention to detail, some good techniques and some very basic materials can transform this degraded action figure to become a worthy display piece for even the most finnicky collector to be pleased to own.

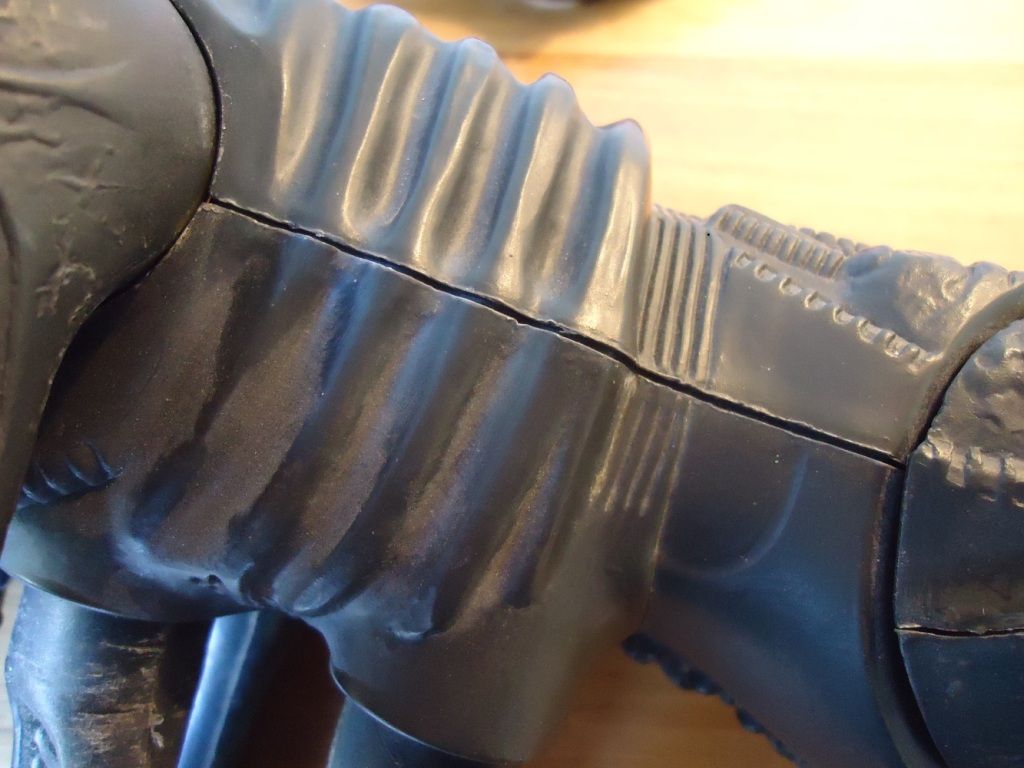
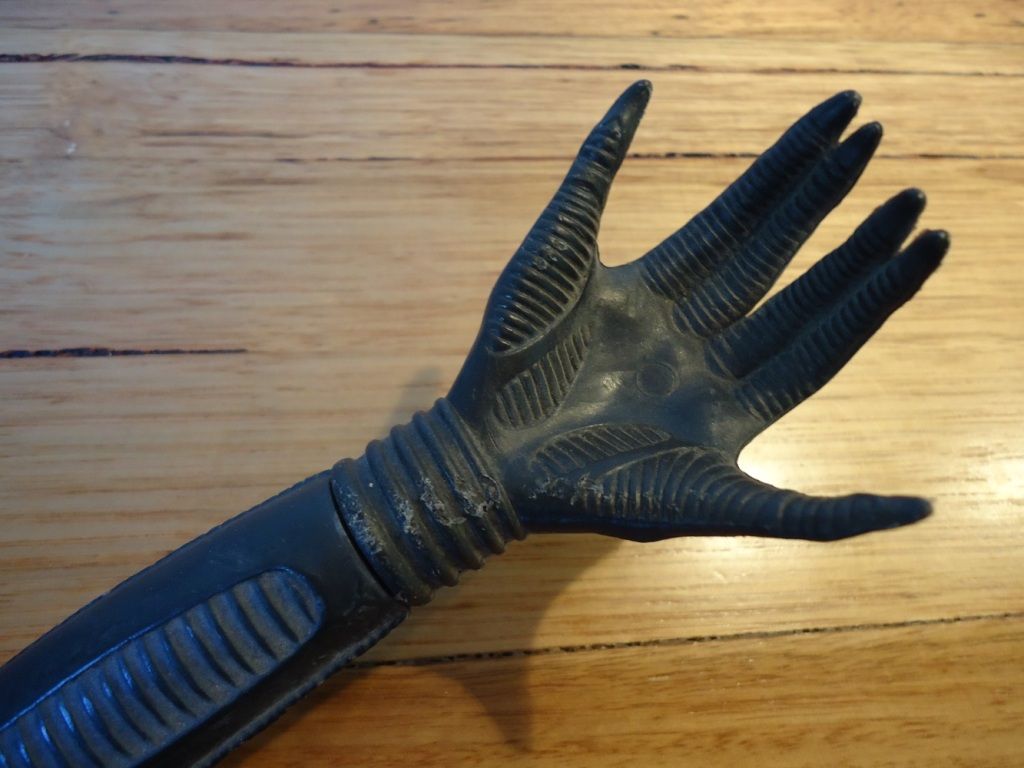
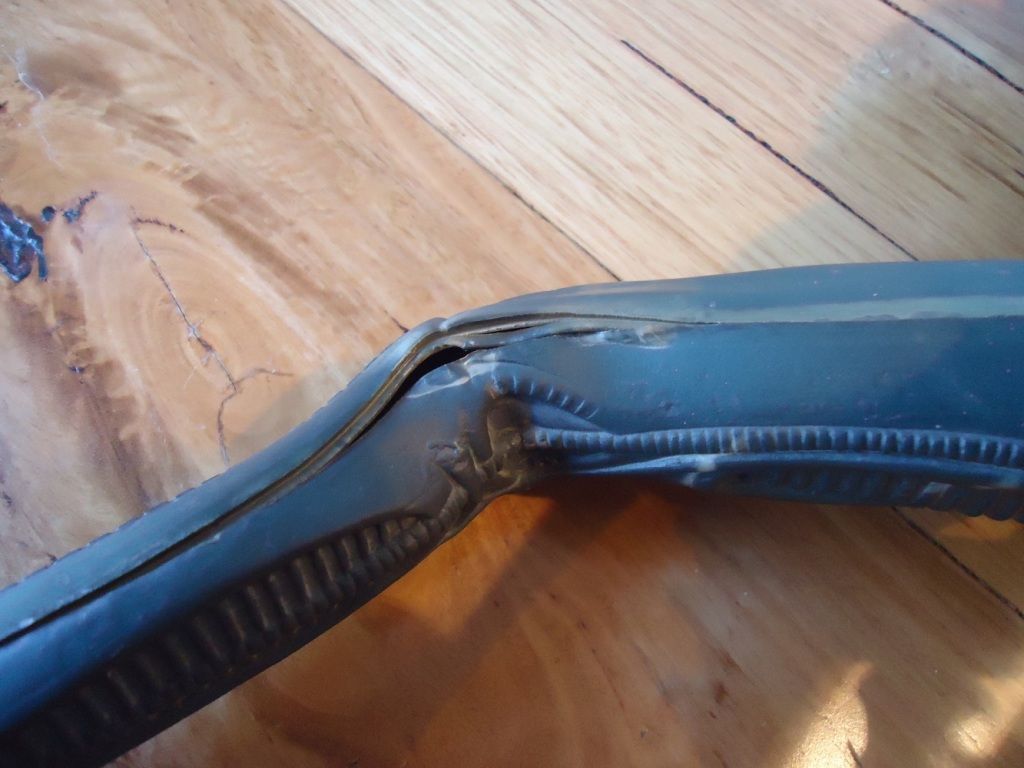
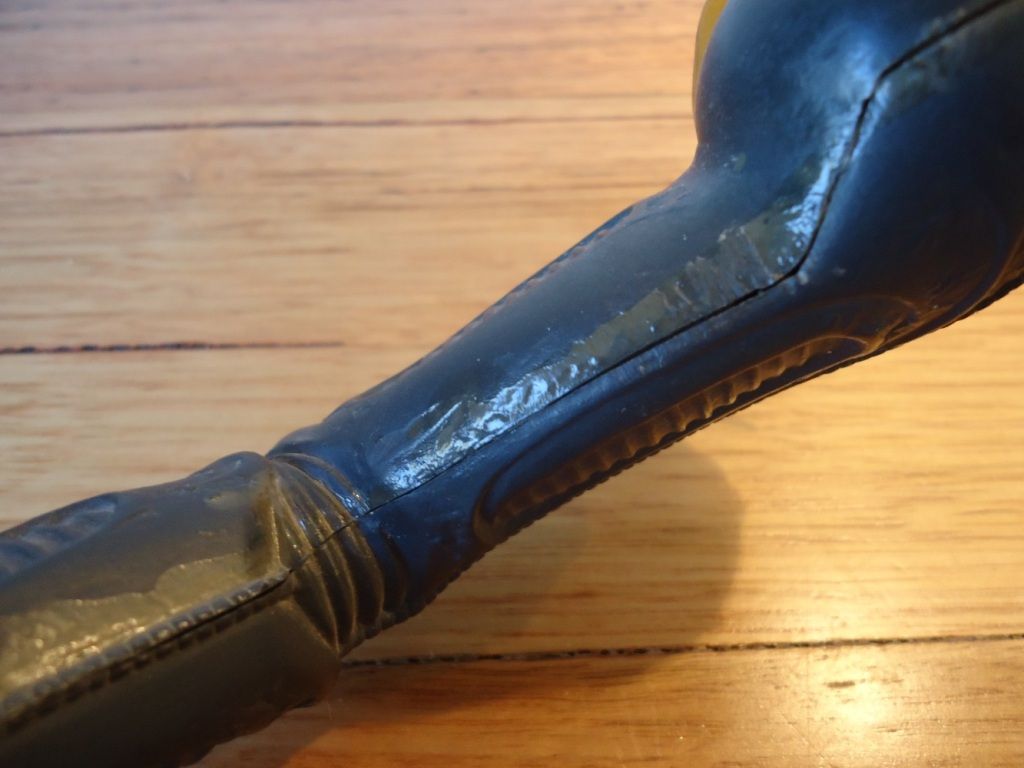
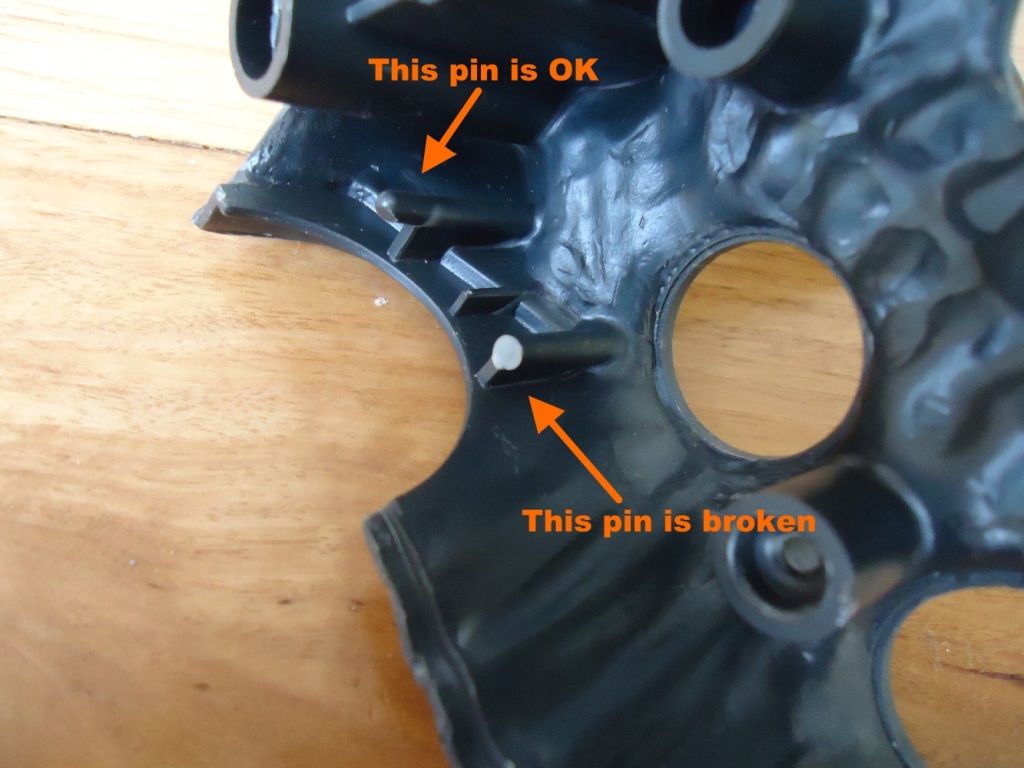
    Evaluating the figure and identifying all of its issues will be my first goal. Then we will move onto how these issues get addressed in future posts. To this end, I will first conduct an overall assessment of the 36 year old action figure and detail its positive and negative issues in my next post.


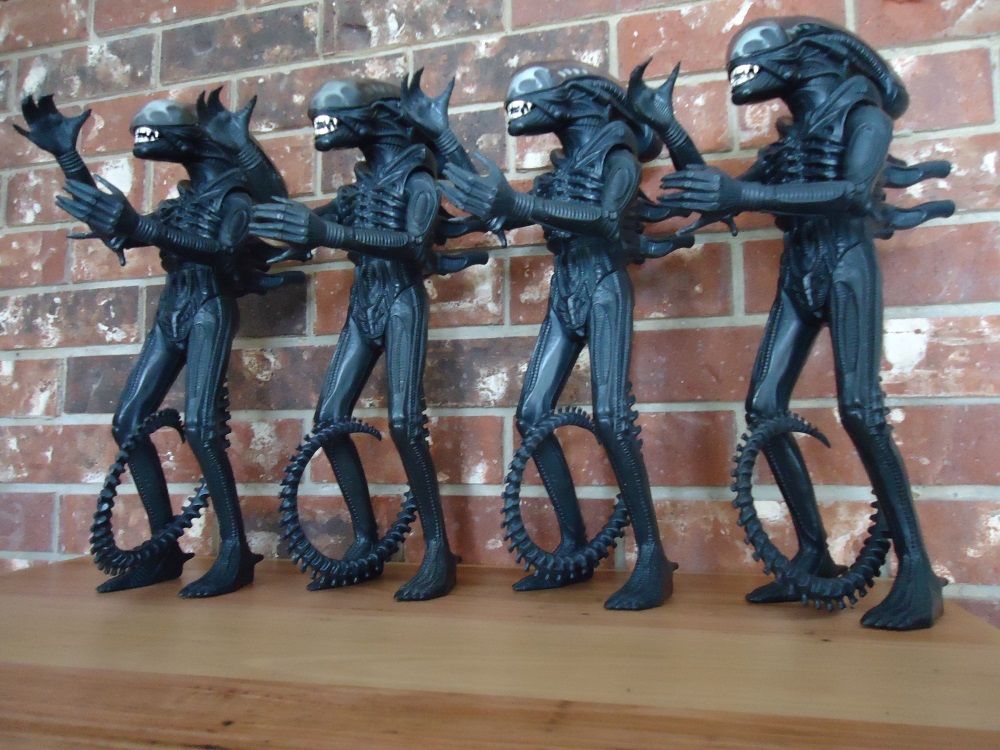
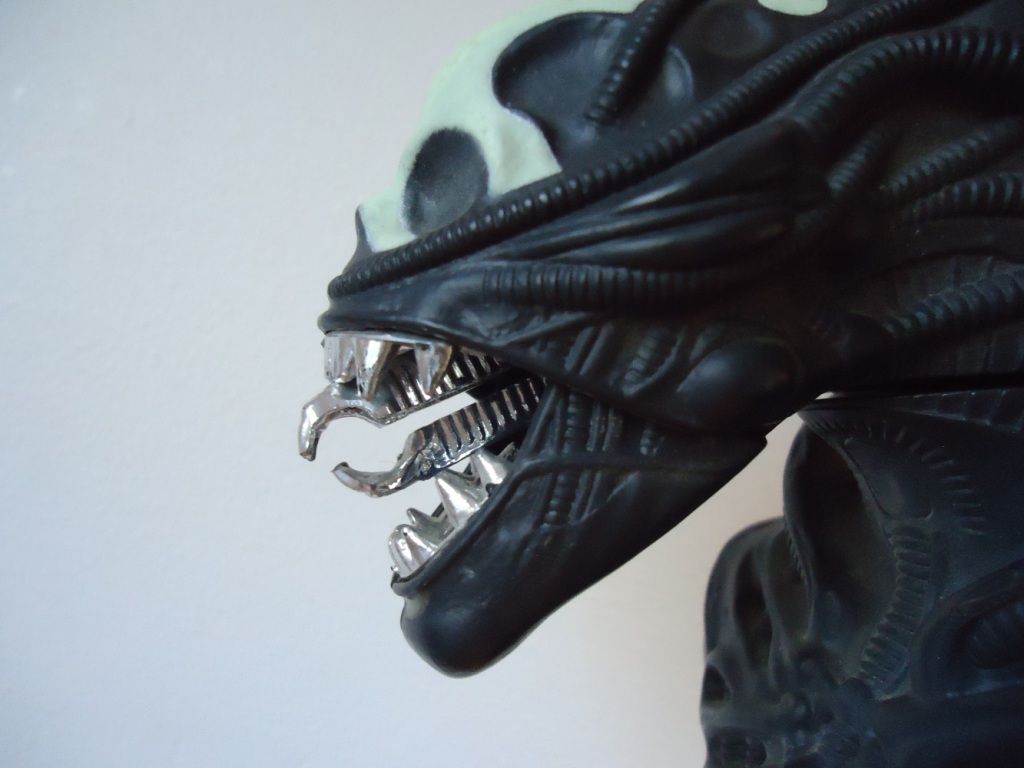
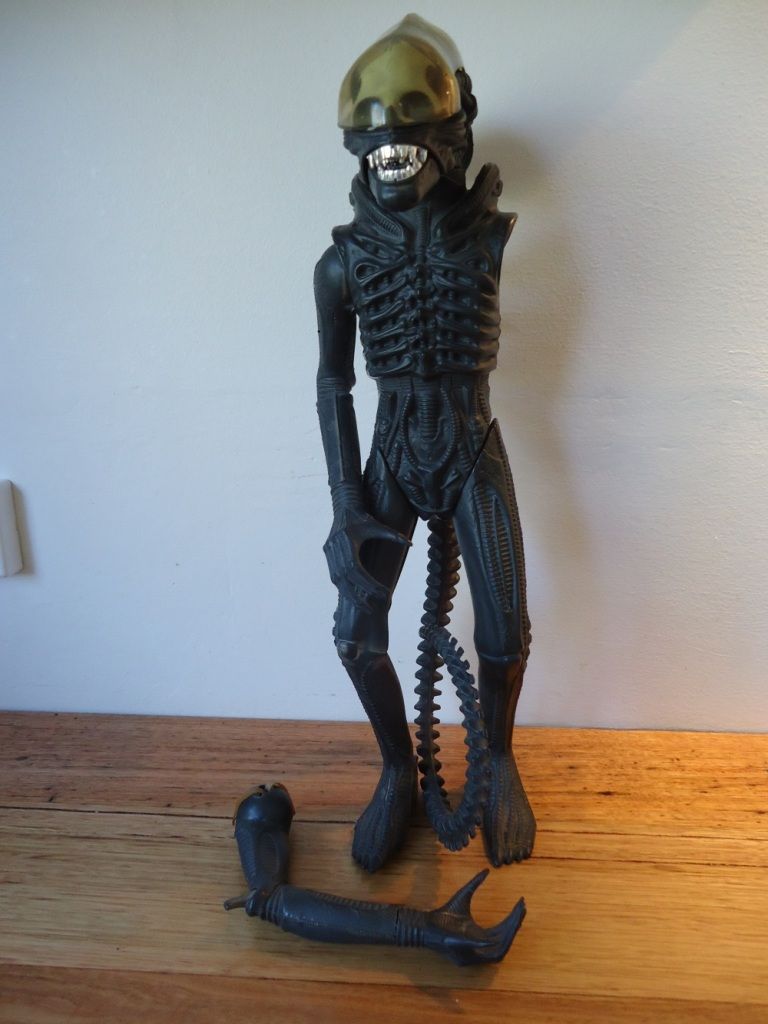
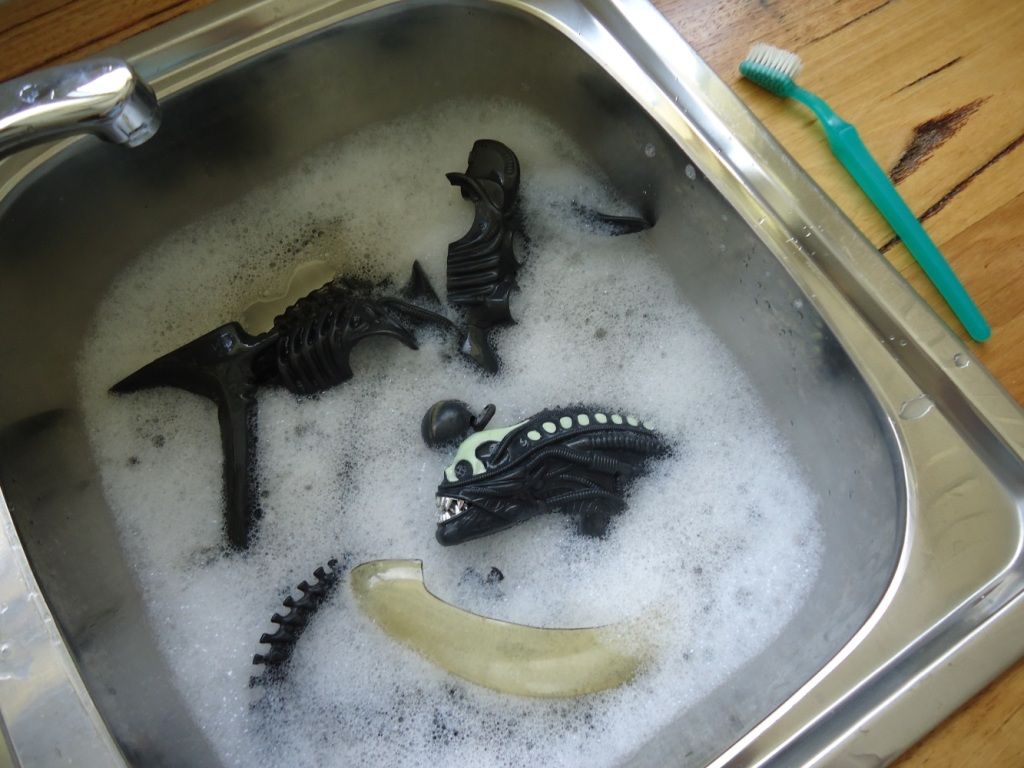
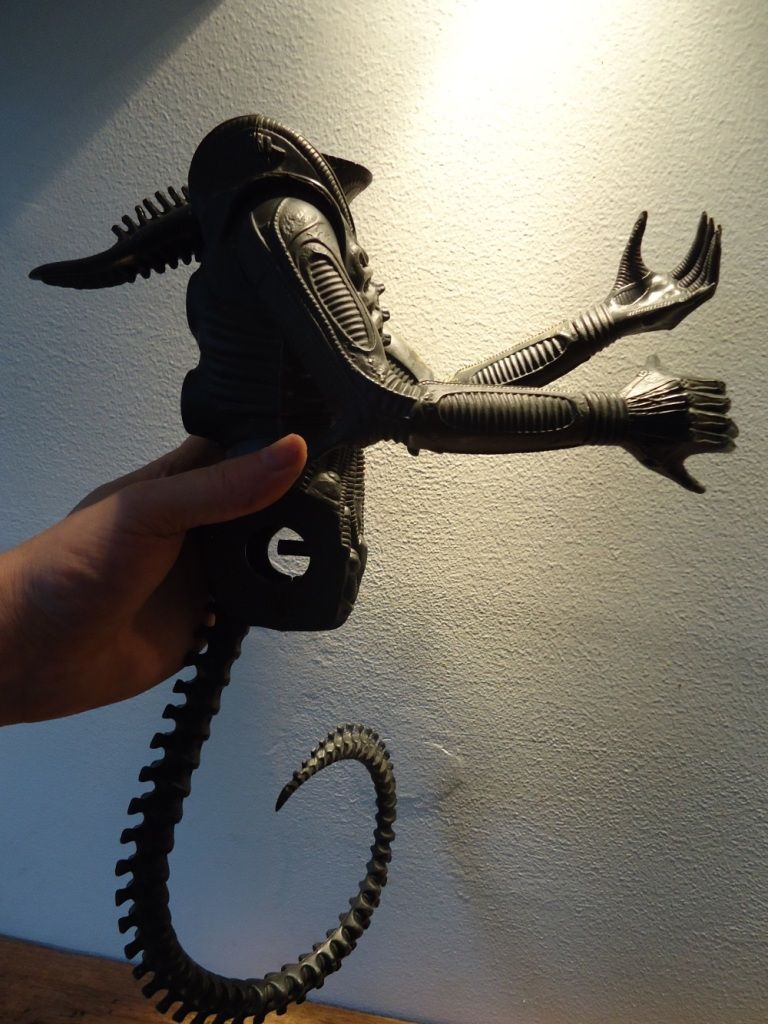
    Ultimately, the dusty broken figure on the right will be comparable in quality to the Big Chap on the left. He'll be better, sexier and more complete, actually.


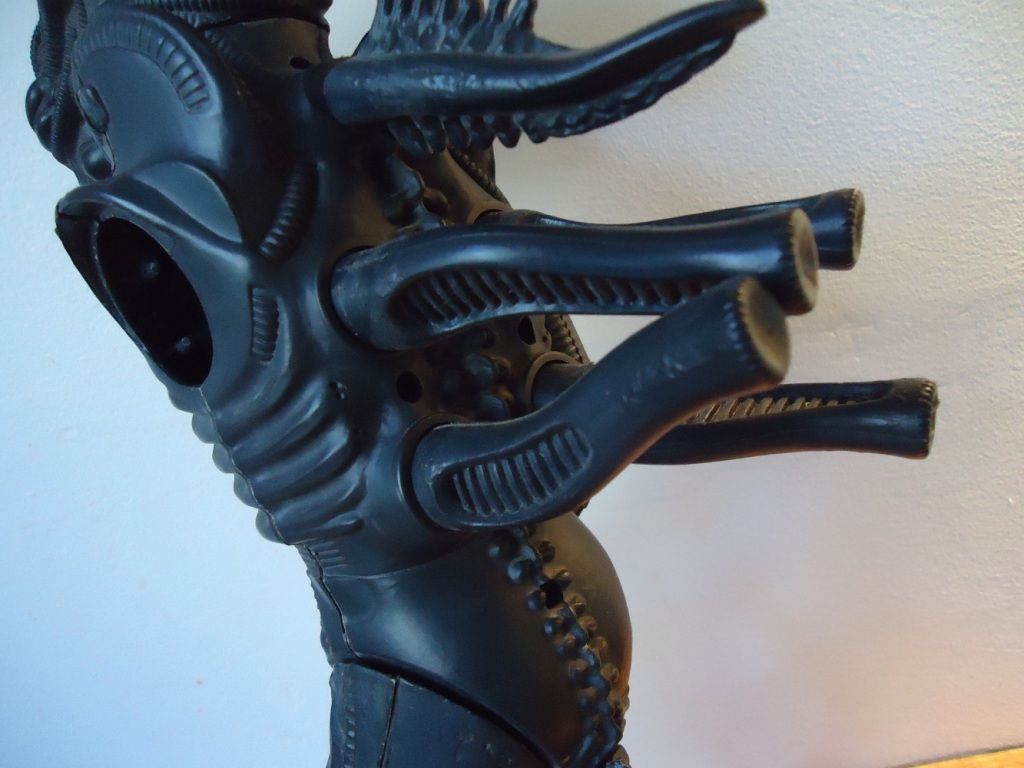
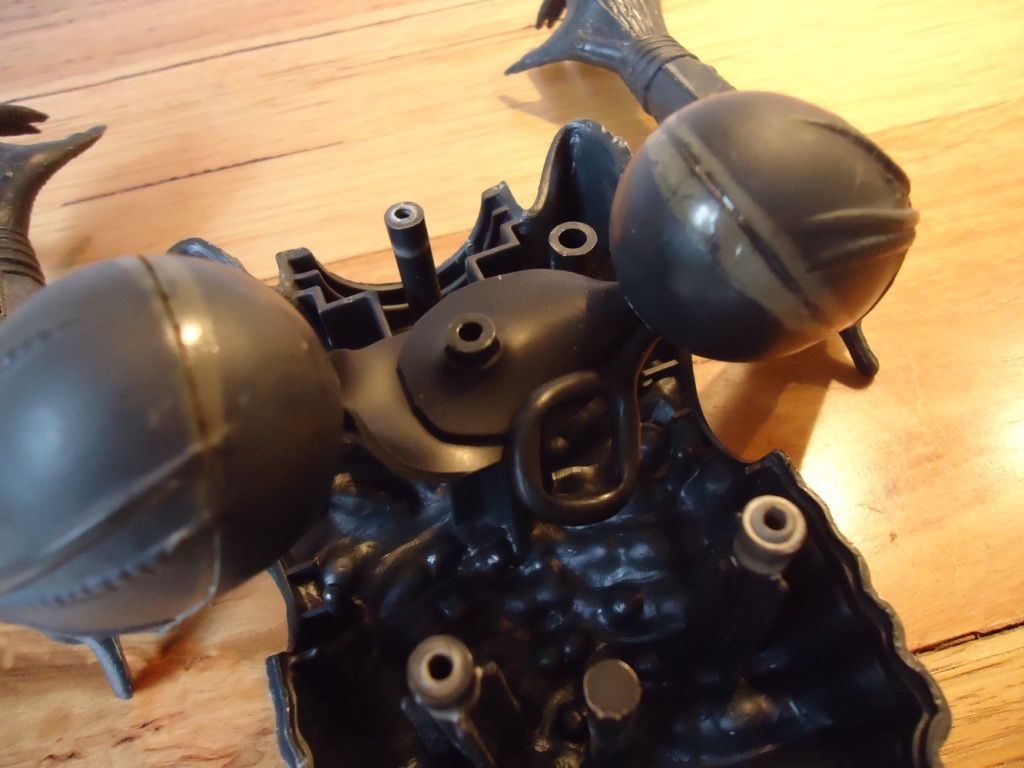
    Let's start by taking a closer look at the candidate itself, shall we?

    This is going to be fun!

    -Windebieste

    *Taking into account the nature of some of the damage and the fact that the figure itself is 36 years old along with a few other considerations, 'restoration' does not mean 'as good as new'. This figure will never be mint condition - but it can be significantly improved upon its current neglected state.
    Last edited by windebieste; Apr 27, '16, 12:11 AM.
  • Hedji
    Citizen of Gotham
    • Nov 17, 2012
    • 7246

    #2
    Welcome to the forum!

    I'll be watching with great interest. I've got one whose arms need to be re-strung.

    Comment

    • drquest
      ~~/\~~\o/~~/\~~Shark!
      • Apr 17, 2012
      • 3736

      #3
      I'll be watching as well!

      I have 4 loose complete loose 18" Aliens and a boxed one as well. My wife has 2-3 of these looking over her shoulder when she's working at her desk

      I've gotten pretty good at re-attaching the arms but I'm always on the lookout for more info!
      Danny(Drquest)
      Captain Action HQ
      Retro shirts and stuff
      More retro shirts
      Stuff For Sale

      Comment

      • windebieste
        Museum Patron
        • Dec 31, 2015
        • 115

        #4
        Nice. We'll get to restringing those arms for you. It will be covered later. The results I get are very good:


        Cue: Offenbach's CanCan.


        Before we continue, some background for those of you not familiar with this item. This is an original Kenner Products Alien Action figure. It caused quite a commotion amongst parents when it was first released way back in 1979 aimed at 'AGES 5 AND UP' but I won't be indulging in its History here. That topic alone is a lengthy exploration - and one worth making. These 36 year old action figures are sought after by collectors for various reasons. The 18" tall figure can frequently be found on Ebay ranging in conditions like this commonly found but heavily degraded example (worth about US$150) right up to the genuinely rare unopened/uncirculated samples (upwards of US$2000).


        "This son of a ***** is huge. I mean; it's big! It's... it's like a Man!" -Parker, 'ALIEN', 1979. Maybe not quite that big, Dear Mr. Parker, but 18" sure is large for a vintage item like this.


        OK. Now we got that introductory preamble over and done with, let's get on with the Assessment.

        For the most part the figure is complete. It's obviously had its arm broken and a previous attempt to repair it has been attempted. This figure also exhibits at least a dozen other issues that need to be addressed but all of it's critical parts are present. Importantly, the head itself is in excellent shape. All of the essential parts associated with the head are accounted for. The head itself is lightly covered in dust but in generally excellent condition. There's a small scuff mark under the chin but it's not too deep and can probably be polished out. Other than this, there are no other significant damage or abrasions present upon the head.


        It's a small mark and it should be able to be removed without too much trouble.


        The luminous glow in the dark paint upon head is close to perfect. At first I thought it may have been resprayed due to its intact nature on such a heavily degraded figure. No, is not the case. It's an original coating and it's only slightly revealing its age. The glow in the dark ability is still present and works fine when charged under an incandescent light. The only problem present is it's a little dirty and dusty. No big deal, actually.


        Just a few dirty smudges and a slight mismatch of the head halves detract from the otherwise good finish. Also note some scuff marks upon the upper teeth.


        Most notable is the presence of the carapace (aka the 'dome') that loosely sits upon the head which is a good thing. This feature is frequently missing from these figures when you find one. All of the 4 tiny registration points along both sides of the dome are also present, which is terrific. Unfortunately, it does have a small crack at the back of the dome about three quarters of an inch in length. While nothing can be done to repair this crack, it's presence at the back of the head won't distract from the figure's presentation when viewed from the front. It's a small mercy in this regard, but the presence of the small fracture will affect the value of the figure should I decide to sell it. But he aint for sale, so I can live with that.


        A small crack on the back of the carapace mars an otherwise excellent piece. At least it's at the back of the head.


        Also present upon the head is the set of teeth mounted into the upper and lower jaws. They are a little scuffed at the front but it's nothing major and once again doesn't cause the presentation any significant concern. In this regard, both halves of the tongue are also in situ. I'm always very happy to see a figure with a complete set of tongue and dentures still intact like this. Much like the dome, these 4 pieces of the mouth are frequently missing from the figure. This one has all of these features present.


        All the mouth parts are present. They may not be in perfect condition but they are still very good shape.


        As for the trigger mechanism that actually operates the jaws, it's in fine working condition. Its operation making the jaw articulation open and the tongue extend smoothly occur with ease and without any jamming. There is no rattle inside the head so clearly both springs within are still attached internally and the trigger mechanism feature works perfectly.

        Overall, the head is in almost excellent condition. There's a small crack to be found on the dome, some minor chrome coating missing on the jaws and a small scuff mark on the chin but otherwise it's as good as one of these figures gets without paying over $300 for it. It's too bad then that the figure possesses about a dozen other issues upon the rest of the body. Some of them quite major; and we shall get to those next.

        I can see that this assessment is going to take some time, so I will divide it up into multiple posts. The assessment for the rest of the figure will follow when I can post again.

        Thank you for reading this far!

        -Windebieste

        Comment

        • cjefferys
          Duke of Gloat
          • Apr 23, 2006
          • 10180

          #5
          Welcome to the forum! I'm looking forward to seeing how you reconnect the arms. I have a boxed Alien with one disconnected arm. I've read about a couple different ways to fix it, but I haven't taken the leap yet, so I'm curious to see how you do it.

          Comment

          • Hedji
            Citizen of Gotham
            • Nov 17, 2012
            • 7246

            #6
            You're off to a great start... love your style of posting and assessing the job.

            Comment

            • Magenta
              New Member
              • Apr 21, 2013
              • 31

              #7
              Didn´t you already post this at Toyark?

              Comment

              • windebieste
                Museum Patron
                • Dec 31, 2015
                • 115

                #8
                Have I posted this over at ToyArk?

                Well, yes... and no. I hope that's not a problem for anyone.

                Whereas my ToyArk posts are a random selection of processes, Historical information and other content, this particular thread documents a single purpose and a complete tear down and rebuild of a figure I purchased recently. There WILL be some crossover, of course, but expect different content here directly relating to his specific figure.

                Thank you for noticing. It is appreciated.

                -Windebieste.

                Comment

                • windebieste
                  Museum Patron
                  • Dec 31, 2015
                  • 115

                  #9
                  Anyway, continuing with the assessment at hand.

                  While there are some things that are easy to verify when purchasing online, like photos of how complete a figure may be, they can't reveal everything. For example, when I opened the package this figure arrived in, it had a slight odor of stale cigarette smoke. It's possible the figure may yet have other undisclosed internal issues as well that I may yet uncover when I disassemble the figure.

                  For now let's just remain concerned with the exterior of the figure and give it a complete inspection first. There is a light layer of dust coating the figure and along with the odor, it's removal will happen when thorough cleaning of the figure piece by piece is completed. Cleaning it will be the first thing I do when it is dismantled.


                  Light dust is present throughout the figure, particularly in the many and varied recesses that detail the figure.


                  It's obvious from the fatigued and broken rubber band still attached to the severed left arm that the figure has already had an attempt to repair it. While this may have been successful when initially applied, the rubber band has since deteriorated and broken, once again freeing the arm and falling away.

                  Nonetheless, this means the figure has been dismantled at least once previously. So it doesn't surprise me to find some marks upon the edges of the torso joins where the front and rear halves meet. Some bruising and light wear marks indicate the torso halves have been forced apart without adequate care. Possibly pried with a knife or screwdriver. Please don't do this.


                  Very light pry marks and other disturbances to the edges of the torso halves. More dust is present between the ribs.


                  The right arm is still attached to the figure but is extremely loose. I can peer into the opening where the left arm was previously attached and see that an original anchor is still in place upon the shared mounting post that both arm anchors should be attached to. It has fatigued considerably and while the arm is still attached to the shoulder, it swings freely and the figure can no longer hold a pose with the right arm. This will need to be retensioned.

                  Another minor issue regarding the right arm is some light abrasion upon the wrist. With some luck, I should be able to polish these marks without too much trouble. Aside from this, both hands have all 12 of their fingers in place and both arms have unbroken spurs upon the elbows. These are uncommon issues but breakage can occur at these points. Both arms are reasonably firm at the wrists and rotate well without too much looseness.


                  Light abrasions on the wrist. Nothing major, but if it can be fixed, I will do so.


                  Upon the back of the figure are 5 appendages. Commonly, the uppermost of these crests is missing and its absence can usually be attributed to damage on the torso rear. This figure still has its crest in place indicating that no damage is present upon the figure's back. However, the piece is loose and I will treat the need to address this looseness as optional. Looseness of the item is innate but the range of motion that this piece is demonstrating on this particular figure is more pronounced than usual. An investigation of the figure's interior will help make that judgment call when appropriate.

                  Three of the other 4 remaining dorsal appendages are loose and floating within the back of the figure. So I already know that they have broken away from the mounting plate that is concealed inside the figure. Only the lower left appendage is still attached to the internal plate. This is another frequent form of damage to these antique figures and is easily repaired with a little bit of fussy attention.


                  3 of the 4 tubular organs on the back are broken and flop around like half a dead squid. Can be fixed.


                  Both legs upon the figure are loose. 36 years will do that to an old figure like this. The looseness of the legs is so pronounced if I pose the figure standing fully vertical, it will have a tendency to give way at the hips and topple backwards. Right now, the figure can stand vertical with a slight lean forwards; but not with the confidence I would consider acceptable. Fortunately, there is an easy fix for this.

                  I am noticing a narrow tapering gap in the left leg of the figure where it joins the hip. I suspect that there may be some internal damage done here to the leg spindle but can't be certain until I dismantle the figure. If it is damaged, I should still be able to repair the problem.


                  This gap between the left leg and hip should not be like this. An internal inspection is required to determine a course of action.


                  The right leg is seriously damaged. It demonstrates clear deformation and wide openings where both halves join at the seams have separated. This is a real problem for the leg and it cannot be repaired. It will need to be replaced. Luckily, I do have a spare right leg (a spare leg that has had previous concealed damage at the spindle and been repaired, actually.) that will serve as an ideal replacement for this item.


                  Right leg damaged from possible fall damage - or maybe previous failed repair attempt? It doesn't matter. The only course of action is to replace it.


                  The tail possesses a couple of issues. Firstly, the tail appears to be complete and the blunt spike at the very tip which can sometimes be broken off is still present. This is a good thing. However, it is bent outside of its usual shape and that will have to be fixed. The other issue regarding the tail is it's looseness. Tightening up the tail internally when the figure is disassembled can easily be done. There are a couple of options available for this repair.


                  When viewed from the front like this, the tail should be straight and not curvilinear. Easily fixed.


                  There is residue along many of the seams of all parts of the figure where an attempt has been made to seal any gaps the manufacturing process failed to fill. I should be able to remove much of this surface residue by carefully polishing the figure.


                  Many edge joins on the figure have the same brown residue coating them. I will attempt to remove as much of these coatings as possible.

                  Upon more reflection, I've been thinking the carapace may not be an original piece. It may be a reproduction part - but I am not convinced either way for now. The only thing that makes me think this is the case is the coloration of the piece. It possesses more of a sepia hue than the dull murky grey that other genuine pieces exhibit. Curiously, all the other features that you can expect to appear upon the carapace, including both the oval manufacturing artifacts located at the skull's temples on the head are present.

                  I've never actually seen a carapace before of this hue. I understand that several different types of carapaces were made (Whether true or not, I don't know and I would like have this verified.) and this item may be a variant. One thing for sure, if it is a repro part, then it's a good one. All the concealed edges where the piece rests upon the edges of the head are also accurate to an original piece. It's just the coloration makes it suspect.


                  4 Carapaces. The 3 on the left are verified genuine. The one on the right came with this figure.


                  That's the assessment complete. It's quite a list but all of these issues can be addressed in some way or another. Some will require nothing more than a simple clean, others may require the crafting of custom parts, and others will need different attention altogether. Nonetheless, there doesn't appear anything on this list I can't address. This won't be done straight away, though. Tomorrow I will disassemble the figure and give it a good wash. Hopefully, there aren't any additional internal issues to be revealed in this regard as I already have my work cut out for me with this figure.

                  Once cleaning process is complete, I will address the arms next as there is obviously some demand for that.

                  -Windebieste

                  Comment

                  • Hedji
                    Citizen of Gotham
                    • Nov 17, 2012
                    • 7246

                    #10
                    Originally posted by windebieste
                    Once cleaning process is complete, I will address the arms next as there is obviously some demand for that.
                    That's putting it mildly.

                    Comment

                    • windebieste
                      Museum Patron
                      • Dec 31, 2015
                      • 115

                      #11
                      We shall get there, but not quite yet.

                      In the meantime, the figure is now completely disassembled and washed. During this process, there were more interesting issues to be found inside.


                      Into the kitchen sink you go, you grubby old codger. Some hot water, mild kitchen detergent and a good scrub with an old toothbrush will do the trick.


                      Firstly, while disassembling the figure I found that the screws used to clamp the torso together weren't the original fasteners used by Kenner. A replacement set of 4 had been used. The problem with such replacement screws is their thread does not match the thread they are intended for within the torso halves and the tightness of the clamping can be diminished. Fortunately, I do have a set of screws that will be a better choice than the ones included with the figure. While they are not original ones, they are threaded to match the original figure. I will be using those instead when I reassemble figure instead.


                      After restoring more than 2 dozen of these vintage figures, this is only the second time I have encountered screws other than those that were originally installed in the figure.


                      I already knew that at least one of the 8 internal shoulder pins was missing from inside the figure because the absence of the left arm revealed it. The presence of the 4 pins inside each of the shoulders are important because they prevent the arms from collapsing into the figure. They are moulded directly into the torso halves but they are more delicate than they should be and are easily broken. A single broken pin as revealed by the absence of the left arm isn't so much of a problem but if 3 or 4 of them are broken (or worn down) and gone, then the tension of the rubber anchors will pull at the arm and it will collapse into the figure (This condition can be fixed, by the way.).

                      With the figure now completely disassembled and the right arm removed, all of the figure's interior is now laid bare. The pins are revealed and just like the left side, only a single pin is missing on the right hand side. 2 pins missing out of 8 is an acceptable loss. It's not perfect but I have seen a lot worse than this.


                      Considering the small dimensions of the mounting pins and what they are expected to do, it's no wonder that they are frequently broken.


                      The next thing of note is the head. It turns out the head wasn't in as good a condition as I earlier believed it to be. All the the features are present and do work perfectly but there is a fine crack and glue residue present upon the concealed neck attachment of the figure. In which case, the figure has (presumably) had a fall and the head had been snapped off of the figure at the neck. A previous owner has glued the head back onto the stump at some time. Luckily, the glue was compatible with the plastic and the join is still solid and good. There's no telling how long ago this work was conducted but it's still a very competent repair.

                      Many glues, when aged, will perish, deteriorate and ultimately fail in their bonding. Such previous repairs will come undone and you are left with 2 separate pieces once again but with the added disadvantage of perished residual adhesive adhering to them that needs to be cleaned away. I've experienced a few figures that had been repaired using glue in the past and they basically just fell apart without too much handling. Some glues are just not designed to last the distance of several decades but on some occasions the incorrect adhesive has been used. The repair to this head is still solid and holds fast so it looks like the correct adhesive has been used. I'm happy for that. Mind you, having previously already encountered several severed heads this one is the fourth I've handled. Regrettably, this means they appear to be way more common than expected.

                      If you do have a figure with a broken head. Please don't throw it out! These can be fixed; and the best part is glues are not mandatory. The tutorial found Here amidst a bunch of other posts can help you return a severed head to the torso.


                      Such hairline cracks and glue residue indicate extant damage but will only reveal themselves once the figure is dismantled.


                      The one other aspect of the figure that revealed itself upon dismantling it concerns the tail. As I do want to address the tail's looseness and warped condition at a later date I will include this revelation along with those processes. I can see quite a lengthy entry being made regarding the tail alone.

                      Now that the figure is actually in pieces and I have had a chance to actually fully assess what is required to get this figure into a state that will make it worthy of display, I can make an accurate prediction for its completion.

                      The outcome of a full restoration featuring complete functional articulation and excellent display presentation is the strongly anticipated result for this figure.

                      Next up, I will get stuck into the serious work of actually rehabilitating this figure. First I will tackle resolving the issues with the arms. One of which is broken, the other is just loose. Perfect for my purposes. You'll see. Not only will we be working towards getting both limbs returned to the figure; but we will also be making sure that they can confidently hold any pose in front of the figure within their vertical range of motion. That's the plan. I'm certain that this goal can be achieved.

                      Thank you for reading.

                      -Windebieste

                      Comment

                      • Bruce Banner
                        HULK SMASH!
                        • Apr 3, 2010
                        • 4325

                        #12
                        Great series of posts!

                        I still have my Alien which I got from Zellers back when I was a kid, and it's still in pretty decent condition. Always loved the figure.
                        PUNY HUMANS!

                        Comment

                        • windebieste
                          Museum Patron
                          • Dec 31, 2015
                          • 115

                          #13
                          Thank you. These old Alien action figures are more common than people realise. There's a lot of myth surrounding them regarding how rare they are but that's just not true. Good condition figures like the one you probably own are uncommon, yes; but the beat up versions like this one I am working on are relatively easy to find. Anyway, onwards with the Goods.

                          The original arm mounts Kenner used to fasten and apply tension to the arms were manufactured out of cheap rubber. On top of that, the toy was not designed to last for decades and it's been 36 years since the figure was released. Its no surprise then most of these old figures have lost a lot of tension in their arms due to the rubber perishing or becoming fatigued. The undesirable result is the arms hanging loose and languidly at the figure's side. In many cases, that fatigue goes well beyond simple limp arms and culminates in the breakage of the rubber anchor occurs. The net result being the arms fall away from the figure completely.

                          This particular figure exhibits instances of each of those problems. The left arm is broken away from the figure while the right limb remains attached. The remaining limb is so loose that it hangs freely. Any movement of the figure reveals how pendulous it actually is and the limb casually swings from side to side. The first task I performed on these arms was to remove the perished rubber band that served as an impromptu anchor inside the left arm.


                          One arm is broken and while the other can still be attached to the figure by the 36 year old rubber anchor it was manufactured with, we will be ignoring this connector now. Both limbs will undergo the same repair.


                          Repairing a broken arm needs some careful consideration and for the repair to be optimally successful, it needs to be able to fulfill all of these criteria:


                          - It has to be tight. The repair needs to provide adequate tension so that the arm will hold a confident pose without dropping and swinging loosely to the figure's side.

                          - ...but not too tight. It has to hold the arm in place without being over tensioned. The repair should not be so tight that it pulls the arm into the shoulder socket recess.

                          - It has to be repeatable. In the event of an error, the entire repair process is easily abandoned, removed and attempted once again until it works successfully without leaving any additional debris inside the arm or otherwise damage the figure or the arm in any way.

                          - It can't interfere with the figure in any way. It has to be accomplished in such a manner that no modifications are made to either the shoulder socket, arm ball joint, existing rubber anchors or the mounting post inside the torso.

                          - It has to be mechanical in nature. This repair has to be done without the use of glues or adhesives or any additional chemicals that may leave residue or film on the figure or it's arm or otherwise alter or mark the figure in any way.

                          - It has to be easy. There's no point trying to achieve this goal if the tools, materials and methods are outside the reach of anyone wanting these results. Mind you, patience that you bring to this repair will influence the result dramatically.


                          On one level, it's a difficult set of goals to achieve; but on another, the arms are actually reasonably easy to fix. I've used the following method successfully many times and it will work effectively on both broken and loose arms. It can be a fiddling process and more than one attempt may be required to hit that 'Goldilocks sweet spot' but it's worth the effort. Before we begin, some preparation is necessary. Here's the tools and materials you will need to gather in order to conduct this repair.


                          Stuff wot u need: A length of neoprene rubber strip, an old coat hanger, 2x pairs of pliers, a craft knife, a hole puncher and a pair of scissors.


                          The 1mm thick flat neoprene rubber strip is relatively easy to come by. It can be purchased from the swimming pool department of your local hardware store. Or maybe try your local swimming pool supplies store. It's relatively cheap, costing only about a few dollars per meter and a common product in these retail outlets. A meter may seem like a lot of material; but if your first, or second attempt fails, you will be grateful that you still have more than enough material to work with in order to repeat the repair. (If you can't find a strip of this stuff, go visit your local bike repair shop. If you ask them for a discarded bicycle tire inner tube you can use that instead. Usually, damaged inner tubes are just thrown out with the rubbish but you can still extract the necessary material you need from it and apply the same instructions below. Further experimentation on your part may be required to achieve the same result.)
                          A wire coathanger. This should be easy enough for you to acquire. Really. If you don't possess one, maybe you should move to a more civilised part of the World.
                          A sharp pair of scissors. The sharper the better.
                          2x pairs of pliers. These are basic tools and easy to come by. At least one of them should be capable of cutting wire.
                          A leather hole puncher. Once again, easy to come by but you may have to ask around for one of these. Someone you know is bound to have one.
                          A sharp crafting knife. Optional, but if you need to repeat the procedure, you will need this item. Once again, it's an easy tool to come by.

                          Now, we get down to do the work.

                          For repairing these arms, I cut a pair of 40mm lengths from the 1mm thick neoprene strip and marked a pair of points on each of them with a marker pen. The 2 points were 24-25mm apart. Using the hole puncher, I selected the smallest hole choice and punched a hole on one of the marks. Then I selected the largest hole choice and punched the other mark with a large hole. I did this with both pieces of rubber so that they both had 2 holes of differing size apiece punched into them at either end. The scissors were then used to cut and taper the rubber at the end with the small hole.

                          Using a pair of pliers, 2 pieces of short wire material was cut from the wire coat hanger about 15mm long apiece. Then both pliers were used to bend the pieces of short wire at about 15-30 degrees at their midpoints. Then I inserted a piece of wire into each of the small holes on the tapered end of each of the rubber pieces. At this stage, I now had a pair of improvised arm anchors ready for use on the arms. Following so far? It's not hard.


                          The neoprene rubber strip coil, a cut and shaped piece of neoprene rubber with a piece of trimmed coat hanger wire next to it and an assembled improvised arm anchor.


                          Then the wire end of the improvised anchor was inserted into the figure's arms and pulled taut to ensure it was in place without coming back out. The large flappy rubber pieces were left hanging out. It didn't matter if the original rubber anchor was present or not in either arm as it's an easy task to squeeze the tapered end of the rubber with the wire attached to it into either the broken or unbroken arm. Of course, it's a little bit more of a squeeze to get the wire inside the right arm which still has the original anchor in place; but it's still an easy operation. Then I attached the other end of each rubber piece to the central internal post on the front torso half. After this is done with both arms, it's time to test.


                          Both arms are now ready to be tested. Note the original anchor on the right arm is still present. It can just stay there.


                          Testing is easy. The rear torso half is added to the front and they are clamped together using the screws. They don't need to be super tight, just enough to seal the halves completely and see if the arms will hold a pose. I'm not concerned about adding the head or the legs or other parts just yet as this assembly is only needed to assess how well the arms will hold a pose at this stage. If successful, I would normally pull the test assembly apart and add the missing parts to the figure and screw the whole thing together. Job done and ready for display.

                          If not successful, as was initially the case with this figure, and the assembly was too loose and the arms just sat there by the figure's sides; meant I still had more work to do. I had to dismantle the test assembly and start again with cutting a fresh set of improvised rubber for the anchors.


                          Once the arms are ready, partially assemble the figure and test the posing ability of the figure. The arms holding this position without dropping is the desired result that passes the test.


                          The test initially failed and the sharp craft knife was used to cut the wire free from the neoprene rubber strip. Once cut free, the wire will be loose inside the arm but you can invert the arm and shake it until the small length of wire falls out. Sometimes it falls out straight away, sometimes it takes a few minutes of shaking the arm around. This is true for both the broken and unbroken arms. Either way, recover the small length of wire for re-use and discard the now irreparably damaged rubber pieces and cut a fresh pair. For the next attempt, reduce the gaps between each hole on the improvised rubber anchors by 1mm and repeat the above process. Then test again.

                          After a couple of attempts, (actually, this figure took me several attempts. I've done this many times now and I am familiar with the process and can usually get it right the first time but this particular figure gave me quite some amount trouble. Multiple attempts were required before I was satisfied with the result.) the arms attached to the figure should now be able to hold a pose during testing. The figure can then be assembled properly with all parts in place and made ready for display.

                          When finally assembling the figure, (after all the other work that remains to be completed) both improvised rubber anchors will be attached to the internal post. The previously loose arm anchor that the figure came with is still intact and it is not going to be removed, nor will it participate in the restringing of the figure. It's just going to sit there, still attached to the arm and float inside the torso but remain unattached. It will effectively be Officially Retired after its 36 long years of service and hard work. I have a number of figures that still have both sets of original anchors present inside them and I use this method to bypass those original anchors and let them stay floating inside the figure. This way, the original anchors are still intact, kept internally and will permanently remain unbroken. They are still present and are no longer in any danger of snapping now that the load of the weighty arms has been taken off of them. Technically, those figures are still complete despite the original mounting systems are now no longer being used and I can re-instate them if I ever(?) need to do so.


                          Note the original anchor is still present but is now abandoned. Disabling this original anchor in this way will preserve it.


                          I hope this is detailed and helpful enough for you Guys. let me know how you go - I'll be happy to help if necessary. Please post photos of your results here sometime in the future if you choose to use this method. Sometimes it can take a few attempts to get it right but it is repeatable process and persistence will be rewarded with an impressive looking figure with both arms attached and holding its pose. It did take me a while to perfect it.

                          This particular figure took me about 5 (or more) hours (much of this time, of course, also includes taking photos and writing a lengthy post about it) but I recommend you put aside an evening and be prepared to repeat the process any number of times. Don't be surprised if that long piece of neoprene rubber strp ends up being shorter than you expect.

                          -Windebieste
                          Last edited by windebieste; Jan 20, '16, 10:10 PM.

                          Comment

                          • windebieste
                            Museum Patron
                            • Dec 31, 2015
                            • 115

                            #14
                            Just to re-assure you with the validity of my claims that this technique works effectively and rewardingly, each and every one of the figures appearing in the image below has been repaired using this method.

                            They all stand straight and can hold a pose with ease and despite the use of facsimile parts (mostly carapaces and some dorsal crests) they each look spectacular and worthy of display. Some of these figures were in severely degraded states similar to the candidate I am currently working on and documenting; including severed arm anchors and loose arms that had no hope of holding such poses without some much needed attention:


                            9 figures with repaired arms, all sharing exactly the same pose should I want them to do so.

                            Anyway... next I will tackle the legs. They have a few issues, too so it will be fun to address those. I'll post as soon as I can. Maybe today... maybe tomorrow.

                            Thank you for reading.

                            -Windebieste.

                            Comment

                            • Mikey
                              Verbose Member
                              • Aug 9, 2001
                              • 47242

                              #15
                              I'm really enjoying this thread !!!

                              Comment

                              Working...
                              😀
                              🥰
                              🤢
                              😎
                              😡
                              👍
                              👎